You shouldn’t drool over nutella recipes on pinterest when you’re on a diet.
You shouldn’t make eye contact with strangers on elevators.
You shouldn’t buy underwear at a thrift store.
And you definitely shouldn’t build your built-in bookcases before you decide whether you want to wire them for lighting. Oops. (Fortunately I can still say I’ve never made the underwear-in-a-thrift-store faux-pas.)
Here’s the last shot I showed you of our office built-in wall in progress:
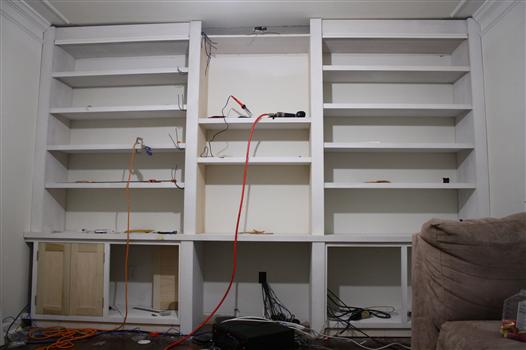 It looks a little crazy and a LOT “under construction,” but everything was coming along smoothly. The only problem was that we reached this point BEFORE Andy and I had the following conversation one very late night:
Andy:
We forgot to talk about whether we should put lighting in the bookshelves.
Me:
Um. Oh yeah.
Andy:
I’d have to wire for it. Except that we’ve already closed everything in. I’d have to run wires through the ceiling, down through the columns into each bookshelf.
Me:
Sounds GREAT! Let’s do it.
So we started researching our options for under-cabinet lighting, keeping in mind that we’re a TINY budget.
I’d found this photo of a lit bookshelf on pinterest. While I liked the idea of lighting, Andy and I both agreed we wanted to light each shelf, not just the top. I also didn’t love the puck-light look. We used these puck lights for our under-cabinet lighting in the kitchen, and instead of creating an even glow, they produce little hot spots on certain parts of the counter. Not ideal.

We also considered LED strip lights and rope lights. Everything was either way more than we wanted to spend – a couple hundred dollars at LEAST to light every shelf individually – or just ugly (fluorescent lights, I’m looking at you).
Until we stumbled upon the COOLEST, BEST undercabinet light option EVER. Seriously.
Andy started digging and came across these lights on Amazon*. They’re called LED reels, and they come on a 16-foot strip that you apply like tape. Each tiny light is about 2 inches apart, and each reel is only $12!
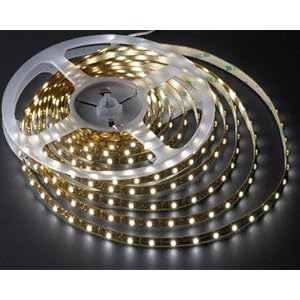 If you can solder wire, you can even install part of the strip, cut it, and use the rest of the strip somewhere else.
The way you do this is by using magic and wizardry, as far as I know. Fortunately Andy is fluent.
We bought two strips plus a transformer (which you need, according to the Electronics Wizard). Total cost: around 30 bucks. (The price of the transformer has gone up a couple bucks since we bought it.)
Andy spent SEVERAL evenings wiring each shelf. (Yes, this would’ve gone MUCH faster if we’d done this before building the shelves.) But guess what? It was SO WORTH it. Look how amazing it looks all lit up!
At night:
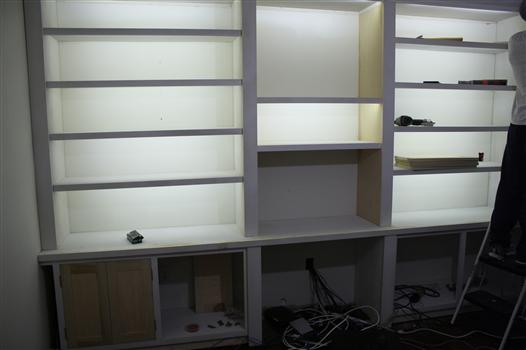
In daylight: (We left the bottom center shelf unlit because that’s where the computer monitor will go, and lights there would interfere with our ability to see the screen.)
Deluxe, right?
It casts a smooth, even natural light on each shelf (similar in color to an incandescent bulb) and I think it’ll look pretty stunning once I paint the back wall and add books, art and useless-but-pretty tchotchkes. Did I mention it only cost $30?! AAAAAND, the LED lights use virtually NO electricity. Something like 3 watts. THREE WATTS. You’re welcome, Earth. And monthly power bill.
Update: We posted a tutorial for installing these lights, if you’re interested! Check it out here.
Up next we’ll finish trimming it out, then caulk, paint and other fun finishing jobs (like STYLING! Yay!). Was your weekend as productive as ours? Did you get any little projects accomplished or spend the weekend doing normal-people things like having fun and relaxing? Or did you hit the thrift stores for some new skivvies?
UPDATE: See how we used these LED lights to make a lamp run on batteries. Cordless lamps are where it’s AT.
*Amazon links take you to my affiliate shop.
 Hi, I'm Kelly. Glad you're here! This little blog is where I chronicle our efforts to fix up our beaten-down home on a tiny budget. We're not there yet, but here's a peek at the view along the way...








WOW. That looks great!!! So, maybe I’m dumb or maybe I missed it in the post – where exactly did you put the lights? Along the middle of the shelves (on the underside)? That is looking fantastic! Can’t wait to see it all “done up.”
Um well I did find an extraordinarily flattering pair of floral bloomers at Goodwill over the weekend….am I going to get a disease or something if I wear them? 😛
What a cool solution to your problem! I love how they make each shelf glow. Can’t wait to see your styling…I agree, that’s the most fun part! 🙂
ps-I don’t actually buy and wear used panties. Ew.
OK seriously… you may have just saved us a lot of work. We want under the cabinet lighting in our kitchen, but we dont have an overhang on the bottom so that they aren’t visible, but it looks like this would work without having to add it! So excited! This looks amazing!!! Definitely worth the extra $30.
WOW!!!!! so so awesome!!!! love it! and i will have my honey-do list ready for your husband when he is all done over there. 😉
It looks beautiful! Fabulous solution. I’d love to see how he did it…I can’t get my head around what to do at the end of each shelf. Does the strip have to be cut, or do you keep it as one long strip that snakes through each shelf? Yes, I’m clueless.
Kelly, you and Andy are superstars! For real! You guys have done an amazing job – I just about fell over when I saw how effectively they light up each shelf! I was expecting the cold, stark light that seems to be inherent with LED lights but you are right, it looks so similar to incandescents! I’m with Carrie, can you talk us through how you thread/cut the strips? Your blog is becoming my DIY bible!
No. Way. That looks completely amazing! I’m going to go ahead and third the requests for a “how to”. This is awesome!
Wow! That looks terrific. I’ve been wanting to put some undercabinet lighting in our kitchen so I’ll be looking into this stuff for certain. Still can’t believe y’all (Andy) built that. Impressive.
And I’ll make it a fourth request – would love to know where you fitted them to get such a great even light over the whole shelf.
Amazing, just what I want in the alcoves next to my fireplace (although no backing as I want the wallpaper to show through). Thanks for sharing.
I love the lighting! We may need to look up that lighting for when we replace our kitchen cabinets this year. It looks amazing!
I’m going with the masses. How-to post this business. Jump on it. Because I want to jump on under cabinet lighting on my very own but I want to steal all of your magic secrets first.
Another vote, or desperate plea, for a how-to. This looks amazing!
I’m with them. Give us the secret recipe so we can light up our lives as well. Stunning!!!!
You guys are amazing! I haven’t heard of LED reels before, thanks for sharing. The shelves look great, you guys did a wonderful job. And that beautiful lighting is the cherry on the top!
I can’t wait to see it styled!
Jessie
http://www.mixandchic.com
Oh My! I love this!
Kelly,
You are a genius! I love this look! We have built-ins very similar to yours (that my husband built, too) in the family room. I have always wanted lighting. Can you e-mail me your source where you bought them?
PS Have you heard anything about the contest?
karianne
I am completely and utterly in LOVE with you now! There are thousands of us who have this same dilemma and you guys totally solved it for us! OMG thank youuuuu for sharing this awesome find! I pinned this for the universe to see 🙂
WOWZERS! Love your built in, so pretty! That lighting is amazing! High fives to you, I can see that you are going to have a fabulous space when it’s all said and done!
xoxo!
Jen
Oh my gosh, best idea ever! I’ve seen these at Home Depot, but they were expensive! I will be ordering through Amazon for sure. And $30 total? That’s how much I spent on those 3 CRAPPY lights that I returned. I can definitely swing $30
Those look great and I love how you found a solution that worked for you!
If you’re interested, we’re hosting our first ever link up party. Please stop by and link up! http://www.waywardgirlscrafts.com/2012/01/wayward-weekend-week-1.html
Brilliant! Great Post .. Would Love for you to come share on my new Link party http://www.getouttamyheadplease.com/2012/01/show-it-off-link-party-8.html
Omg! You did a fantastic job! You are so talented!!! This is a great post! I’m having a linky party as well, and would love for you to join it! Here is the link http://www.thesouthernproductqueen.com/one-stop-s… Thanks for sharing!
I am planning to put lights under and above my kitchen cabinets. These lights will be perfect! Also checked out the tutorial. I think I can do this all by myself! Thanks for posting. (I am “pinning”!)
Seriously.. I think I love you.. You have just changed my life!!! I have been looking for this solution for a long long time…
can anyone direct me to the tutorial on led strip light installation?
It’s right here:
http://viewalongway.wpengine.com/2012/01/how-to-install-inexpensive-energy-efficient-under-cabinet-lighting/