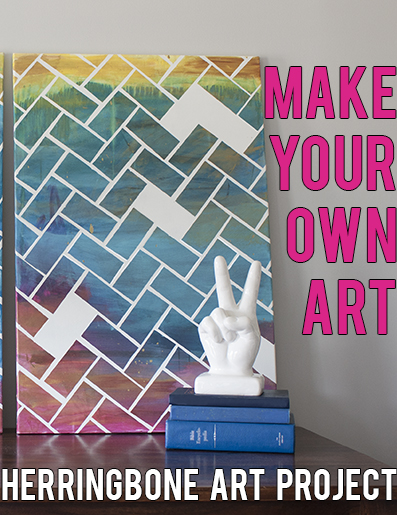
Long have I admired this art piece I found on pinterest. Long have I wanted it in my home. But small is my budget, and large is the size of the canvas I would want.
So, of course, I just had to make it my own little self.

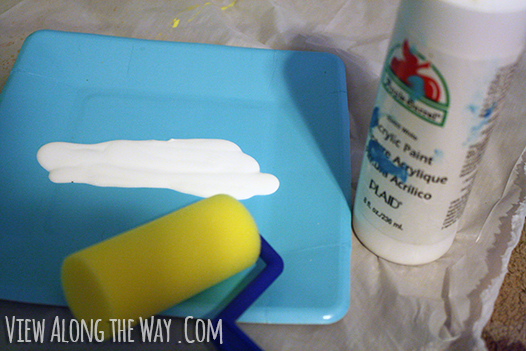
Here’s what you’d need to make your own:
- Canvas in whatever size you like. Mine are ginormous.
- Lots of acrylic paint in colors of your choice, and brushes. I mainly used foam brushes like these.
- Foam roller
- White acrylic paint
- FrogTape
- Excited preschooler who can’t stand to watch without “helping.”
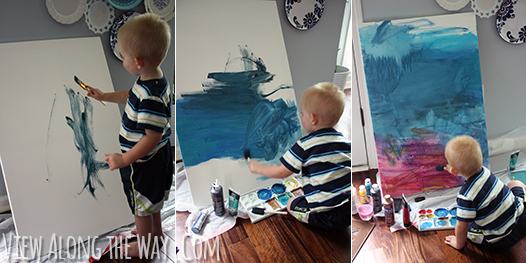
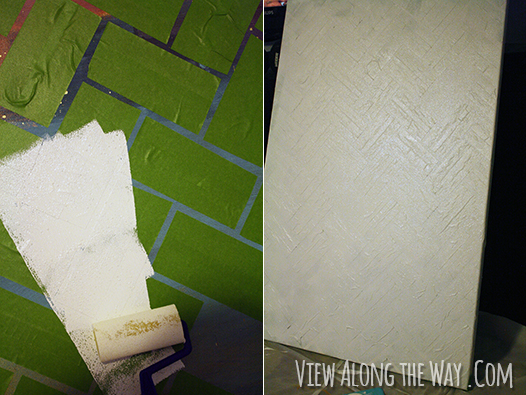
It was a fun project, and I had lots of help from an eager pair of hands. I poured little blobs of various colored paints – mostly shades of gold, raspberry and navy – in a tray, and Weston and I just smeared it all over the canvas with foam brushes. It’s hard to mess this step up!
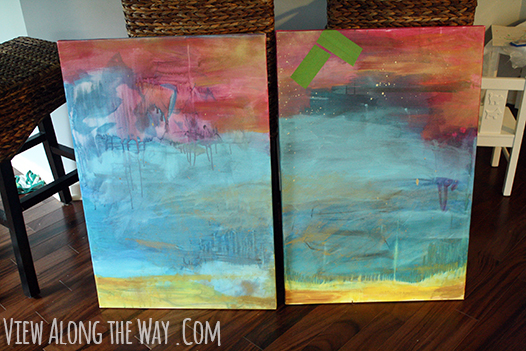
I played around with adding more water to the paint too, which is how I ended up with that drippy spot in the top left corner above. It’s no big deal: acrylics are very forgiving, and if you don’t love a certain spot it’s easy to change it. Plus, it’ll mostly be covered with white later anyway. No need to panic.
After both canvases were painted, I grabbed a can of gold metallic spray paint and added some shiny speckled parts. It’s hard to tell in the pics, but they’re there. (In retrospect, I wish I’d made it blingier.) Here’s how the canvases looked at that point. (You can see that I’d started adding the green Frog Tape squares before I realized I’d forgotten to take a picture.)
Next, I cut pieces of FrogTape into rectangles. I wanted the rectangles to be a little wider than the FrogTape that I had on hand – and wider than the rectangles in the inspiration art – so I put two pieces of tape side by side to make the rectangles almost double width. Then, I planted my sweet little bum right in front of the television and immersed myself in some brain-melting entertainment while I covered the canvas in those rectangular tape pieces in a herringbone pattern. Make sure the edges of the tape are sealed well! I ran a fingernail over the edges to make sure they were stuck tight.
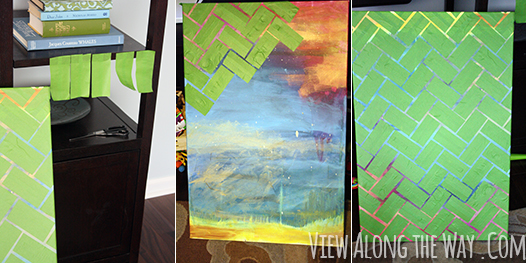
(I didn’t do any measuring, just a lot of eye-balling, because I like it imperfect I have no patience for petty “measurements” and “numbers.”)
Once it was all taped off, I removed a couple of the squares so the canvas would have some white spots, like the original. Then I regretted removing them. Then I decided it would be better without them. Then I waffled back and forth a bunch and just decided to go forth and paint.

Using a foam roller, or whatever, cover the entire piece in white paint. NOW you can freak out.
Now slooooowly, carefully, peel off the FrogTape. I did this while the paint was still pretty wet, hence the white fingers.
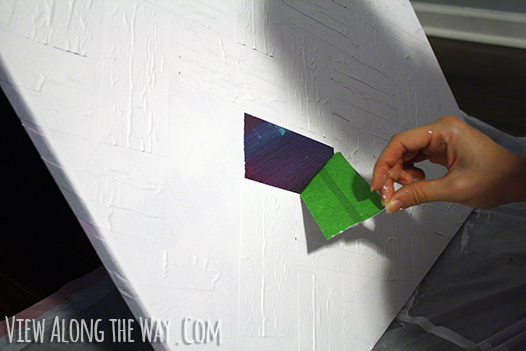
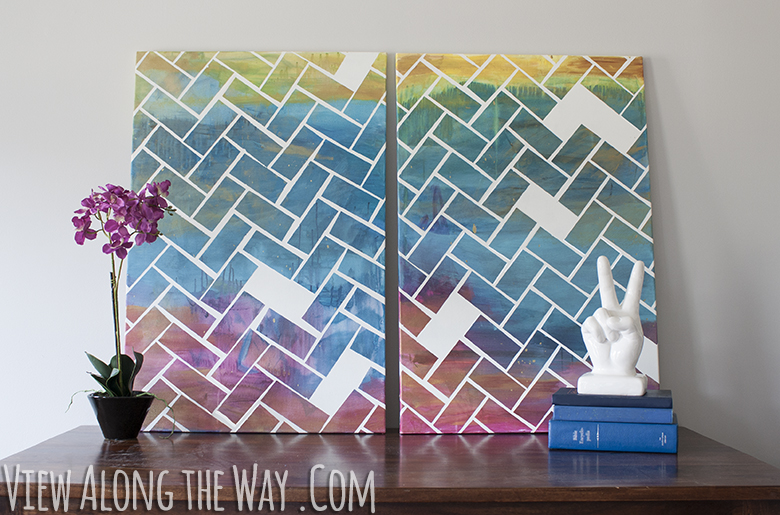
Oh man are those crisp lines beautiful or what?!
Once you’ve pulled off all the little tape squares, pat yourself on the back: you are a real arTISTE! Bonafide. You are Van Gogh. (Or maybe that’s just your two-year-old.)
(I made this art to hang in the office, but I’m not quite sure if it’ll live there yet… more to come!)
What I love about this project is that you can customize it for your space. Use colors that will work in your room; make it as crazy or as calm as you’d like. Let your little imagination run wild with the acrylics before you add on the tape. Let your two-year-old play with acrylics!
(P.S.: Letting Weston play with acrylics was an awesome idea, until he accidentally set his entire hand in a gob of paint, then wiped it off on his shirt. Still.)
It’s a great, inexpensive way to make your own large-scale art, and bonus: it’s totally fun, promise. Especially if you shun measurements.
Have you played with paints recently? Ever been crazy enough to give a preschooler free reign with acrylics?
P.S.: Here’s another tutorial for simple, fun word art!
This post is sponsored by FrogTape and contains affiliate links.
 Hi, I'm Kelly. Glad you're here! This little blog is where I chronicle our efforts to fix up our beaten-down home on a tiny budget. We're not there yet, but here's a peek at the view along the way...


that is way too cool!!!! LOVE it and love that the kids were involved!
What an AWESOME Project!! I love that its so kiddo friendly, and it looks great!! -Also where did you get that peace sign paper weight thingy?? 😀
Thanks! I got it from TJ Maxx or Marshalls, can’t remember which. Clearance for $9! 🙂
Very nice! I’m digging that peace sign finger thing.
Kelly, you are a woman of many talents! The picture is really great and the potential for so many color palettes is inspiring.
I love the end result of this piece and the best part is that you did it with Weston. How cool is that? I love the pop and variations of color. Too cool! Thanks for sharing…I think I need to do this with my kiddos soon!
Oh wow Kelly, that turned out beautiful!
Love this Kelly! Thanks for the inspiration. I may have to try this!
That DOES look fun–and it turned out great!
That’s pretty darn cute. Don’t you dare try to cut off that boys ear.
Bliss
This is a wonderful project. It turned out absolutely awesome. My mind is running away with me as to how you can do different things with the background. I’m thinking of painting free form (imperfect) flowers all over it. before putting the tape down. And, how cool it would be to use different shaped tape pieces. Oh this is a must try! Thanks for the inspiration.
I love me some Frog Tape:) That’s a great project Kelly although looks like a ton of work. Definitely amazing results though.
Very cool, Kelly! It turned out great! xo Kristin
I love how this turned out!! The colors you used are great too. Going on Pinterest as my next possible project. Thanks for sharing!
How cool!! What a great idea! You’ve got my brain-wheels churning! 🙂
I did this…only the opposite. I painted canvas white, put on skinny tape to make pattern, then painted the color. Turned out the same as yours. I didn’t think of your way…..LOL.
I love the peace sign hand!!
You are a creative genius! Pinning!
🙂 Linda
I really like this one.. I might let Ariana do this. I think your helper is the cutest little boy I know!! Love you all.
What a great idea! I love that his little hands were all over it. Priceless. 🙂
This is seriously so cute! I love it! Definitely going to have to try this!
What a COOL project, Kelly! Yes, I turn my preschoolers loose with acrylic paints periodically — closely supervised of course. 🙂 L.O.V.E. this one.
xo Heidi
I really love this! I thought you had painted paper and then cut it out and glued it down or something. I’m not sure which way would be easier… haha. It looks great!
I have seen people do it that way, but for some reason it seemed much harder? Maybe I’m wrong? 🙂
Oooh I was thinking of throwing some paint on canvas this weekend! What a fab project, got my gears going now you inspiring woman you 😉 xxx
Loved this!! Pinned :o)
So fun that Weston got to help! I hope his clothing is herringbone now, too? Because that would be totally hip. 😉 Love the colors you chose!
I MUST DO THIS! It’s gorgeous…and I love the “imperfect” pattern…sometimes perfection is boring. 🙂
Thanks! That’s what I tell myself when I really, really don’t want to measure. 🙂
Beautiful Kelly!! I LOVE the colors you chose!! Great lil helper ya had there too! 😉
I’m also a no measure, no math, no level kinda girl lol
Nancy
This is GREAT! I love the creativity! Say it over at TT&J link party- super happy I stopped over here!
-Jen
I love this! Love that your son helped paint it too:) I was just thinking about doing a herringbone lamp[shade and you have may have pushed me over the fence with this cute piece!
If you get a chance this weekend, I would LOVE for you to link up at Get Schooled Saturday at Too Much Time On My Hands
xxx
Kim
http://too-much-time.com/2013/01/get-schooled-saturday-56.html
Oh wow! This is SO fun! I’m always looking for fun art projects I can do with my son that actually look awesome when they’re finished. Pinning for sure! I’d be thrilled if you’d share it here at my party:
http://www.oneartsymama.com/2013/01/shine-on-fridays-62.html
Absolutely LOVE it Kelly! Fantastic! Pinning and Stumbling-I need to try this!
Super cool. Pinning. Love it.
I had pinned something similar with hopes of trying this over a year ago! Now I can just pin yours and pretend that I did that with my preschooler:)
Jessica
I super love this. I love it so much that I’m already coping you…in a mod podge scrapbook paper on a filing cabinet sorta way 🙂
I love the joint effort! Turned out great!
Wow, it’s so pretty! I love that your little guy helped too 🙂
Makes it super special that way 🙂
I love, love, LOVE this! I’ve always thought that inspiration piece was cool too, but I sort of overlooked it because I wasn’t a huge fan of the colors…but seeing your piece with the perfectly imperfect herringbone pattern and pretty color scheme I’m finding myself itching to make one of these myself! Thanks so much for sharing!
I was trying to think of something to use my last canvas I got for Christmas for – this was perfect! Super easy, and looks great!
Kelly, those are flippin’ amazing! I love them! Love that you eyeballed it too. I can’t stand the pesky numbers either – makes my head spin… Great job!
PS – love the new look!
This rocks, Kelly! So pretty, and simple to create. Thanks for the inspiration.
This is a really cool idea. I love unique cheap art. Great Job! I am hosting a new link party and would it if you would link up. http://www.ifitsnotbaroquedesignblog.blogspot.com/2013/01/tuesday-link-party-2.html
I LOVE this idea, especially since my little guy could totally help me create it! I see this as an awesome activity to do in the Spring outside, once it’s warm :o) Pinning!!
WOW, I am obsessed with this! It seriously looks amazing. I’ve been wanting to try my hand at painting a large piece and this just pushed me to finally do it!! I feel so inspired 🙂 And I love that you let your son play with the paints too! 😉 xx Melissa
You need to start saving for your kiddos future art school education – love it!!! Turned out gorgeous Kelly!!
LOVEEEEE THIS! Totally going to do this in my own home with my own little two-year-old!
Great work! And where did you get the adorable hand holding up the peace sign? I need that.
I love this! I did a similar project with cut up pictures and it hangs in my dining room–I didn’t think to use paint. It looks amazing.