![]()
Welcome to the June {ditto} DIY challenge!
Once a month ten very different bloggers are hosting this challenge to recreate in our own homes – and yours! – a project or design element inspired by a haute couture design. The idea is to inspire everyone to incorporate fine design elements into your own home in a way that fits your style. (For more details on what {ditto}DIY is all about, check out this post.)

The ten hosting bloggers include:
Darlene @ Fieldstone Hill Design
Ruth @ Living Well Spending Less
Cindy @ Skip to My Lou
Jen @ Balancing Beauty & Bedlam
Edie @ Life in Grace
Rachel @ Surviving the Stores
Karin @ Trophy Mom Diaries
Lauren @ I am THAT Lady
Kelly @ View Along The Way
Melissa @ The Inspired Room
This month’s theme is Go for the GOLD, and this was our inspiration photograph:
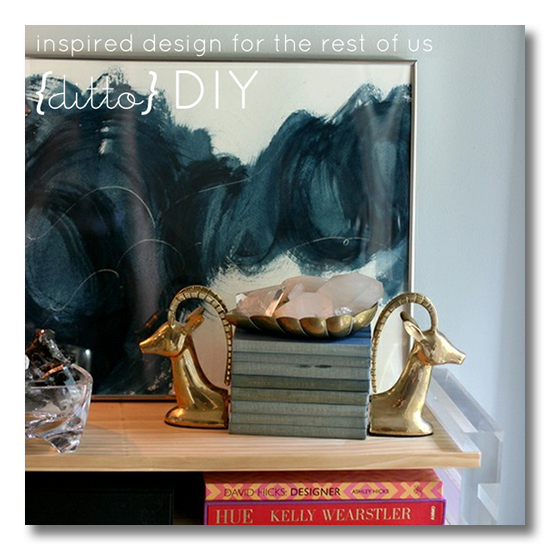
{Art and design by Samantha Reitmayer Sano of Style/Swoon.}
The {ditto} DIY Challenge:
Gild something, or paint it gold! Then use it in a lovely display.
This is where I’m supposed to tell you about how I did on my Ditto DIY project.
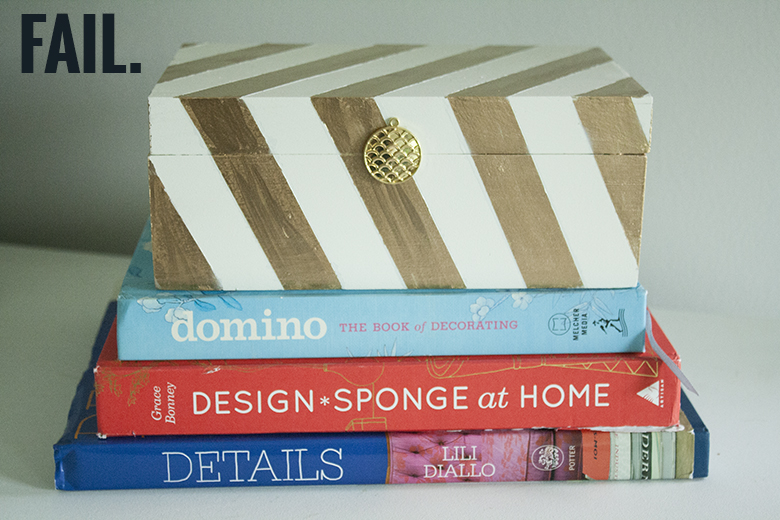
WELL. File this project under: “Just wasn’t meant to be.” I had big, golden plans to make this amazing striped box, with diagonal stripes! It was going to be awesome! You were going to love it! We were going to high five each other and celebrate! I had it allllll planned out.
But NOPE: I created a giant gilded box of failure.
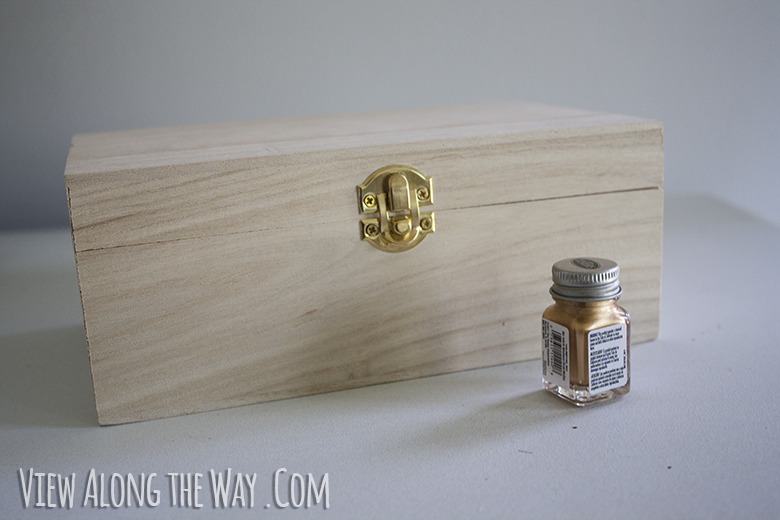
I know you’re dying to know how to make your own failure box, aren’t you? It’s easy! Also, frustrating! I went to the craft store and got this unfinished wood box (about $5) and this Testor’s model enamel paint (I think it was $2?).
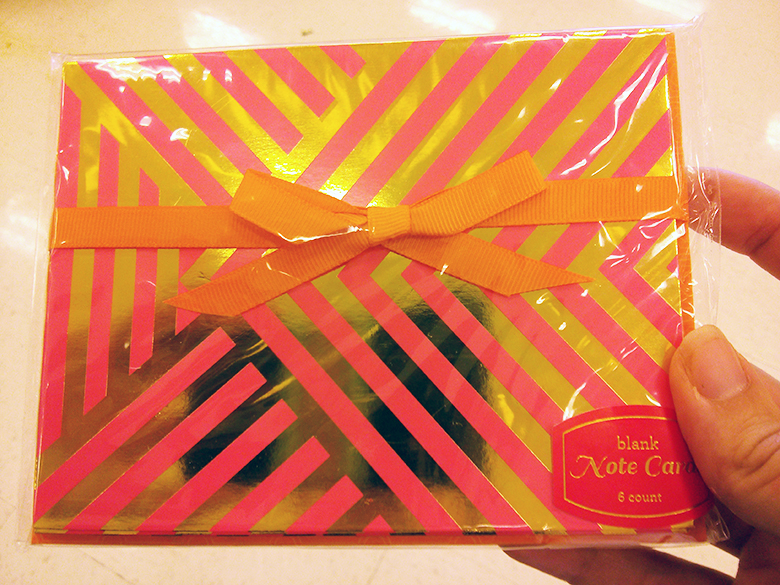
I’d planned to paint diagonal gold stripes inspired by these fab little cards I’d seen at the Target dollar spot:
So I disassembled the box so I could spray paint the whole shebang with a high-gloss white spray paint. Just used a teensy little screwdriver to take off the hinges and the little closure thingy, which I’d be replacing. (If you need any guidance on screwdrivers, make sure you check out Weston’s screwdriver tutorial, which is the cutest, least-helpful video tutorial ever.)
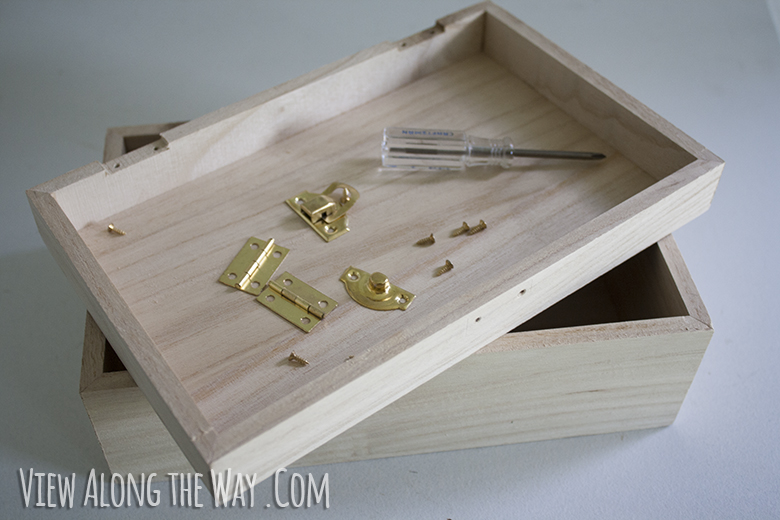
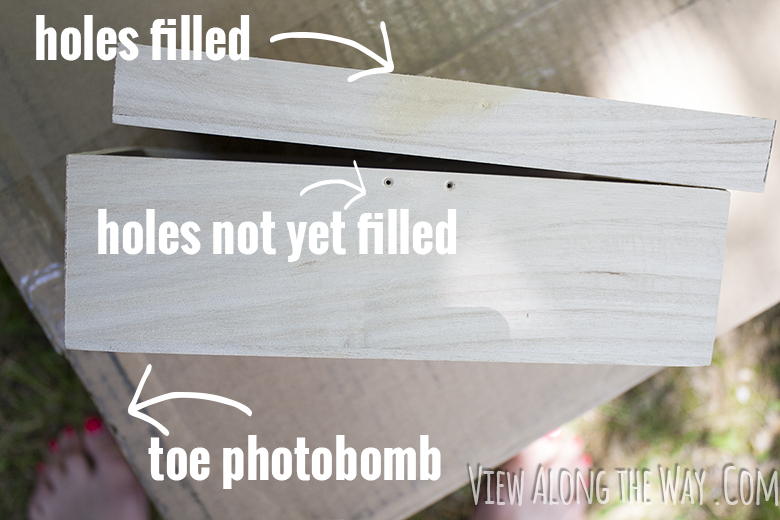
Then I used a little wood putty to fill the holes where the little hardware had been screwed in on the front, since I knew I’d be replacing it.
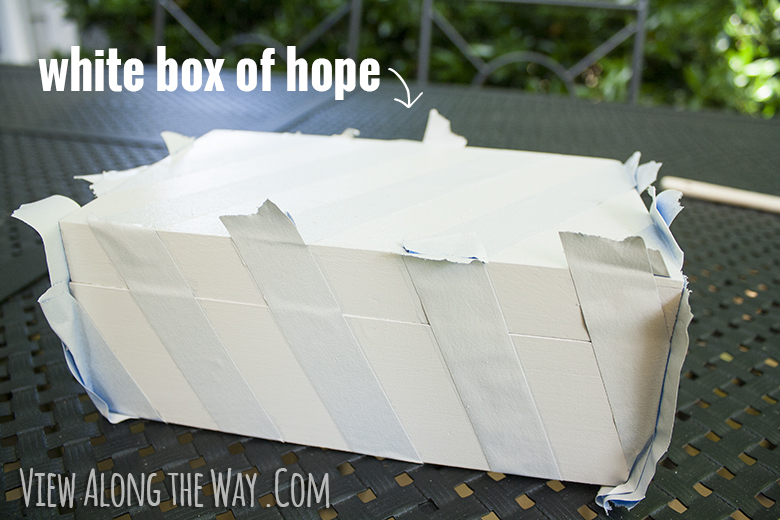
At this point, things were moving along nicely, and I had successfully not ruined anything. I had a blank canvas of a simple white box just ready to be decked out. But this is where things started to go wrong. This happened while I left the box outside for the spray paint to dry.
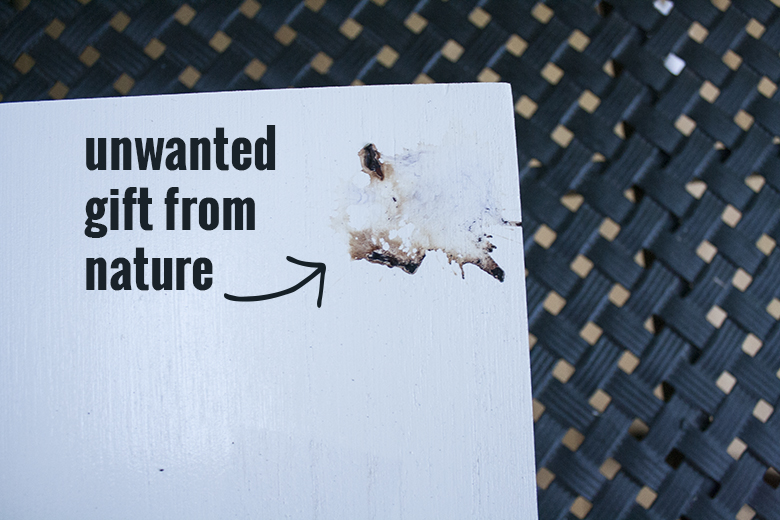
Turned out this would be very symbolic of the direction this entire project was headed.
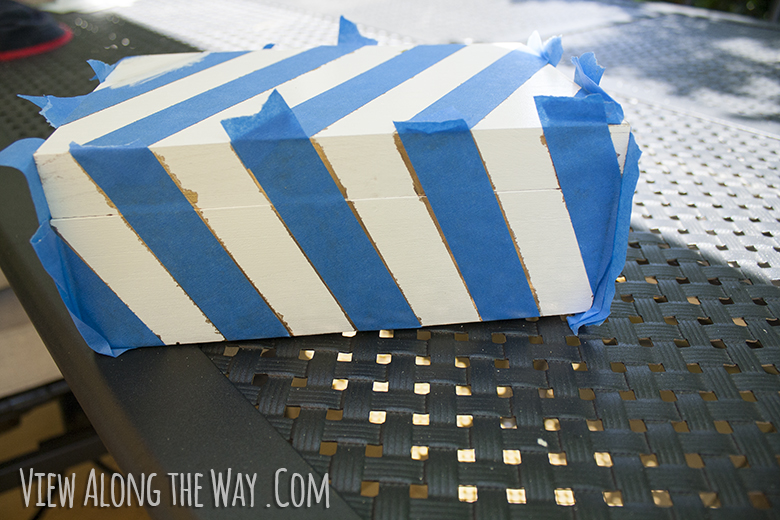
With my little bird-poo pile cleaned off and the box re-sprayed, I took the box inside to tape off the stripes. Since I’d removed the hinges already, I taped the box closed and started taping off diagonal stripes on the lid. I taped the entire lid, then removed every other piece of tape so that my stripes were even. I did this on the sides too, but not the back, because what am I? Some kind of overachiever?
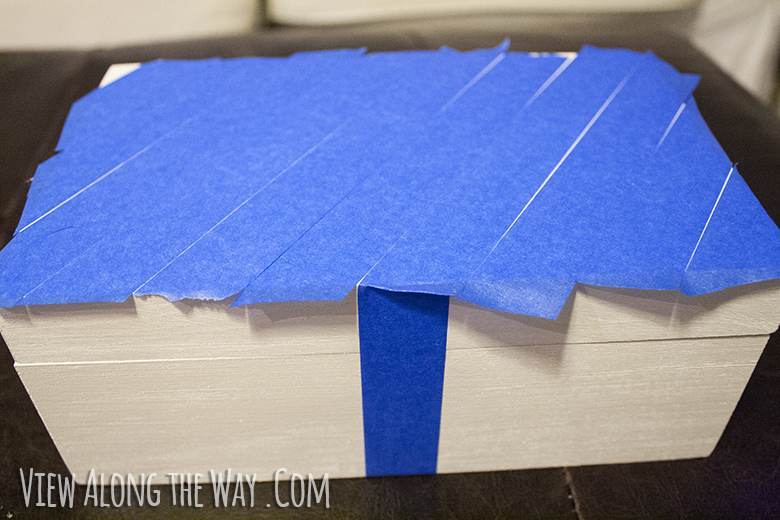
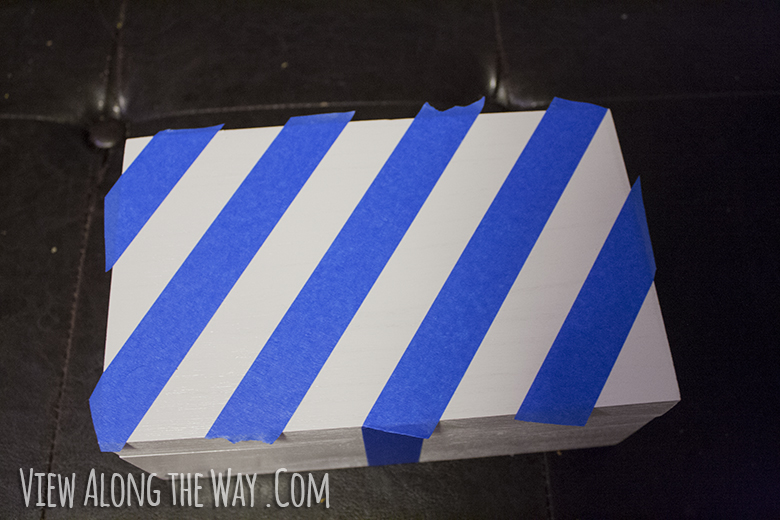
I poured a little Testor’s enamel paint on paper plate and used a tiny foam brush to start filling in the gold stripes. The first coat was very thin, but after the second and third coats, I started to fall in love with the mirrored metallic finish. SO FAB.

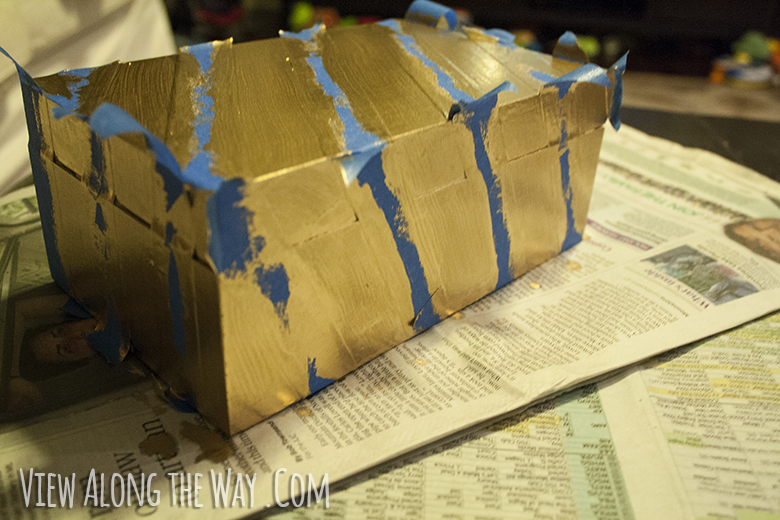
Isn’t that looking promising? Like you could just pull the painter’s tape right off and it will be amaaaazing?!
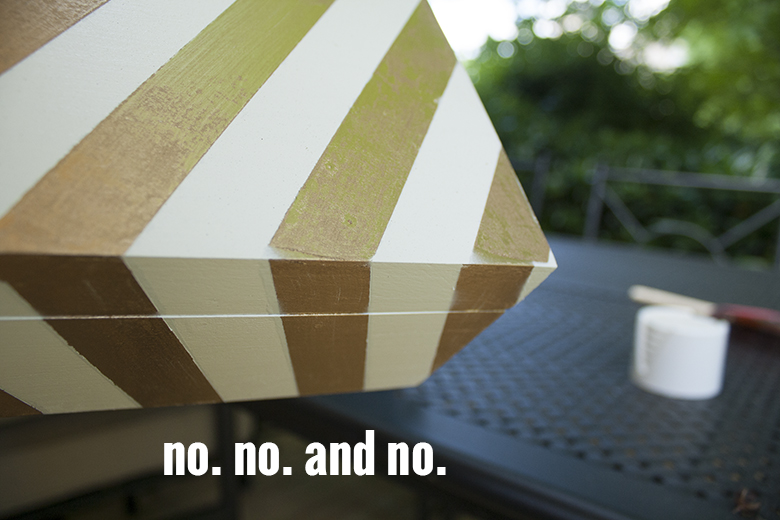
I removed the painter’s tape, and it was PERFECT!
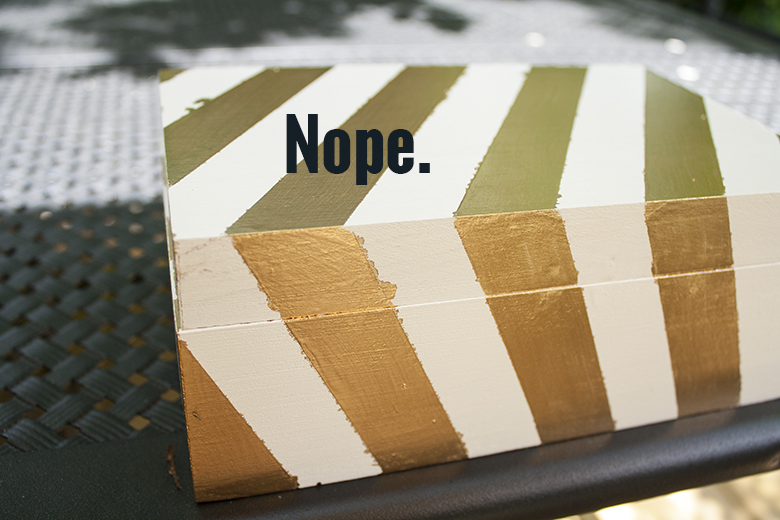
Perfectly… bad. Andy and I stared at it a while in silence, while in my mind I willed it to be better than it was. It’s okay, I’ll just fix it, I thought. I was so young and naive then.
After the gold paint dried, I taped off the gold, sprayed some white paint into a cup, and brushed it over the stray gold parts.
But the spray paint smeared the gold, even though the gold had dried overnight. Some kind of chemical reaction of doom, I think. Ever the optimist, I decided this could still be salvaged. I’d just tape off ALL the gold, and spray paint the white again. Easy peasy, right?
This is starting to sound incredibly ridiculous. I give you that. But at the time, I thought just a smidge of perseverance would be the key.
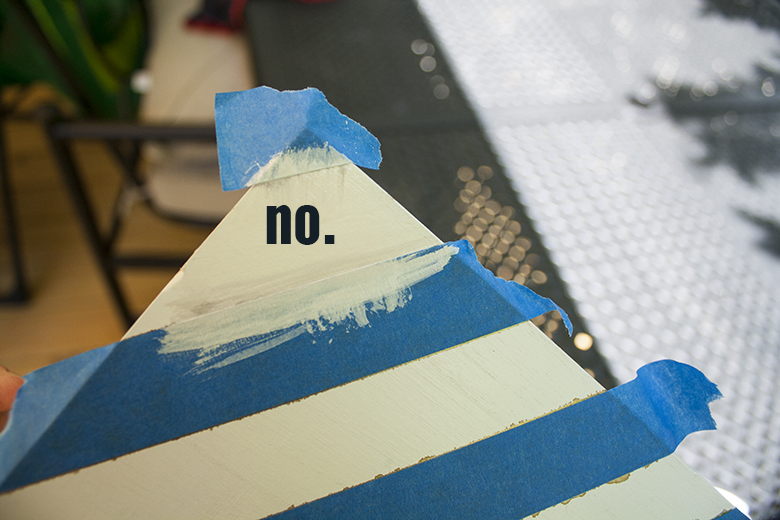
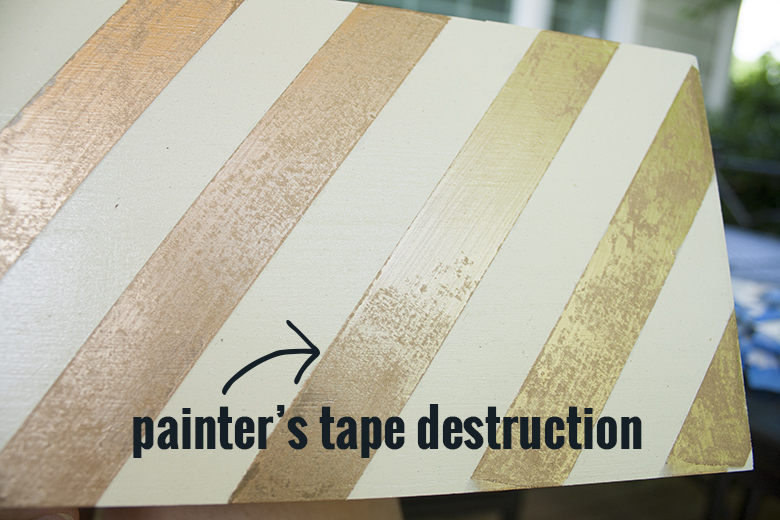
Look at this! Just look! All my hopes and dreams were just waiting beneath the painter’s tape, ready to be revealed! All I had to do was carefully peel off the tape! Hope soared big and full in my heart!
Not ONLY did I now have white paint on the gold stripes, but the painter’s tape had ruined that liquid gold shiny finish I was digging.
At this point, we should all be able to agree that I should probably just give up on this project. I’d given it a good go, but any reasonable human can see when it’s time to cut your losses and move on to better things.
Right?
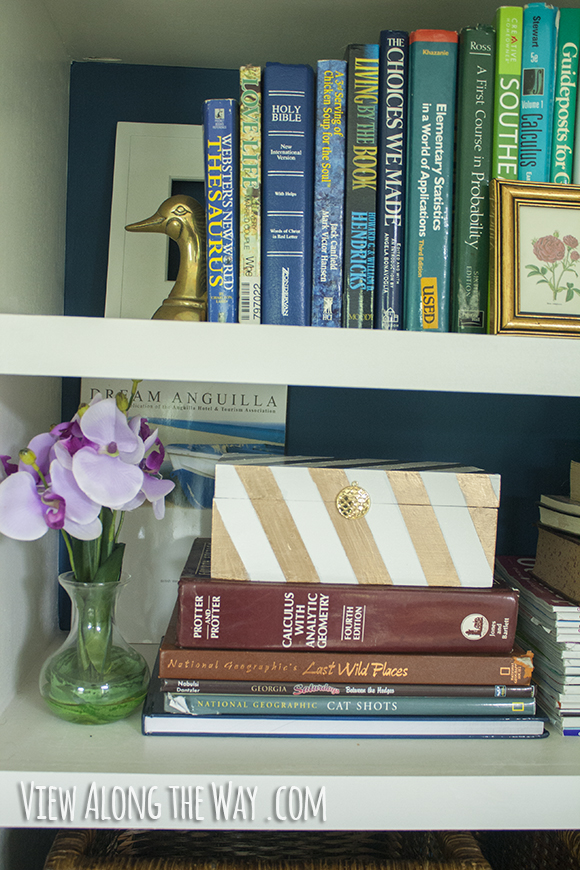
I am not a reasonable person. I pulled out the gold paint A-GAIN. And I tried to touch up the finish. A-GAIN. And I added a little charm to the front with hot glue, in hopes that it might distract the eye from the terror of the rest of the box.
It didn’t work.
I’d planned to use this box in our living room as a snazzy little place to hold our remotes, but ain’t no way I’m puttin’ that junk where it can be examined. Right now it’s hiding on our office bookshelf wall, trying to blend in with its surroundings.
Fortunately this only cost me $7 and a billion hours. *SIGHHHHH.* Ya win some, ya lose some. Happens to the best of us.* If it wasn’t for this Ditto DIY challenge, I would have hidden this box away and never let it be seen by a living soul. But I owed you a gold project for Ditto DIY, and I finished this last night, soooo… Procrastination strikes again. At least there’s always next month’s Ditto DIY challenge!
*It probably doesn’t happen to the best of us.
BUT GOOD NEWS! It’s time to link up your own fabulous Go for the GOLD projects and join the {ditto} DIY party! It wouldn’t be much of a party if you didn’t stick around, so be sure to check out all the other much-more-fabulous, much-less-failurey gold projects!
Then, it’s time to get ready for next month’s challenge, which we’ll all link up right here on July 1. Be sure to visit Darlene’s site for a peek at next month’s challenge along with some expert design tips on incorporating gold accents into your home. (HINT: This design challenge could very well use something that is just sitting in your closet, and turn it into gorgeous art work for your walls!)
I can’t wait to see how you killed it this month! Let’s see your projects!
 Hi, I'm Kelly. Glad you're here! This little blog is where I chronicle our efforts to fix up our beaten-down home on a tiny budget. We're not there yet, but here's a peek at the view along the way...


i find sometimes with stripes, if you distress a little, they blend and you don’t notice the mishaps…. that might help with this piece- seriously! it’s adorable and i think that could help!
Oh, project fails. I have certainly had my share of those! I love how you used it on your bookshelf though–it looks beautiful there, and the marks are totally inconspicuous. Thanks so much for hosting this awesome challenge/link-up! I really had fun coming up with my project. Have a wonderful week, Kelly!
~Abby =)
#8, DIY Gold Cake Stand Organizer
It looks good from a distance. That’s all that really matters in blogland, right? 😉
I’m with Michelle, it looks good from a distance. Don’t they say that about Mona Lisa? Or something. A for effort though! I blame the painters tape– definitely not user error.
I’m with Cassie on this one. Distressing helps a little! I love gold and white stripes though and from far I would have never noticed.
oh YAY for laughter…seriously. I well know the frustration of a project gone wrong though!! I agree with everyone else…distress!! Might relieve some of your distress! 😉
This was so much fun! I can’t wait to try another! 🙂 I love the idea of your box! I also love how honest you were about the process! Made me laugh because most of my projects behind the scenes go like that! 🙂 Especially the toe-bomb photo, ha!
Oh Kelly, you make me laugh. Darn painter’s tape gets me every time. Frog tape…you have to splurge and go with frog tape. Just sand it all down a bit and then gild the whole box 🙂
I think it is adorable too!! Hmm…. maybe the computer screen makes it look better…. like the skinny mirror.
painter’s tape: I curse thee.
Kelly – you are amazing! I was laughing at this post – but I also can totally relate. I am pretty much a design fail about 70% of the time, the best part is that I learn from my mistakes…well sometimes. I do think it looks good from far away 🙂
Oh my gosh, Kelly, this post made me laugh so hard. However, I have to say that I think it is pretty darn cute too! My theory is when in doubt, add Mod Podge. 🙂 You could also embrace the imperfections, add some faux weathering with sandpaper, and call it a day!
The unwanted gift of nature actually made me snort! That is something that has totally happened to me.
You cannot win them all. But since your projects nearly always turn out gorgeous, I think we can say you can win most of them? 😉
I’m dying over the bird poop! You should’ve left it alone. That bird was just trying to add his “artistic contribution” to the project. It was an abstract masterpiece. Or something… LOL!!
Anyway, I love the idea of the stripes. I know it’s so frustrating when things don’t go the way you plan. But it looks awesome from afar! 😉 It’s still cute.
If we don’t laugh about things, we’d be crying, right? This post makes me like you even more because I so relate to those fails, especially when you try to fix them and it just becomes a comedy of errors. I think it looks just fine in the pictures and I love the idea of it, it looks great on the shelf with your other old items. Maybe give the whole thing a sanding and call it “distressed”. On second thought, maybe not. 🙂 xoxo
Oh by the way, I so needed to see Weston’s screwdriver tutorial. Now I know what to do. That was awesome. Safety first! 🙂
I think we can all relate to this – the fails make the wins that much sweeter don’t they?! Thanks for the party – love me some gold!
Oh Kelly – best post in our Ditto Diy series. We must meet. We’d be fast, fast friends. I read about your inner red neck. Yep, me too. 🙂
Kelly, I can relate to your experience! I’ve had many of failures too that I haven’t posted about it! 😉 but it looks great from a distance and good on your bookshelves too! 🙂 Thank you for hosting this fun party and for having me! 🙂
I posted my fail too hahahaha. Love it. I love the bias of your stripes though. The design rocks!
Thanks for hosting!
Kelly, I SWEAR to you, I did this exact same thing with a small red laquered box I found while thrifting. I sprayed it high gloss white and then tried to put two big stripes on it and it was a disaster. It even got pooped on outside. I cannot stop laughing right now because I completely realize how that sounds, but I SWEAR. Even the poo. Even the poo. I’m so glad you shared your gilded fail. Although for what it’s worth….it actually IS cute once it’s on the shelf. 🙂
I say it’s perfectly imperfect. I have a beautiful gold desk that’s been begging to get on my blog, but I told her she hasn’t waited quite long enough. I’m not done procrastinating and she’ll have to just chill… 🙂
Aww…it’s not so bad! Though, I’ve had a couple of similar experiences recently when things didn’t quite pan out how they were supposed to! haha.
Thanks for hosting the Ditto DIY party! So much fun… 🙂
Oh Kelly – I think yours is my favorite! The overwhelming majority of my DIY attempts are complete fails… as in there’s no way that I could still display it on a bookshelf. Your “fail” still looks great on that bookshelf to me. 🙂
I giggled all the way through your post….and maybe cried a little because I so identify. Kudos for your perseverance and your ability to laugh in the face of adversity (and bird poop and cantankerous paint)! Well done!
Oh no, Kelly! Say it ain’t soooo!
You know what you should use this box for? Tiny broken things that were special, but are no more. I have one that includes the most perfect set of (glass) costers that stuck to the bottom of a glass, decended and shattered. I kept the biggest pieces and threw in some left over candle wax from a discontinued Yankee so it smells like warm, sweet memories every time I open it to add another broken thing. Perhaps! In my house we have a saying whenever something doesn’t work right, “they can’t all be gold.” How fitting! Next months fabic ikat looks awesome, though!
Why do birds feel the need to poop on the exact square inch of earth that is clearly NOT meant to be pooped on? Like they couldn’t pick a different square inch of earth? I think they do it on purpose then laugh evilly as they fly away.
Painters tape is definitely not as good as frog tape. I learned that the hard way. I wonder if some gold spray paint might work, too!
I loved this post so much. Haha. The box definitely still looks okay from a distance and you have such a way with words. You are ALWAYS entertaining. Better luck with the next one?
Oh gosh, how I feel for you! But you had me laughing with the ‘toe photo bomb’! I just love you “keeping it real”!~~Angela
The bird poop omen–that’s the best! I think you should try ONE MORE TIME with a gold sharpie paint pen, just because I love sharpie paint pens. You have a lot of books about math 🙂
Lol. I know how this goes! I have worked on many a crappy project. 😉 It’s still cute though!!
I bought something to paint gold, and I never painted it! Looks like I have 5 days to link up, so hopefully I’ll be back!
Ugh, so it goes sometimes, right?! Makes for a good story, though 🙂
Hilarious. Such a buzz kill when this perfect idea you have in your head flops… “metallic” spray paint has been the culprit for many a DIY downer in my house. Visions of shiny pretty mirror-like finishes are dashed. Go eat some ice cream and forget about it. 🙂
Well, maybe it wasn’t your most positive DIY experience, but it did make for a very cute, very relatable post. Who hasn’t been there with a project, at least once? 🙂
Ugh, precisely why I usually would rather buy a box I love than to DIY it haha. But had it turned out like you had hoped, it would have been amazing! Really doesn’t look that bad, just probably different than you expected! A for effort! 😉
What a bummer. I despise spending time on a project that turns out to be a fail. We have all been there girl!!
Totally laughed through this whole post because I have had TONS of fails! Love your humor and the idea behind your poor little box 🙂
Um, so you know that your #fail posts make me love you all the more? Not only does it make me and my craft fails feel more normal, but this post was a #win in the “make lauren chuckle” category. Especially the toe photobomb. You sure know how to thoroughly entertain a gal! And I think you’re the bee’s knees.
(And P.S. I’m going to keep hosting Silhouette Giveaways until you win one. And yes, that’s a major hint to stop by the old blog-o in the next few days. Eek!)
Hilarious. I think we can all agree that we are NOT reasonable people when it comes to crafts. It does look good, though, on the shelf. Great design, even if the execution didn’t turn out as planned. I especially like the charm. 🙂
Thanks for the laugh, I have a big fail yellow lampshade story in my DIY past… it’s always good to laugh at our ambitious crafty attempts. Love your sense of humor!
warm regards,
Emily @ Town And Country Shuffle
I don’t know how to tell you this… I feel kind of awkward about it…
I like your fail
AHHHH!
Also please stop making me laugh, I’m gonna wake up the baby. Thanks.
Oh, so sad! Here is the best Best BEST thing for doing stripes, or chevron, or harlequin patterns with masking tape.
1. Base coat.
2. Plan, measure, whatever, then tape. Wait till your base coat is really, really, really dry.
3. With a light coat of the base color, brush gently over the edges of the tape. So, if anything bleeds under, it will match the base coat.
4. Let that dry!
5. Now do your pretty alternate color.
6. Wait for it to dry.
7. Peel your tape. Do an inconspicuous area first. If it looks like the tape is peeling up your 2nd color coat, use an exacto blade to slice along the edge of the painters tape so it comes off cleanly.
This *should* work better for you. If your base coat has shine (semi-gloss or gloss) you can go over the edges of the blue tape with a clear sealer of matching sheen, and that will also save you bleed under woes.
This sounds like something that would happen to me. I always try to take the easy way on projects but that always ends up creating more work for me than if I had just done it right to begin with. Also I finally saw your feature in Better Homes and Gardens and you looked so pretty!
I love your project fail! It has such character. I sympathize with you about the bird poop. They always seem to know just where to do it (it’s a sixth sense) LOL
#58 Gold Toolbox
Thanks so much for hosting! I love the gold trend going on now and I also feel for those too cute cards from Target!!
Erica @ Craftivity Designs
The box doesn’t actually look that bad. (Must be your mad photo skills!) I’ve had plenty of projects that just didn’t seem to meet the spectacular vision I had in my mind. And I had to laugh when I saw the picture of “nature’s gift.” That happened to a project of mine that I had worked really hard on. (Bummer at the time, but funny now in retrospect.)
Oh my gosh, this is just awesome Kelly. Like, “Yay Kelly for showing us that things don’t always go as planned!” Actually, I think it’s pretty funny that I just pushed “Publish” for my latest post, and then I was like, “Hmmm….I’ll go check in on my buddies. Let’s see what Kelly’s been up to………..ohhhhhhh………….a linky party with gold???” Man, I thought I was so cool. Haha! Btw…I’d love to have you! Love ya lady!
Love the blog, and I appreciate all your work to bring it to us. I would like to sincerely thank you for sharing a fail! Most of the bloggers that I follow would NEVER show a fail! I love that you are confident enough to share! Not many would be, although I’m sure PLENTY of us have failed (miserably) at something. I do a lot of crafts, sewing and home décor/reno projects and have some that turn out magazine worthy and some that are hiding in nooks and crannies….. but they are all mine. Not all pretty, but the result of blood, sweat and tears; sometimes literally!!! Thanks again and keep up the strong work!
easy fix it!!! get a ruler… and a sharpie… they sell gold now, but i think a black or bright pop would look cool… and make straight lines on the edges that the gold meets the white…
cleans it all up and takes a second…
#WINNING
I love that you shared your box anyway. From a distance it really doesn’t look bad. I just had something similar happen with the back of some bookshelves I was trying to cover. It seemed easy enough and I had high hopes, but the project didn’t work out. The burlap I used was falling off the next day. I think the most frustrating thing was the amount of time I had invested in it to not to work out. I have another use for the burlap though and it will make a great story for my blog.
Aww…poor dear. At least you kept your sense of humor about it. I had my own gold fail recently, but I only just found your blog so didn’t know about the Ditto DIY challenge so I haven’t written it up yet. It involved spray paint. I fixed it, but the first try wasn’t pretty.
I love your valiant effort and persistence! I really do need to get in on this ditto thingy …. maybe for July. I need to see what challenge you’ve set forth first …
🙂 Linda
oh my gosh kelly, this is so darn funny!!! even though you were probably so frustrated!!
also, I’m pretty sure I would have given up a whole lot sooner than you did. props for your get ‘er done attitude!
I just linked over from the garland light, so I’m late to the game on this one, but I have to tell you that I laughed so hard while I was reading it. Hey, there ain’t no shame in perseverance…it’s a character quality admired by many….just not admired by gold enamel paint unfortunately.
hello, Not sure if this has been said but if you paint the whole box one colour and than put your tape on for your strips paint over the tape with your base paint once that is dry paint in between the tape for your gold lines. the base paint seals the tape and your gold leaving paint will not seep/bleed through.