Before I get started, a couple quick notes. A few of you asked for a how-to on our bookshelf lights – you got it, hopefully Friday. You guys know I can’t say no to your squishy little faces.
Also, THANK YOU for your support last week on the Top DIY Projects of 2011 contest! We didn’t win, but I’m gonna go all cheeseball for a sec and tell you I feel like we did, because it was crazy awesome just to be in the company of those other incredible projects, and I was *BLOWN AWAY* by YOU for your support, facebook notes, tweets, blog posts (Michelle, Katie and Jen, thank you!), smoke signals and telegrams in efforts to round up votes. You all rock, officially. *MUAH.* (And huge congratulations to BJ on winning! Andy and I both thought her playhouse was VERY deserving.)
* * *
When I first told you about our plan for the office bookshelf wall -(are you SO SICK of hearing about this already? Sorry!)- I mentioned that I had a HUGE crush on these bookshelves with their fancy molding at the top and bottom:

A closer look:
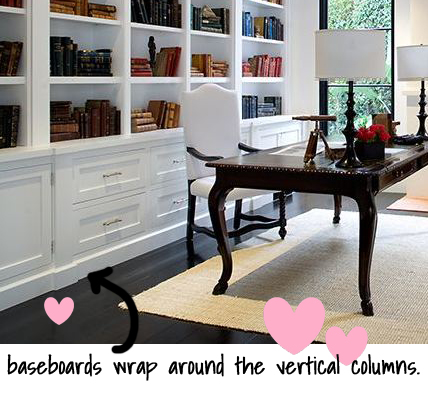 Seriously, I want to peel off those baseboards, pinch their cheeks and cuddle the ever-loving life out of them. It’s not even appropriate.
Here again is that shot of the bookshelves I showed you earlier in the week:
")
You can see in that picture where we’d removed the crown molding along the back wall to install the shelves, and just made it dead-end into the shelves.
")
That room actually has three pieces of crown, just like our dining room. You can kind of see the three pieces in this photo of our dining room here. You can also see how we installed the clover mold at an angle in the corners:
")
So we had to remove the angled clover mold, crown AND basecap, then reinstall them once we’d built and installed the shelving unit. Look, new crown molding and basecap!! (Thanks to Andy and my dad, who we sometimes trick into doing these projects with us, since he used to be a professional trim installer and I am a very persistent beggar.)
")
Still needed to add in the clover mold at the top:
")
And add the baseboard around the bottom:
")
Welcome, new clover mold!
")
OOOOH. AHHHH.
")
And now with baseboards for your viewing pleasure (around the bottom):
")
There are lots of visible cracks and holes still – just look the other way until we can caulk it, k?
Andy was able to salvage a lot of the trim that was on that wall before we started this project, so cost for this little upgrade was minimal. It still needs all that caulk and spackle, plus the rest of the cabinet doors and door hardware – but it’s starting to look much more finished now, don’t you think?
So tell me the truth, am I alone in my healthy affection for deep infatuation with chunky trim? Do you prefer a more streamlined look or is the chunk-o-molding winning you over too?
 Hi, I'm Kelly. Glad you're here! This little blog is where I chronicle our efforts to fix up our beaten-down home on a tiny budget. We're not there yet, but here's a peek at the view along the way...


oooh it looks amazing! i am seeing hearts and stars!!!
Bring it on. The more trim the better. Great job.
ok pretty please come over and do that in my house????
One of my big projects for 2012 is adding bookcases to our living room (after our basement is complete, after we move some furniture around, and so on, and so on…..) LOVE how yours are trimmed out!!
(And your posts are so funny!….”squishy little faces” is how I talk in real life 🙂 )
Hahaha, I’ll send Andy right over. We can have a bookcase-building party! (I wish more of my bloggy friends lived nearby so we could really do things like that!)
Oh – I love, love, love the chunky trim. Wish I could do something similar in our house, but it’s a ranch circa 1960 in Dallas so the ceilings are low, the rooms small and the closets teeny tiny. Too much trim overpowers our spaces. The most I can get away with is simple crown molding in the living room and now expanded entry way and I am slowly upgrading the base molding to 3″ pieces in each room as floors are replaced. Very jealous of an entire wall of shelving, but maybe I can adapt to one small wall in my office. Hmmm . . .
Thanks! Oooh it is tough to do the trim in those sweet little ranches. But I bet even the simple crown made a huge difference. Have you seen Centsational Girl’s “built-in” bookshelves using ikea shelves? That might be a great solution! I would’ve done the same thing if my husband was less handy and/or easily persuaded. 🙂
I love the inspirational pic – like a library feel. Your room built-in makeover looks promising and I am sure will look amazing.
Love the chunky molding!
Your molding is seriously amazing. I’m actually feeling a quite a bit of envy and I’m trying to control it… gorgeous!
That is so gorgeous! I love everything about molding and the detail you uare including is going to make this space incredible! You are so lucky to have such talented people helping you!
LOVE chunky trim, gives it so much more character and depth, really lovely and I am looking through slightly closed eyes so I can’t see any problem with gaps 🙂
Just a small request, is there any chance you can put a pic up of the inside of the shelves to show us how you fitted those wonderful lights – I have found a UK supplier and will be having those in my own home so would really know how you got them to give such an even light (pretty please with moulding on top!)
Can’t wait to see the finished project, it looks amazing already… well done you and Andy.
Someone once said that molding is like jewelry for a house and I agree! That being said…..I really like your jewelry!
blessings,
karianne
Chunky trim is SO much better than wimpy skinny trim! Love that you salvaged the other trim rather than buying new. 🙂
Okay, I cannot believe (wait I can believe it out of you two) how incredible this looks already. One day, when we grow up, I want us to be just like you and Andy 😉
I do have an off topic question about drywall. Maybe you have a good answer. So Bo and dad did not install the drywall perfectly, meaning where two of the walls meet, there is a 1/4″ gap in one of the corners. I don’t know how to finish it, so I can get in there and paint. This only happened in one spot and it was on their first sheet of drywall (my father was fired from measuring after that :), so I cannot be too hard on them. Any recommendations are appreciated!
You are a dang genius!!
Love the trims and mouldings! You both did a great job. Can’t wait to see the finished product.
Have a lovely weekend, Kelly!
Jessie
http://www.mixandchic.com