Let’s just get this out of the way: I don’t know whether to call these “curtains” or “drapes.” Or “drapery panels.” Or “window dressings.” Skivvies for your wall orifices? I also never know whether to say “armoire” or “armuaaaaahh.” Or “vase” or “vahhhze.”
Also unfortunately, my sewing skills are about on-par with my decor-pronunciation (in)abilities. Sorry about that. Hopefully I can still explain this clearly enough for you to go forth and sew your own curtains drapes window pants.
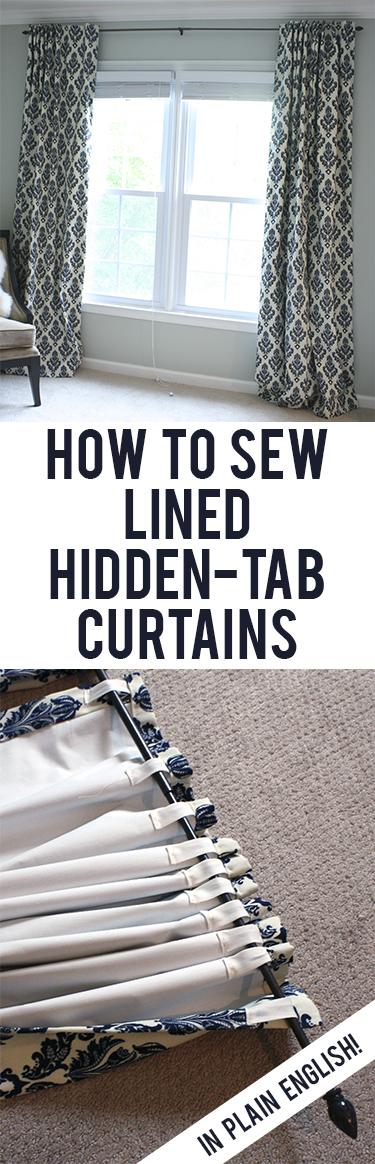

This process is not hard. It’s just long, with lots of steps. Best completed accompanied by wine and a mom who can sew. This is the method I used to make the drapes in my master bedroom…

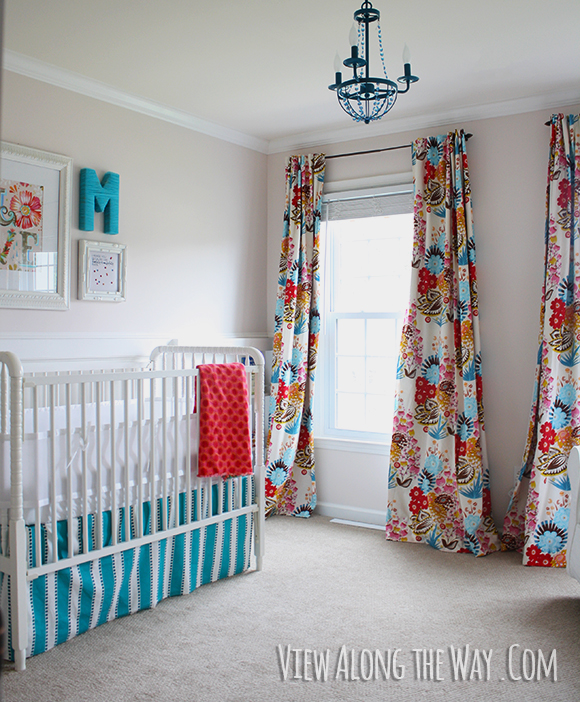
And in the nursery.
I leaned pretty heavily on this great tutorial at Midwest Magnolia, but I improvised my own back-tab system because I love how the back-tabs look hanging up:


So here’s how it all goes down!
Materials Needed:
- Curtain Fabric (I used this in the nursery and “Premier Prints Avery” in the master bedroom.)
- Lining Fabric (I used this brand.)
- Thread (my fabrics are THICK but regular thread seamed to work okay.)
- Bias tape (I think this is the one I used) or ribbon for back tabs
- Patience. A helpful mother or friend recommended.
1. Cut Your Drapery Fabric
Measure the finished length you want your panels to be. TIP: Plan to hang your curtains high and wide!

Add 10 inches your finished panel length: that’s how long you should cut the fabric for each panel. (My finished panels are 96 inches long, so I cut my fabric to 106 inches long.)
2. Cut Your Lining Fabric
It’s all about the lining isn’t it? No flimsy, transparent curtains for us! We’re using blackout lining and sleeping til noon! In an alternate life.
Okay, remember how long you wanted your finished panels to be? Add 2.5 inches to that, and that’s how long you should cut your lining. (My panels are 96 inches long, so I cut my lining 98.5 inches long.)
Now, cut the width of your lining to six inches less than the width of your curtain fabric. (For me, this was 49 inches.)
Here’s a pretty little picture for ya:

3. Hem the Bottom of the Curtain Fabric
Fold your fabric up four inches from the bottom and iron the fold. Then fold it up another four inches, iron it, and pin it in place.

Sew the hem. No fancy stitches here. Just a plain-vanilla straight stitch or whatevs. Make sure you back-stitch at the beginning and end.

(I like to say things like “make sure you back-stitch,” as if that’s something I was totally familiar with before attempting this project.)
4. Hem the Bottom of the Lining Fabric

Fold the bottom of the lining 2 inches up and iron the fold. Fold another 2 inches up, iron the fold and pin it in place. Sew the hem, doing your back-stitch thang.

I’d like to draw your attention to the relatively straight hem you see before you. This was unprecedented for me. Hold your applause, please.
5. Sew the lining to the Curtain Fabric
Lay your curtain fabric on the floor, right side up. Now lay your lining on top of it, right side down. (The right sides are facing each other, because in a minute you’re going to sew the sides together, then turn it inside out like a pillow. It’ll be magical. Hang in there with me.)
Please no one ask my mom how many times I accidentally didn’t lay the right sides together and had to go back and redo this step. I was embarrassed for myself.
The bottom of the lining should be 1.5 inches from the bottom of the curtain fabric, and one of the sides should be lined up. Like this:

Now, pin down the side where the two fabrics are lined up.

And sew that side together. Straight stitch. Nothing crazy. You should probably backstitch here too, but what do I know?
Now that one side of the lining is sewn to one side of the fabric, lay them back on the floor again, and line up the other side. Because your fabric is wider than the lining, it’ll be bunched up and kind of awkward. Just do the best you can to make the second side lined up, then pin it in place.


Now sew that side too.
NOW. Stand up and pat yourself on the back! (Necessary step.) Because here is fun part #1: Turn the panels inside out, and you (almost) have a lined panel! All you have to do is finish the top and bottom! LOOK AT YOU GO!
6. Straighten out the sides and iron
Lay your curtains on the floor, lining side up. Now, kind of maneuver the curtains until you have equal curtain fabric on each side of the lining.

Iron the side edges so it stays in place. Extra credit if you starch it.
7. Finish the bottom
Right now, the bottom corners of your panels look like this:

Fold the corners of the curtain fabric in so it looks like this:

Now, “just” blind-stitch the corners in place. I say “just” because I still don’t really know what that means. Basically, you’re hand-sewing the corner in place. The truth is, you can really skip this step if you want. If you don’t do it, the curtain police will not even know about it. If you do it, it will look something like this:

Tres professional, no?
8. Make Your Back Tabs
Warning: I completely made up this entire process. Maybe there is a “right” way to do this? I’m not sure. But this way will get you there.
For the tabs on my master bedroom curtains, I used bias tape:

First, decide how many tabs you want per panel. I have ten on each of mine. If your panels are less than 55 inches wide, you’ll probably want fewer tabs. My nursery curtains are 44 inches wide and I have 9 back tabs on each of those. I think about five inches between each tab turns out pretty well.
Cut your tabs about 2.5 inches long.

Because I was using bias tape, I hemmed the top and bottom of each tab to reinforce them, since they will be holding the weight of the curtains.

After I went through that INCREDIBLY TEDIOUS process with the master bedroom curtains, I changed things around when I sewed the nursery curtains, and I just used satin ribbon like this:

I cut a bunch of 2.5-inch long tabs out of the ribbon and I didn’t even hem the edges because the ribbon seemed sturdy enough.

(The tabs are not as crooked as they look in this picture, pinky promise.) So far the ribbon is holding well enough for me. I won’t tell if you won’t.
Now that you have a nice pile of back tabs ready, it’s time to pin them to your curtains.
9. Prepare the Top
Fold the top edge down 1 inch and iron the fold. Fold it down 1 inch again and iron it. Don’t sew it yet though, you overachiever. Just hang on one second.

Now place your back tabs evenly spaced along the back of the panel, tucking them about 1/2 inch underneath the folded top edge you just made.

You definitely need a tab at each end of the panel. Then evenly space the rest in between. Pin them in place. Make sure you’ve tucked about 1/2 inch of each tab underneath the edge of the curtain fabric.


Now just sew along that fold. You’ll be simultaneously sewing the top edge down AND sewing the tops of the tabs in place.

Once you’ve sewn one straight stitch along the top of the curtains, go back and sew the bottom of each tab in place. I sewed over the bottom, backstitched, sewed over it again, backstitched, a bunch of times to make sure the tabs were on there really good.


AND YOU’RE FINISHED!
Hang those “curtain drapery panel window clothes” high and wide, then sleep til noon. You (and your mom) deserve it.
Don’t forget to pin this so you have the info when ya need it!
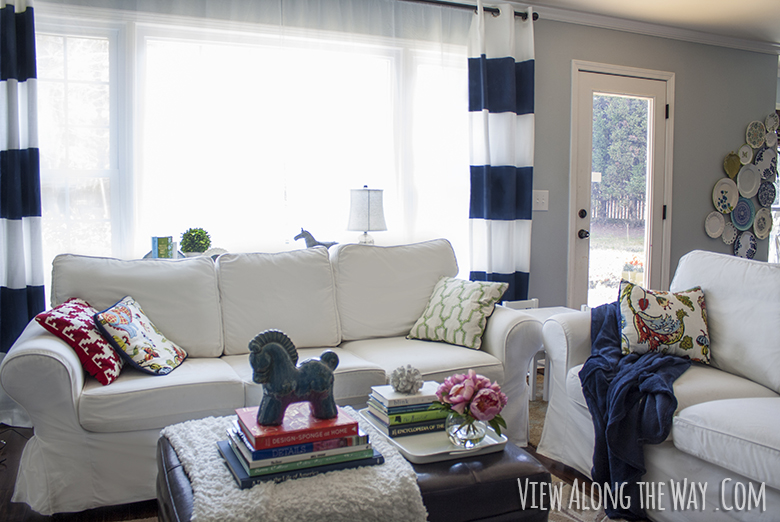
P.S.: Looking for other easy DIY curtain options? Check out my no-sew DIY striped curtains:
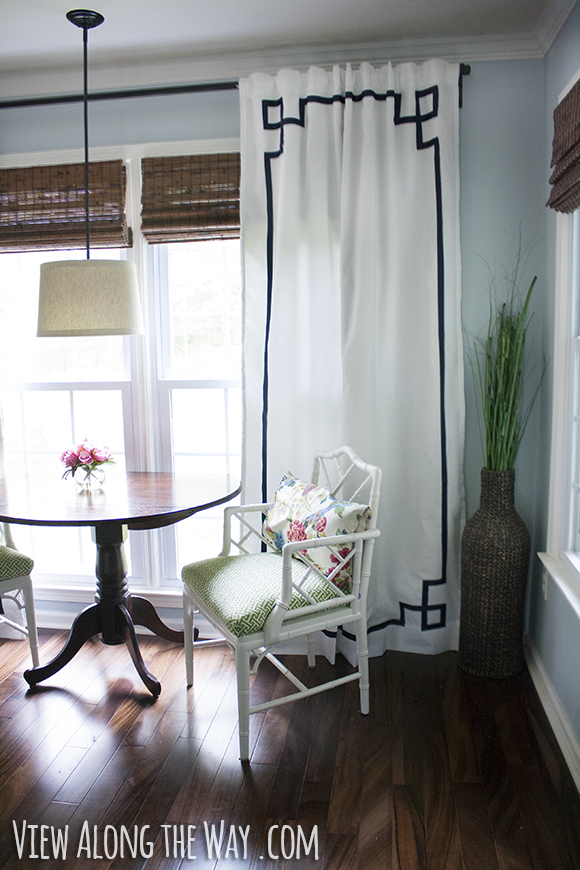
And my no-sew Greek key curtains (low-budget, high-impact!)
Here are some other great tutorials to check out too!

This post contains affiliate links.
 Hi, I'm Kelly. Glad you're here! This little blog is where I chronicle our efforts to fix up our beaten-down home on a tiny budget. We're not there yet, but here's a peek at the view along the way...


When I first looked at the tabs on your curtains, I thought it was going to be one of those tutorials that I nod my head at but secretly know that I would never be able to accomplish it but this not only looks super professional, you made it look easy peasy! I’m particularly excited about this because I can never find curtains in a fabric I love, also, I think curtains are really expensive – can I ask you more or less how much this project cost?
Thanks Meghan! 🙂 Oops! I meant to post the cost info. So it definitely depends on how expensive your curtain fabric is. I bought on sale with a coupon, so mine was $6.50/yard. I think the lining on sale with coupon was something like $5? The thread and tabs were negligible, maybe $2 each? I think it ended up costing me something like $30 per panel, which is not cheap if you’re looking at simple curtain panels, but it’s a great price for wide-width black-out lined panels. You could bring the cost down by not using black-out lining, or by using cheaper fabric.
I think you did one of THE best tutorials i have ever seen!!!!!! Can’t believe you are a beginner. the back tab curtains are on my to-do list. Thank you.
I agree with Debra- good tutorial
Agreed! This is AWESOME! Thanks to you I actually did it, I can’t believe it! The ironing almost killed me. Thanks for the easy to understand, step by (slow and steady) step approach.
I completely agree that you are very good at tutorials and your sense of humor helps me to go for it and not be intimidated. Thank you so much.
When you sew the tabs on how do you keep the stitching from showing at the bottom on the on front side of curtain.
I understand the top part since you have to see the top hem down but not the bottom
I too have the same concern about how to keep the stitches from the tabs to show on the front of the finished work!
Hello, As there been an answer for Pam and Roxana’s questions. This is the firsr thing I questionned when I read this tutorial?
It technically does show, but only if you look up SUPER DUPER CLOSE and know what you’re looking for. I think it looks pretty much invisible in real life though.
Hi Kelly, I was wondering the same thing…but, if you think about it, the tab part will be the folded part that fold back toward the window and the part without the tab will be folded forward and what actually shows most of the time…You will be able to see it if you look for it, but matching treads will help that to be obscure.
Maybe because my wife is the one that spots these things but i was blissfully unaware at the differences in your Don’t and Do diagram. i was looking at it for a good 5minutes thinking i cant spot the difference 🙂
Hahaha. This might be my favorite comment ever. 🙂 Now I want to go test my husband and see if he is also curtain-blind.
Hey, you did it! I would recommend that the bottom hem on the face fabric (not the lining fabric) be blind stitched, especially on a solid, but you did good! Congrats!
Oh, and it’s draperies if you want to be fancy. A drape is a verb.
Ellen
Thanks! I’m going to update it to say that blindstitching is a good idea on the face fabric. (Face fabric: wish I’d known that term while writing this!) BTW, so good to hear from you! I was thinking of you while I was sewing these!
I’m glad you said lining fabric. I would have had no clue what face fabric was because I, too, am a novice sewer. :o)
Agree – use terms novices understand. The professional terms would have us completely lost. I am halfway through the draperies and so far so good. Excellent tutorial.
man that is a lot of work, but they do look awesome!
I am exhausted, and I didn’t even make them. They came out great, I’m totally pinning.
Can’t wait to see you next week!!
Wow. This is a great tutorial, but I am sad to say I will never, ever use it. 😉 (and I saw that first image on hyphen interiors –
Thanks! Just emailed Kristy and got the original source! 🙂
I’m tired just reading that, but WOW was it worth it! They look great!
Whaaatttt?! First of all, you made those?! You are SO talented. Second you made me feel like I might be able to make these! How in the world did you do that?! Oh my goodness these look AMAZING….!!!!! You are making me want to sew my own curtains…. but I seriously have about 16 windows that need treatments… that could either end up great or end up really really bad! 🙂 Totally pinning!
Jaime
Thank you SO much! Trust me, if *I* can do it, YOU can do it. I’m ridiculously unskilled at this stuff! 🙂
I love your finished product. Don’t you just love curtains, drapes, panels, window pants, etc.? I think they just make a room. You did a wonderful job for a novice. I am working on Grommet curtain panels for the first time. I am definitely going to use your excellent tutorial for the back tab drapes in the future. Love how you mitered the corners. Keep on creating.
Jacquie
ARE YOU KIDDING?? THIS ROCKS, KELLY! Even this no-sew girl is now thinking I could do this. And to get that look, I’d be willing to try. Kudos!! Sharing!! Pinning!! Shouting from the roof-tops!!
xo heidi
Rocking IT! Lady
You make it look so easy! I’ll have to pin this to refer back to! Great job. Thanks for sharing.
I SO can’t sew, but I love your entertaining tutorial! Maybe your mom can come over and I can “help” her to sew some curtains for my room:)
Jessica
stayathomeista.com
girl. this is an AMAZING project!! I love it. IT is so polished. Bookmarking. Sharing with clients. Pinning.
Of course for me, the title could have just been: “Tutorial: How to Sew”
How much will you charge me????
Oh, and you had me at, “Skivvies for your wall orifices”
Wowza … I know what you mean about writing a tutorial. Painful, right? It might take a few weeks for me to write my painted chest tutorial … I’m freaked just thinking of it!
But I love your tutorial. I love the professional lining. I’m going to follow your tutorial when I make draperies for my very own master …
… or are they window pants …
🙂
Linda
Fabulous, fabulous, fabulous!!!
this is quite the impressive tutorial! As a diy’er i know how much of a pain writing these things can be! they look fantastic 🙂
Oh my goodness!! My jaw is on the floor!!! These are absolutely gorgeous!! You cracked me up too! I’d love to know your sources for the fabrics- both are lovely! Do you have a nursery tour on here somewhere? I’d love to see an up-close of the one wall. Great job!
Thanks SO much! The master bedroom curtains are Premier Prints Avery in Deep Blue, and the nursery curtains are Anna Maria Horner Summer Totem in Tart.
And here’s my nursery tour: http://viewalongway.wpengine.com/2012/04/the-nursery-reveal/
Love your curtains! They are gorgeous! My husband wont let me hang my curtains at ceiling height, for some reason he absolutely hates the space between the rod and the top of the window.
Your window pants look so good! I am going to do back-tabs next time I sew curtains–I never realized that was what made the difference in the bunch at the top, but obviously it looks a lot better that way…
This is awesome!
That was some tutorial.. You made it super easy for us but it must have been exhausting for you. Nice work and your house looks amazing!
Your awesome Kelly! Thank you for putting together this amazing tutorial : )
The timing on this is perfect! I just bought some too-short curtains for our room, which Junior will now inherit and I reeeeally wanted them to be darkened! Plus, I’ve got to figure out how to sew my own goddanged curtains for our room now. Thanks!!
They also make a tape referred to Serpentine tape that is translucent that is continuous that can be applied to the drape to create same effect. Great job by the way!
This is a marvellous tutorial and I give credit to the one who sewed and the one who took pictures of every single step. Thank you for this, Kelly! Now all I need is a sewing machine 🙂 although I have been tempted to consider sewing by hand!
Wine – check.
Mom in law who can sew – check.
But I’m afraid I’d still be committed to a padded cell if I tried this! I’m not the most patient gal – but your instructions are so fabulous (love the visuals) that even I might be able to accomplish this.
Kelly
You go girl 🙂 This is an amazing tutorial. You need to turn this into an e-book now and earn millions and hire a seamstress to make curtains for the rest of your rooms 🙂
blessings,
karianne
Such a fantastic tutorial. Your drapes are gorgeous!!!! Love your blog.
Wow, Kelly! That’s all I can say – wow. You are awesome and so is your mom. Can’t believe you made all those drapes for 2 rooms – you are impressive, Lady!
Omg, these are awesome. I totally agree with you about the back tabs. They make the drapes hang so much better. Great tutorial, Kelly!
Holy wow, that is a serious tutorial! They turned out amazingly and I love the step by step – that must have taken forever to write, so thank you!
These are so pretty! I love the way they hang. I’m definitely pinning this for the next set of curtains I make!
These look amazing. I am bookmarking this post! I just did my first accomplished sewing project that I posted on my blog for my sons room. I would love for you to swing by and check it out. I am also due to have a little girl in October and will be attempting to use your tutorial to sew the window panels for her room. Thanks for the tips! Hope I don’t screw them up! 🙂
Ok, love this . . .looks reasonably easy. Couple of questions . . .
1. What was/is the diameter of your curtain rod?
2. How far from the edge of the window did you extend your curtains? (How far is the outer edge of the curtains from your window frame?
Thanks!
Hi Madge! It is reasonably easy. 🙂
1. My curtain rods are pretty dinky, maybe 1/2″. I prefer thicker, wider ones but I already had these on hand and new ones weren’t in the budget. If yours are wider, you can just make the tabs longer.
2. I like to go as far out as I can, depending on the length of the rod, but I’d say at least about 4 inches on each side. If your curtains are wide enough and your rod doesn’t sag in the middle, you almost can’t go too wide.
Good luck!
For thicker rods buy PVC pipes at the local home improvement store. They are cheap and easily painted in a color to match or contrast with your curtains. They come in various diameters and are easily cut to length. Check the wood or metal finials and put one in end after painting. Some interesting ones are in the lamp departments. Metal ones are also available in the drapery departments of Bed, Bath and Beyond. Easy to insert the finial into a piece of styrofoam then “whittle” the styrofoam to fit into the PVC pipes. No need to buy the expensive metal rods! There are also brackets available to hold up your new rod. Save money and complete your custom look. Plumbing pipes also work and they are very sturdy with the weight of the drapes.
came across this earlier today – thank you for a great tutorial
@ Kelly: Beautiful job on the curtains! Hope you don’t mind me adding —
@Madge: Plain wooden dowels are also another option for curtain rods. They can come in various diameters, numerous lengths (which can be easily resized for your purpose) and can be finished off any way that you like. i.e: Painted to co-ordinate with a space. That said, regarding the positioning of the rod usually it is about 6″ on each side (total of 12″) beyond the window frame if you wish to block out any amount of light but this distance can vary dependent upon the type of heading being used and/or the fullness of the curtains plus stack-back allowance. (Latter meaning, once the curtains are open they will not be visible from the outside when looking at the window.) -Brenda-
Tips: Places like Home Depot carry the wooden dowels and will even cut them for you. If you wish to add finials (decorative ends) ensure your choice is in scale with the diameter of your rod chosen otherwise they will definitely look homemade. ☺
This is probably the BEST tutorial for sewing curtains I’ve ever come across because you haven’t scared me with lots of terminology and skipped showing me EXACTLY EVERYTHING you did (I totally need that). You have actually given me a little bit of faith that I could actually attempt this project!!
I’m applauding now, standing up and the whole shebang. Fantastic. Totally pinning.
xxx
Can I just give you a hug? I bought some fabric for curtains and have been searching and searching for a good tut. I am so linking the heck out of this when I post my curtains on my blog! Love your window skivvies btw.
I love this tutorial. I’ve not been able to find curtains I liked for our spare room and your tutorial has given me the confidence to make my own – thank you so much!
For a novice your results are quite simply beautiful and professional looking. I love them! Think I will be trying this one. Thanks for sharing.
I am so tired of tabbed curtains, but love the deep folds. I have never ever thought to put the tabs on the inside of the drape.
Your visual on why you should have them wider and longer is pretty convincing. Thank-you for all your work. It has saved me tons of time wondering what to do next.
How did you get your deep folds….how wide did you cut your fabric? Twice the width of the finished product?
My fabric is 55″ wide, and I just left it that wide. The fabric I used for my nursery curtains is 46″ wide, and I also left it that wide. I didn’t cut any of my curtains any more narrow than the fabric. I hope this helps! Good luck!
Ah I just posted a question at the bottom, but my windows are various sizes (small, not large)…for instance, the first window I’m making curtains for is 28 W x 16 L. So, how much do I add to the width of my panels for the hem on each side? And does anyone out there double that for shirring? I think that’s how I purchased my fabric. Thanks for the great tutorial!
I have been working on my curtains for about 8 hours. Just finished sewing up the sides of one panel. I have the other panel ready to sew up tomorrow.
I decided to go with the width of my sun block material. I had to add about 16 inches to the width of the main fabric. My window is 58″ wide and only 33 “long. Each curtain panel, finished is 47″ long (there is a wall heater under it) and 60” wide.
They are looking pretty good. It was hard to get the sun block material square. I used the middle of my folding table and one side as my guide. It is also hard to sew with it on the feeder foot. Ugh! It is best to have the main fabric on the feeder foot….other wise it drags.
So glad to find you. Thanks for all your help!
Thanks for the update! I can’t remember how we had it set up on the feeder foot. It is a LOT of fabric to work with at once, isn’t it? I’d love to hear how they turn out!
Gorgeous! I’m realizing that if I want amazing curtains in the price range, i’ll have to make them. Phew. Where did you get your material?
And how much do you think it cost you per panel (or per two panels)?
Thanks! Hoping to get on it (along with a move and 3 small children).
Thanks so much for this tutorial. I just finished making a pair of these and they came out great. Your instructions were really clear and they made the process very easy.
Came across your tutorial on pinterest a few weeks ago and have been drooling over it daily ever since. Found my fabric online, patiently tracked the shipping every hour or so until it arrived this past Thursday, then finally made my panels today. They came out BEAUTIFUL!!! Even my husband loves them 🙂 thank you so much for posting this awesome step-by-step sprinkled with witty side notes to grab us all. I so appreciate it!
Dear Kelly,
Three months ago I finished all 4 bedroom blackout curtains.
I folded them tight and stored them in a box while preparing the moving to my new house.
Now, that I want to hang them I found them with deep marks due to bending.
I need your advice on how I can remove these deep marks.
Thank you very much
Mary Feldman
Unfortunately I’m not much of a pro when it comes to this stuff. This is my first time sewing curtains like this. I would try a steamer if you have one, but I know I have ironed my curtains (carefully) and it worked well for them. Good luck!
The dryer for a few minutes usually does the trick. It it the blackout fabric keeping the folds.
Hi Kelly
Thanks so much for this tutorial. It is amazing and so helpful. I do have one question. I am doing bathroom curtains for inside the window box in a bathroom that gets killer afternoon sun. Weight is an issue as the round bars for that application are not very strong. So why do I have to ad the extra weight of a hem in the lining fabric? It doesn’t fray at all.
Thanks.
Cheryl
You probably could skip the hem in the lining and shorten the hem in the facing fabric. I’m sure they’d still look great. If you take pictures, I’d love to see!
They make the ceilings look really high. Well done!
Wish I’d had you around when I made my draperies! You did such a great job. Stylish, funny and well-written. One of the best tutorials I’ve ever read.
Loved your tutorial!!
I’ve made lots of drapes and curtains over the years – I’d be the mom in your scenario 🙂 I’ve generally just figured it out as i went along, like you did. I decided to look on-line for some instructions; just so i could look at the pictures and get an idea of how it’s supposed to go. I wouldn’t want to read all the boring details… I have to tell you, i read the whole thing and it was great fun and very clear. I love the comments saying that people who didn’t think they could ever do this are now willing to try! Great Job!
This was so helpful and clear!! I couldn’t find premade curtains that I liked for our nursery, and knew it couldn’t be THAT difficult, but this tutorial made it super simple! Love the step by step photos and hilarious comments! Our nursery curtains turned out so professional looking (and better yet, they were cheap!!). Definitely agree on the high and wide! Thanks so much!!
Thanks for this tutorial! I laughed out loud at your commentary, which I really needed before embarking on my own curtain project.
When sewing the bottom of each back tab… are you going through the lining AND the face fabric? Or just the lining? If it is the former… don’t you see the stitches/backstitches through the front of the face fabric? If it is the latter… how do you sew this AFTER doing the hem along the whole top? I am confused by that part, but I really like the results (bravo!) so I am hoping for some clarification!
Yes you sew through the lining and the face fabric. I was worried about this, but I can’t see the stitching at all once the curtains are hung.
I had that same question, so I’m glad you asked and got an answer. It occurred to me that if you match the bobbin thread as closely as you can to the curtain fabric, it’ll improve the chance of those stitches remaining invisible. I need to try this!
I found this post while researching how to make my own window treatments. I’ve never sewn curtains, and have actually done only a minimal amount of sewing ever! I used your instructions for my master bedroom curtains, and your step-by-step was superb! I completed lined curtains that match the fabric of my bedding beautifully! These would have been very expensive to have done professionally, which is why I decided to try it on my own. My husband loves them as much as I do! Thanks for your very detailed and effective instructions and photos! After the holidays, I am going to do the rest of the house! And BTW, love your blog 🙂
Thanks so much for your wonderful instructions for the lined tabbed drapes. I started at 10 a.m. And was completely thru by 4:30!!! I found two twin comforters on sale for ten bucks each for my guest room. Then needed curtains. Went back and got a matching queen comforter for ten bucks, took the batting out and wha-lah….beautiful looking matching drapes!!! Thank you so much for your time and effort in sharing this great project. You go girl!!!
Wonderful tutorial! Big question for me though is….. how well do they glide compare to the grommet style? I’d love to know, thank you.
I’d say they glide about as smoothly as a pair of grommeted curtains I have, but it depends on how big you make your tabs and how big around your curtain rod is. If you want them to be very loose, make your tabs longer and looser.
Thank you for taking the time to post this great tutorial, Kelly. I will be shopping for material this weekend for drapes for the den. But I had a question along the same lines as this one…
When you open the drapes, do they stay put, or do they want to slide back toward the middle? I don’t mean do they slide all the way back (I know they won’t), but I picture making the tabs large enough for an easy slide, but if the slide is too easy… I hope you know what I’m asking, because I’m struggling with the right words!
The size of the tabs doesn’t seem to influence how much they slide back toward the middle. I think it depends more on how stiff your fabric is. Thinner, “flimsier” fabric bunches up around the window and stays put a little more than stiffer fabric, which “wants” to be spread out more. I hope that makes sense! 🙂
Yes, that makes perfect sense. Thanks again, Kelly!
Your ideas and instructions are great, but even better is your humor. Keep up the good work! I am enjoying reading your blog. Wish computers were around when I was your age (well, they were, but they were named Commodore 64 and Atari. We had Radio Shack TRS 80’s at work. Google it.). Bravo!
Thank you for such detailed instructions. I found this on pintrest and thought it would work perfect for my husband who works 3rd shift. I have one window done and they look wonderful. I used the ribbon tabs and have had no issues. Thank you for posting this.
What a great tutorial! I can’t wait to make a pair of these for our nursery. Can I use a regular cotton fabric or does it need to be home decor or curtain fabric in particular?
I actually just used regular old fabric. Home decor fabric will be wider so it’ll make for wider curtains, but I think the fabric I used in my nursery was only about 40-something inches wide, and it works great with those windows. Obviously the wider your windows are, the wider you’ll want your fabric to be. Other than that, I’d say go with whatever you like! Since you’re lining it, thickness isn’t really important. Good luck! I’d love to see pics once you finish!
Thanks Kelly! I was hoping regular would work too since it gives me more options. 🙂 Our window is like 54″ wide, so I was thinking 40″ wide panels would work.
THIS IS THE BEST TUTORIAL I HAVE EVER SEEN ON THIS SUBJECT!!! GREAT JOB. THANK YOU SO MUCH.
Great tutorial – thanks for sharing Kelly! I wish you could see my first attempt at curtains when I first was sewing – NOWHERE near this nice looking when complete! (which is why I am now sich of them after only 3 yrs. and now searching for a great tutorial like this one instead of just “wing-ing it” this time around). While my curtain making ability lacks a little something, I am better with other craftiness (including projects with bias and hem tape). total side note and doesn’t effect the tutorial itself: you used bias tape (which just means a piece of fabric that has been folded and pressed in a certain way – fold each side down 1/4 so the unfinished edges meet in the middle – used to finish off edging of projects such as bags or quilts). Hem tape is a bit different (used when hemming to cover the finished stitching on the wrong side of the hemmed pants – helps conceal the ugly hem + helps prevent a heal from catching on the inside seam (generally hem tape is made out of a thin piece of lace or I’ve used grosgrain ribbon as it generally does not have a fold).
What makes it bias tape has nothing to do with the way it’s folded. You could fold any fabric or ribbon in a palmier pattern like that and it wouldn’t suddenly make it bias tape. What makes it bias tape is the fact that it’s cut on the bias (a.k.a. the fabric is cut diagonally or at a 45 degree angle from the way the thread the fabric runs) You can make your own bias tape with any fabric you have. The fact that the strips of fabric are cut diagonally makes them really stretchy (consequentially not a great choice for back tabs which should be sturdy, not stretchy,but it’ll work) you use bias tape to edge things that need to stretch (such as the neck hole of a tshirt) or something with a curved or wonky edge that would wrinkle if you trimmed it with something that doesn’t stretch well (such as the brim of a tiny top hat or the edge of a keyhole neckline).
Hello!
In step 6 or so, why is the fabric wider than the lining? Do they end up being “even”? I am so ready to head to the store and by the materials to do this, but I need to clarify that step before I start….I’m afraid to be frustrated in the middle of the process. thank you soooooo much =)
If you look at the picture just under step 6, you’ll see how the back of the curtain ends up looking. You want the fabric to be wider than the lining so the fabric wraps around the backside of the curtain and the lining doesn’t show from the side of the curtain. When you straighten it all out, the backside of the panel will have a stripe of fabric going down each side. Kind of hard to explain, but you definitely need it that way.
I’ve been sewing for over 40 years and I must say that you, my dear, are a total genius! I have never seen a better explained/diagrammed set of instructions for making simple drapes. My only suggestion, since someone else already mentioned the blind hem stitch, would be to add buckram at the top so that your drapes will maintain their beautiful folds and not end up sagging from the weight of the fabric. In all, this is a A++, 5-star tutorial.
Thanks for the tutorial! I used it to make curtains for our nursery over the weekend. I followed your steps exactly and they turned out great. I keep walking in there just to look at them! Love your blog.
I am getting ready to make these drapes that you have on your web site. You talked about the length of your drapes but not much about the width. I realize that is a variable depending on the It is a great tutorial. Thanks so much.
Thank you! I just made mine the width of the facing fabric. In my master bedroom, they are 54″. In my nursery, they are 45″. 🙂 Good luck! I’d love to see pics when you finish!
Hi! I’m looking at using your tutorial to sew curtains for my dining room. Typically I always wash my fabric before use but I’m being a little lazy and wondered if I should skip that step or not. I’m using home decorator’s fabric also. Did you wash yours before you sewed them?
Thanks!
Lisa
IF I could sew, I would totally make gorgeous curtains like yours … love the length and your fabric choices!
I’m always intimidated by sewing window treatments! I love your step by step guide. I have a mother in law that can sew, well, like a mother! ha She usually does all of mine. Just in case she can’t help next time, I’m pinning this for future!! thanks!
Once I discovered back tabs it was all over! These look the best, in my opinion. It’s like a hybrid between a rod pocket and nice pleats. I’ve even purchased tab tops (which I despise) an pinned them down in the rear to make back tabs. Great tutorial for lined drapes!
In your tutorial you never said anything about the top. How far from the top does the lining come up?
After you line up the sides and the bottom, assuming you’ve cut the pieces the right length, the top will fall into place. I don’t remember what that number ends up being, but if you follow the instructions in the tutorial, it’s a number you won’t actually need.
Hello, question… All th tutorials talk about the length of the starting fabric. What about the width? How many inches should I add to my starting out fabric?
I left my facing fabric the width it came in; I didn’t cut down the width or add to it at all. I addressed the width of the lining fabric in the post. I hope that helps!
Ok, so I pinned this month’s ago and now I’m ready to get started. Just re-reading the tutorial and was so entertained and could sooooo relate to you. Sure wish you were my neighbor…lol! Can’t wait to get started 🙂
Oh Kelly!
After what seemed like hours! of searching for a tutorial for sewing black-out curtains, I stumbled across your site. I swear… not only was the tutorial wonderfully detailed, but I don’t think I’ve ever had that much fun learning how to do something!! (and I’m OLD! – so that says a lot!) Your sense of humor is out of this world! I laughed out loud at the end of every step. You’re a riot! Thanks for such a great tutorial – and for making my day 🙂 #youmakelearningfun!!!
~Cheley
I have just emailed this article to a Landlord who needs to put some curtains up in a property in Crawley. I hope their ability is greater than there desire to try and refurbish the apartment.
I’m planning on starting curtains this weekend and still didn’t know how much fabric to buy, now I do. Thanks!
I’m trying out these curtains and I can’t figure out how wide you cut your face fabric 🙂
I didn’t cut my face fabric. I just used it the width it came in. I addressed the width of the lining in the post. 🙂 Have a great weekend!
This is a great tutorial! I’m not sure I’m brave enough to undertake it, but I have to tell you that it’s one of the more entertaining “how to’s” I’ve ever read. “Window Pants” truly made me laugh out loud! Will pin it and then maybe someday…
Hey! Love them! I am an experienced sewer and love this plan! I also wanted to ask if they open and shut easily? Or do you ever open and shut yours? Thanks for the inspiration and tutorial!
Yes! They are SO SO SO easy to open and close. I think if you made the tabs too small, they might not slide easily, but ours are no problem at all. Good luck!
Thanks for posting this awesome tutorial. It was super easy to follow along and I finished three sets of drapes this afternoon! Since our house is horribly insulated and faces west, we desperately needed a solution (plus, we’re expecting our first baby this fall, so I wanted an excuse to practice these for our nursery curtains, too!). Thanks again for sharing!
P.S. Your baby’s nursery is fabulous. How lucky she is to have such a crafty mommy!
Hey Kelly! I love this tutorial! I’m in the process of making these drapes for my grandsons nursery. I’m using a premeir zig zag fabric in blue. I’m concerned about the top stitching showing through on the front when you attach your tabs. Can you see this top stiching?
You can see it if you get up close, but you have to get really really close on my curtains to tell it’s there. I don’t think anyone would ever see it if they didn’t know to look. Definitely get a thread that’s close in color!
Love your tutorial! I acutally bought cheap curtains and plan on adding the lining to the back, But does the lining make it a “blackout” curtain? Thanks for you help!
It depends on which lining you buy. You can buy “blackout” lining that will completely block the sun, or just regular lining that will add some extra weight and make the curtains look better from the outside. Good luck!
Beautiful curtains! one question…does the black out lining smell when the sun heats it up? I purchased already made black out curtains and I can’t stand the smell of them when the sun is out! 🙁 …So if the black out lining you used doesn’t smell, I may have to make my own as well!
I’ve never noticed any smell at all. Ours don’t really bake in the sun much – mostly indirect sunlight – but they don’t have much of a scent at all. Hope that helps!
Hey Kelly! I’m almost through with my panels! Yay! Thanks to your inspirational tutorial! Just one quick question. When you sewed your tabs down, did you leave a little slack or sew them straight? It’s hard to tell with them on the curtain rod.
Yay! That’s exciting! I actually did just sew them straight down. Make sure your tabs are long enough to allow enough space for your curtain rod, because if you have an extra chunky curtain rod, it could be an issue, but they worked great for me just sewed down flat. Good luck with finishing yours!
Hey Kelly! I just finished making my curtains, and followed your tutorial, which helped a bunch. I did, however, take 3 months to make mine hahah….worst part was trying to get the material cut square! I ended up taping the floor to use as a straight line 😐 Unfortunately, I decided I was going to make my curtain rods from electrical conduit, so I can’t even hang them yet…why do I do these things to myself?? Anyway, Thanks for the tutorial!!
I love the curtains and laundry room makeover. I would love if you checked out my blog and became a follower. Is there a way to follow yours?
Yep just at the top of the sidebar there are options to follow via RSS or email. At the bottom of the sidebar is a link to follow via bloglovin. Thanks so much!
I just finished my first of two pairs of these curtains for my children’s rooms. They turned out really nice! Thank you so much for your tutorial. I can’t wait to see the second set finished as well.
Hi! These are genius! I’ve made these the old fashioned way using drapery tape and those metal things that pleat the fabric and hang it up; this is way better! They hang better and it is more simple to make! Love your tutorial. Very well done, you make me want to sew again!
I found your blog in Pinterest land. After I finish redoing my dining room chairs with new material, I am going to tackle making curtains that match. I am so glad that I found your tutorial. I like the idea of back tags. It seems very easy but it will take some time. Thanks for sharing and I can’t wait to look around your blog.
Tammy
Mrs. Flickinger’s Butterfly Oasis
Great job on explaining how to make these curtains. Guess what my mom and I will be doing in the coming weekend..:)
Just finished making my very first curtains using your tutorial. They look great and your instructions were so easy to follow. Thank you!
I just read your tute on the lined curtains and decided it was a good one to add to my sewing category, but when I did, I was informed that I couldn’t because I was ‘blocked by the owner’. It is the first time I have seen this tute, so I am confused as to why I’ve been blocked. Can you explain please?
Thanks for this tutorial– I definitely need the info for making window “treatments” in my new house. Now, I just need yo to help me pick out fabric & do the actual sewing!
Try looking for tablecloths in a pattern that you like to make these curtains. The tablecloths can be very inexpensive on close outs or clearance. The material is often a little heavier and the choice of sizes can accomodate the higher placed rods. The sides of the tablecloth are already hemmed and easy to turn in for a wider hem. There are many textures and patterns available. A lighter weight white or ivory tablecloth could work perfectly for the lining.
I think some of the questions on the width of your curtains are really asking how you determined the width of your drapery panels compared to the width of your windows. For a “wide” window, you may have to sew panels of fabric together to increase the finished width. Is the total finished width (of the two panels together) equal to twice the width of your windows? More than that, or less than that? How did you figure how far off the side of the window to have them stack off?
I have two bedroom windows, one is 67″ x 58″, the other is 63″ x 32″ (a long narrow window above the bed). These measurements include the 4″ wide trim around each window. I am unsure how wide my finished pair of drapery panels should be to cover the windows with plenty of fullness, like yours.
I plan on making the one pair “long and wide”, but am not sure on how long to make the pair over the bed. We currently don’t have a headboard, but my husband plans on building one. I’m thinking about having the curtains hang about 3″ above the planned headboard? Does that sound right, or do you have another suggestion?
I loved your tutorial. I have sewed a lot of clothing and Halloween costumes over the years, and have made a shower curtain, but not window curtains. It was very informative and easy to follow. I am anxious to get my bedroom draperies started, but I’m just not sure about how to determine the width for my windows. Thanks for any help you can give me.
Sharon, I saw no one had answered you yet… Usually its 1 1/2 times the window width, but if you want them even fuller you could totally go with doubling it. As far as how far above your future headboard, I think that would be just whatever your preference is.. Hope that helps you out.
Yes! Usually they’re 1 1/2 times the window width, but that’s not a hard and fast rule. I have a very wide window in my living room and very narrow curtains. It’s not the ideal look, but if I did 1 1/2 times the width there, I’d have SO MUCH FABRIC that it would be ridiculous. I always say, just go with what looks right to you! As for length, I always prefer them to go all the way to the floor, even behind a headboard. And for how far off the window to have them stack off, I usually just hang them so the inside of the curtain skims the outside of the window. Just a personal preference. Hope that helps!
Kelly, beautiful job on the (I call them) curtains. Probably called different things based on where you are. I am a sewer (definitely not a seamstress, that would be my mom) and have made curtains and valances many times (with moms help), but your tutorial simplifies so much in regards to attaching the lining. At first I was like “huh, what” but then I got to the next step and I think I heard a choir of angels! And your hidden tabs….marvelous!!! I am so inspired!!! All I have to do now is find the “one” for my material, which I will add has been proving challenging at best the last 6 months. Thank you for you humor, I absolutely loved it… cracking up the whole time.
Hi Kelly, I commented earlier about how I had finished my curtains, but hadn’t hung them, well I finally got that done, and while they are nice, they don’t fall as nice as yours …which may be because I sewed the tabs too close together (the material twists a bit between the tabs). It might be helpful to let others know how far apart your tabs actually are, I had mine around 4 inches apart. Thanks, again:)
Good feedback, thanks so much for letting me know! Maybe you can take out every other tab (just take it off the rod) and see if that helps? Mine are 5 inches apart.
I’m curious, does the stitching from the bottom of the tab show on the front?
If you look closely (very VERY closely) you can see it, but I used a thread that blends well, and the tabs are in the recessed portion of the curtain, so I think it’s pretty well camouflaged.
I have an awesome secret for getting tons of fabric for CHEAP…. Top sheets at thrift stores. Great for many a project and you can find some fun prints for $3-6 a top sheet. Yes, you must dig for the gold but I would not have been able to do some of projects I’ve done without this find. Especially quilting, and rag rugs, and now some fantastic black out curtains! Yay to the the rich people who donate their 1000 thread count fancy sheets for me to find!
Love it!! I love how honest you are about your skill-level and your spunk in writing. It’s all about creativity and using what you got to make something beautiful.
Love your blog. Will be following your pattern for living room curtains. Neat fact – we are also an Andy & Kelley couple.
I really really really love the fabric in your daughters room. Would you be willing to share the name of it and where you got it? It has all colors in it so you can change the bedroom to whatever color and not have to change the curtains! LOVE!
Thanks! It’s Anna Maria Summer Totem in Tart:https://www.amazon.com/dp/B0055941TC/ref=as_li_ss_til?tag=viealotheway-20&camp=0&creative=0&linkCode=as4&creativeASIN=B0055941TC&adid=1Z434NE2FJD0MA2BVH5S&
Yeah I realized after I posted this comment that you give a link about 3 times on what fabric you used! hahaha! I’m not a sewer and I feel like I can do this so I got super excited and missed all the other information…..thank you for the response! 🙂
You girl, are quite creative! Great job on the tutorial. Just a suggestion, when you first make window treatments that are going to hand in folds or pleats if you train them they will hang nicer. With the drapery open accordion fold the panel at the middle and bottom replicating how it hangs on the rod at the top. Secure with ribbon, saran wrap, or masking tape. A steamer would speed up the process. If you leave them a couple days they will hang nicely all the way to the hem.
I have been making window treatments for 50 years (and yes I said 50 years) and I think you did a great job. How do you know if you can do anything if you don’t try!
Maybe I missed this in the comments as I didn’t read them all… but you never said when to flip it right side out like a pillow….????
Yep, it’s in the paragraph right before step #6. 🙂
Love these! And just in time because I need to make some! I featured your tutorial over at Go To Sew yesterday. http://gotosew.com/2013/08/featured-lined-curtain-tutorial/
I have been sewing for 40 years and this tutorial was “sew” helpful. My daughter wanted floor to ceiling curtains for her new apartment in pink satin. I hate measuring, especially long panels of material. Together we whipped out four, 100 inch panels in no time. Learned a few tricks and took the guesswork out of our project. Thanks for the humorous, easy to follow steps!
I have sewn all my life. Well, except when I was a litle girl under 5. Since then, well, if yo can sew it, I want to make it! ha, ha. I had a small drapery business and dressmaking business for years. When I saw your pin on Pinterest, I was intrigued. Well girl, as my teenagers you to say to me, You Rock! You are a great teacher and you blog was a fun read. Thank you so much for the tutorial on this technique. You are just what is needed to get shaky new sewers to try to make ‘window treatments’. You have a great style and your choice of fabrics were beautiful. Congratulations. Janice Veiga, FrenchShabbyEssentials
Sorry for all the typos. My old fingers and sticky keyboard just blunder along these days.
I have sewn all my life. Well, except when I was a litle girl under 5. Since then, well, if you can sew it, I want to make it! ha, ha. I had a small drapery business and dressmaking business for years. When I saw your pin on Pinterest, I was intrigued. Well girl, as my teenagers used to say to me, You Rock! You are a great teacher and you blog was a fun read. Thank you so much for the tutorial on this technique. You are just what is needed to get shaky new sewers to try to make ‘window treatments’. You have a great style and your choice of fabrics is beautiful. Congratulations. Janice Veiga, FrenchShabbyEssentials
I did it!!! I just finished my first pair, and I am NOT a sewer (wait, that says sewer…I’m not a sew-er. I’m not a sewer either) 🙂 Thank you so much for your very easy-to-follow step-by-step instructions. I couldn’t have done it without you! Now on to the next pair!!!
I must say, that you madam, are my favorite blogger of all things DIY. You have an uncanny ability of keeping my attention, the one that tends to drift, with your witty honesty. If I don’t actually get to this project, I’m glad to have relived yours.
Thanks!
AmyJ
Great tutorial. Thanks for doing all the math for me so I don’t have to sit down and do all that ciphering. Gives me a headache. FYI, the major difference in a blind stitch and whip stitch in hand sewing is with the blind stitch you are hiding most of your thread in the fold with the long stitch and using a tiny stitch to connect the two pieces together.
Great tutorial! I might even have a crack at this 🙂
I would just like to say THANK YOU! This is SO helpful and just what I needed! I am sitting here trying to find fabric to redo my living room curtains and was trying to figure out the best way to go about it. BOOM. stumbled upon this loveliness 🙂 DONE
Very beautiful draperies and instructions. One tip to complete the project….you can train your draperies to hang with perfect pleats by tying a string about 8″ down from the top, in the center and at the bottom. Leave for several days and remove the strings. The draperies will hang perfectly plumb!
Holy cats! Really?
I am a very experienced at sewing. But I found your tutorial so helpful. I just made curtains for my daughters new bathroom using your instructions. They taught me so much and saved me so much time. All the steps were spelled out, Wow! Thanks for a great idea that paid off.
Hi! I’ve had these instructions saved on my Mac for months. I am now in the process of actually making these lined curtains. Whew! 11 yards of fabric and 11 yards of lining is a lot of fabric to deal with. I just finished one panel so far of four. I still need to finish the top of that one and then on to the other three. I am using wide grosgrain ribbon for the tabs. I hope that t works as well as your satin ribbon did. My cotton shrank about 2 inches when I wished and dried it before starting, so my side “bands on the back are only about an inch wide. But I think they look ok. Thanks so much for this tutorial!! By the way, my fabric is birch tree trunks and I am making them for our cottage up north in Michigan. 🙂
Hallo – thanks so much for this blog. I have to make 15 curtains with heavy weight linings and I was racking my brains for a tidy, modern top heading-tape-free-edge – you provided it. I’d looked at several DIY pages for back tabs and I just couldn’t get my head around the written instructions, and I’ve been sewing for more than half a century, oh, maybe that’s why! Yours is so easy to follow The house is still full of fabric but I am just about to finish the first curtain. This upholstery fabric is heavy and fire retardent so I can’t make double hems, I’m having to tiddle around with top and bottom hems because of the weight of fabric but I’m getting there. Thank you again!
“Window pants”! Haaaaaaa ha ha ha ha! You crack me up! Love your blogs. I think I can do this project, even!
Thank you for this blog. My wife wanted a sewing machine to make new curtains with so have just sent her the link
Thanks for the lined curtain tutorial! I especially like the instructions for turning the lining and finishing the bottom edge.
I have one suggestion – bias tape is meant to be a little stretchy so you can work it around curved edges without distorting the shape of the garment or whatever. That stretchiness makes it less perfect for weight-bearing applications like curtains. Obviously this didn’t ruin your beautiful curtains, but I would recommend using a straight-grain ribbon or tape next time.
I’m following along this tute right now… One question
Are all seeds of curtain hemmed before lining sewed?
Ps
Drape, drapes. Tomato tomahto
this “tute” lololol.
…tute.
You sure make me want a sewing machine. I’ve wanted some lined curtains for a long time now, and always thought I should make some due to the cost. BUT, I never had much luck with mom’s sewing machine so I have a small phobia of them now. This tutorial is exactly what I need, IF I can ever sew. so to Pinterest it goes, Thank you so much!
Skivvies for your wall orifices? I think I almost peed myself reading that!! Wow, that was awesome!! I will definitely be making these if we don’t go with Roman Shades for our new place. Thanks for the giggles (I giggled throughout, but with wet undies due to the ‘skivvies for your wall orifices’ comment at the beginning.
Thanks again,
Kylha
These curtains are so absolutely stunning! I’ve been searching and searching for the right diy curtains and these are perfect.
I’m curious why the bottom needs 10 extra inches of fabric? Is it to add weight?
Thank you for your beautiful post!
Thanks! Yes it’s for weight.
Wait. So how many yards of fabric do I need to buy? Idk if I can do thisssss. Lol I shall try, I have a nursery to finish in oh about 4 weeks or so. It’s empty right now. Ain’t no thang.
LOVED the tutorial and EXTREMELY funny! Who knew that someone who sews could be so funny. Isn’t that like, illegal or something? lol Personally I am applying this application to some VERY heavy hotel salvage drapery with black out material so I will be a busy beaver. I am looking up what type of needle I will need so I am very behind the times with sewing. Wish me luck, thanks for the post your interiors are incredible. I see a designer at work!!!!!
I loved your tutorial and decided to take the plunge. Armed with measurements, I went to the fabric store to purchase fabric. My daughter is a huge college football fan and wanted her favorite team’s fabric. The only problem was that the fabric was only 42″ wide and we needed a width of 64″. Did anyone else run into this problem? I am completely at a loss as I cannot find “the” fabric in a wider width.
Yep, did you see the info about the nursery curtains? I used more narrow fabric there and it was fine since the windows were more narrow. Home decor fabric is wide, usually at least 54″; quilting and clothing fabric is more narrow. Should be fine. 🙂
This is a great tutorial! Thank you. I followed the directions to at “T” (except that I had neither bias tape nor satin ribbon so I just cut tabs out of extra lining fabric I had), and my dining room curtains turned out really nice. Thanks again.
This is the most detailed instruction I have found for making back tab curtains. Today I’m going to use it for my curtains! Thank you so much.
Kelly, I’m in the process of making your back tab curtain panels but I have extra lining fabric left at the top of the panel when I layed it on the floor to pin it. Not sure why. From your pics it looks like yours was even shorter than the fabric panel length. Think I should just trim it down but must have measured wrong. Do you recommend having it so many inches from the top so that when you fold down the fabric the 1″ + 1″ you don’t have double the thickness at the top??
Since I read your tutorial about Lined Back-Tab Curtains, I have followed up with making all my treatments this way. I just recently took 4 cheap black out curtains, took all hems, etc. out (washed them about 4 times) and re-made them using your tutorial. The curtains I used were 84″ long, but by taking out the hems, they are a perfect length. I have to say they look gorgeous in my Master Bedroom. I am getting ready to do a re-do of this room and didn’t want to spend ANY money until I have my plan developed . I am so grateful for you and your tutorial. I am one happy woman!
Yay! Thanks so much for reporting back! I’m so glad they worked out for you!
This is such a great tutorial. I’m planning on using it to help sew some wall orifice skivvies for my nekkid living room. Thank you so much for the inspiration! The wall I’m covering is massive (12′ tall x 11′ wide) and looking at your beautiful finished product and the simple step-by-step to get there might just help me get around to it.
Where did you get the fabric? I have the exact same bedding!!!
Great job on the curtains, and I love how clear your instructions are!
Thanks so much! The fabric is Premier Prints Avery. Not sure if they make it anymore. :/
Thankyou! Such a good tutorial for making curtains. I followed it to the letter (and many pins) and now have wonderful curtains in my sewing room. Would you mind if I linked to it from my blog?
Window pants…..hee…hee… love it! I have been looking for ways to make window coverings for ages…. but none that I thought I could do and like, until I saw yours. The tutorial is great and your sense of humor, refreshing. Thanks so much for posting. I am now a follower!
How do you go about searching for the perfect fabric? I never know what to write in the search engine or even what search engine to use. Help?
I want to thank you for dedicating yourself to this blog. I made these curtains for my daughters room and they are beautiful and since your directions were so user friendly it was fairly painless. I plan on making curtains for every room of my house! That’s how much I love them. Thank you. Keep it up! 🙂
I’ve had this pinned – and decided to try it today! One problem I have is that I am coming up 2 inches short from being able to cut 10 in more than my finished panel length. So my curtain cut length is 8 inches more than the desired length. What is your advice on how to maintain the desired length? Should I make the hem smaller? What would look the best in your opinion?
I hope to hear from you soon, since I am mid-project! Thank you so much for the fantastic tutorial! 🙂
Yes, I would just make the bottom hem shorter. I’m sure it’ll still look perfect. Good luck!
Thank you very much for sharing this step by step process. It had been many, many years since I had sewn any drapery and this made my life so much easier. Panel one took a couple of hours. I think it was the measuring twice and cutting once that gave me the most heartburn. Off to panel two tonight and I’m sure it will go much faster thanks to you. Happy sewing!
WOW! As I was looking for things like interior sliding barn doors I stumbled upon this tutorial. Since there is fabric laying across my ironing board that has been cut, ironed and one hem pinned and ready to sew I thought I’d click on your tutorial and am so glad I did…for the writing style and humor, if nothing else!!!
Although my project is much smaller — an exterior door window, which requires visual blockage more than light blocking — this back-tab idea will be so much more functional and less bulky when I gather them to the middle from the top and bottom rods…when I want the open window thing.
Since my place is more cottage style on the lake, elegance is not my first concern which is always the budget these days. I’m using a sheet (very cheap) in a print I love and works with my decor, lined with old cotton “sheers” that I just never got around to throwing away. I’m sure I have enough bias tape in one of my sewing boxes to complete the project this morning. Thank you for the great tutorial!
All these curtains look beautiful. Thanks for sharing. I am getting ideas to finish my bedroom.
If you take a match and heat the ends of the ribbon it will melt the material and seal it. It will never fray. (Don’t burn it; you will see it melt a little)
This is the type of tutorial i love. Clever, funny and with the understanding that we don’t all have the sewing police around at our places to check for professional finishes!
Thanks so much for the tutorial! I used it to make a pair of blackout curtains for my nursery while making a couple of changes which ultimately made it more complicated. I posted my version here: http://thegeekyloft.blogspot.com/2014/04/blackout-curtains-made-not-so-easy.html. Nonetheless, I wouldn’t have been able to accomplish them without this. Thanks!
Wow, this is just so awesome. Thanks sooo much for sharing this. I am starting to learn how to sew and would love to make my OWN curtains.
Thank you! Have now completed my first pair of fully lined curtains, your tutorial was spot on with photos and info. Amazed myself at how quick and easy it was. x
Hi –
We have featured your fab curtain tutorial on our website – I hope that’s ok, have included a link back 🙂
I just love your tutorial and how simple the curtains are to make! I just made my own set for one of my windows and I am working on the second set now! Thank you so much for the easy to follow tutorial!
This was awesome! I had, up until this point, literally no experience with sewing. All my friends ask me where I got my curtains and I proudly tell them that I made them!
Yay, I’m so excited to hear that!
This is the best tutorial I have every used. I sewed two pairs, one for each of my grandchildren’s rooms in their new house. Sooo easy to do!
I’m so happy to hear that! Thanks, Debbie!
I made this curtains for my babies nursery! They are adorable and look very professional. The tutorial was easy to follow. The only issue that I had was that for some reason my tabs weren’t big enough to pass my curtain rod through so I had to redo them, which wasn’t the end of the world. Thanks for the great tutorial! I love them!
Thank you so much! This was such a great detailed post! It was easy to customize. I wanted to use to different materials on each panel but it was so easy to just add this as a first step before your instructions start. Thanks for making me look like a pro! I knocked out huge professional looking curtains in a couple evenings (very pregnant) for under $80 in materials. Anyone can do this with your help! Oh and I even added lead weights to the bottom hem!
Hi Kelly,
I loved this tutorial and made black-out curtains for our wall of windows in our bedroom. However, once I hung the curtains up the top hem above the tabs drooped down and exposes the tabs, which is not very pretty. I am afraid I made the top hem stick out too high above the tabs… :/ Any hints on how to fix this? Thanks in advance!
Did these today with the help of this post! Love them! Thanks so much!
This is the best curtain and tab tutorial I’ve seen! I have store curtains that need to be hemmed and they are pole pocket (…which I hate), so I’m going to use your tutorial starting at the hemming the top and adding the tabs – I’m super excited to whip them up after reading your blog!
Thanks! Good luck!
Thanks so much for posting this! Such a great tutorial, I followed it exactly and the curtains came out great! Love the shortcut of using a ribbon, in the past I’ve made tabs and it was much more tedious!
Fantastic tutorial. I am actually in the process of redoing my entire first floor. I love the hidden tab look as much as you do, and I will totally be trying this . It’s a lot of work for sure, but yours look way easier than the draperies I’ve made in the past.
Now if only an easy tutorial for slipcovers! I’m just so bad at it!
I did it! Thank you for the step-by-step tutorial. This is my first real sewing project (not counting home-ec class when we made aprons) and I completed it on my own! When I first read the tutorial, I thought I’d skip the back tabs. In the middle of the project, I changed my mind and they turned out beautiful! Though, actually sewing on the tabs was awful since the machine kept jamming. Only when I had two tabs left to go did I figure out that I had been sewing wrong…the top thread goes underneath the presser foot while you sew…ooops! Keep this in mind beginners 🙂
Thank you, Kelly for such an easy-to-understand and well-photographed tutorial! I used it to make a shower curtain for my husband’s bathroom. The use of ribbon is genius and saved lots of time. It looks so great that I think I make some curtain as well!
Great tutorial! I just finished my first set of curtains and your tutorial made it so much easier than I thought it could be. My curtains look great and open and close so easily, thanks!!
Great tutorial. I am planning on making drapes for a couple of bedrooms with the blackout lining & wondered if I could line the curtains only about half-way down in order to save on the lining. The window is not that big. Or would it make the drapes look odd or not hang well. Thanks for any input.
You’re gonna put me out of business Kelly! Haha just joking, loving your DIY advice and the finished product in the bedroom looks great!
I pinned this mainly for the back-tab concept. I have 2 drapes that I plan to combine – one is a loosely woven fabric in a colour that suits my kitchen. The other one is a thermal fabric that I will use as the lining. I may have to hand sew due to the weave. I won’t know until I try. I need to have them finished before the cold weather!
this tutorial is great! The only thing that is off with this tutorial is the finished measurements. If you want your width to end in 55″ you’ll have to add 1.75 on each side (a total of 3.5″) to come out at 55″ (1.5 for the fabric to tuck around and a standard 1/4″ seam allowance). Other then the slight measurement difference this is great! I made some for my whole house and couldn’t be happier!
I just read your tutorial and found the finished product looked very professional. I am sewing my Christmas curtains (2014) with tabs. I have to admit that I was laughing when I was reading your tutorial, which made the reading very enjoyable and of course it was also informative.
Thank you.
This is GREAT! I am a beginner sewer and this was SO much better than any real pattern with sewing vocab that I don’t understand, haha. I wanted coral curtains for our living room and could not find them pre-made ANYWHERE (or atleast one’s that weren’t super pink-coral). When I found out it was going to cost $300.00 to have them made (not including material), I decided to take on the project. All to say, it was feeling pretty impossible until I found your tutorial, so THANK YOU for putting in the time to put this up!
I love the printed pillow on your bed. I have been loking for a pillow with these colors for months. Where did you get it?
Where did you get the lumbar pillow? I have been looking for pillows with those colors for months.
I can’t find the name of the fabric. :/ I think it found the fabric on fabric.com. Sorry that’s not more helpful!
Love your tutorial. I am using a light weight cotton with some blackout lining. Should I prewash all of the fabric before I begin? The curtains will be used in my grand-daughter -to-be’s nursery and may need washing in the future. Thanks so much!
Yes, i think that’d be a great idea.
Yes, you should definitely *ALWAYS* wash and dry (pre-shrink) fabric before making anything (curtains, quilts, etc.)
I’m just curious but you don’t mention when you cut your panel if you added extra to the width? Your panel had a finished width of 55″ when you cut the liner your mention that it should be 6″ less then the finished width. If you cut the width of your panel at 55″ you’re losing out on the width, correct? So I should be cutting my panel wider then 55″ or whatever width I chose, right?
I love it, I will try this way, I need curtains and they are duper expensive, thank you, you got a new subscriber ,
Thank you for the tutorial, it was very useful in creating curtains for my nursery! I did use a different approach for the top, so that the backtabs are sewn right in at the same time as the top edge is sewn.
I used the same approach for the bottom of my curtains, but in retrospect the lining is a bit heavier so it would have been better not to sew in the lining into the bottom hem and do it like you did!
If you want to see the result, and the slightly different steps I followed:
http://www.lemonandmint.ca/2014/10/tutorial-back-tab-blackout-curtains.html
I think you’ll like the way I made the top!
thanks for sharing…..am doing it now!
Great tutorial!! 🙂 Beautiful drapes…very professional looking! From what I faintly remember working in window treatment department many MANY years ago….drapes are heavier, often lined whereas curtains are lighter fabrics unlined…sometimes sheer. I have no idea if that holds true today though. Found your page as I was googling “sew lined drapes”…about to sew blackout lining into some Ikea panels for the bedroom…hope it turns out okay.
Hi Kelly. Just wanted to say thanks for this fantastic tutorial! I actually made curtains for my daughters room last week and showed off on the blog today. They’re at http://barnaclebutt.blogspot.com/2014/11/how-to-sew-blackout-curtains-diy.html. I think you’ll be proud of me 🙂
I really enjoyed this tutorial. I am SO bad at following directions it’s actually sad but your directions are so clearly laid out, it all made sense. And I loved the funny comments along the way too.
I did have an issue with the final length of the first curtain I made, however. I wanted a finished width of 36″ but since the curtain fabric ends up wrapping around a few inches on the sides (as it’s supposed to), the final product will always be narrower than the initial measurement. That’s fine as long as you account for that lost width, which I didn’t. My finished curtain was supposed to be 36″ but after sewing together with the lining (which is 6″ narrower), the final curtain was 32″. Did I miss a step or piece of instruction on measuring correctly (this is entirely possible). I plan to make more panels but am wondering what I did wrong on the first one!
Yes! I just posted concerning this question…I saw figures for length, but not width on the panel diagram…
Forgive me, I didn’t read all the comments/replies…
How do you determine the width of the panel in relation to the size of your window? I *think* I read somewhere (a year ago, when I was planning the cabin curtains that I’m *finally* getting around to make) that you should make the width of your panels double the width of your window for shirring? Thoughts?
Hi 🙂
I know that you already have 92727363638 comments on this post (because it’s AWESOME) but I wanted to add my little thank you! I love how the instructions are super specific
and I love your humble and funny commentary!!
Thanks so very much for this 🙂
Karen
Sewing instructions usually intimidate me because they are written by masters of the craft for other masters of the craft. These instructions are written in a way that a person with basic familiarity with sewing can follow.
Even if saving money is not the primary object, this opens up a broader world of fabric choices. The curtains sold in catalogues are not adequately described. Just naming the fiber(s) and color(s) is not enough but often that’s as much as you get. This is better.
I’m halfway through my first panel to only realize that I may have sewn my blackout fabric wrong side out. The particular blackout fabric I bought is white on the wrong side and black on the right side (my drapery fabric was dark so I bought the black). So as a cautionary to anyone that is using a blackout fabric that isnt white on both sides you want to lay your lining fabric right side up in STEP 5. Now excuse me while I shed some tears with my seam ripper. Fantastic tutorial btw!
Ahhahahaha!!!! Love it! Can we add bikinis to the overpriced list too? I mean seriously, why does such a small amount of fabric cost SOOOO stinkin’ much?!?! Oh yeah, and the “curtain/drapes” tutorial is really great too. LOL. I live in a very strange house with very few walls that stand at a 90 degree angle. So I’ll definitely send pics when I finish my rookie attempt at window treatments. It’ll be interesting for sure. 🙂
OMG thank you for this! I just got a sewing machine and have no idea how to do anything really! And I NEED to do this for my living room. Fingers crossed!
I have made window treatments for over 40 years. They are quite easy. It is all straight sewing. You have done such a good job. Very professional looking. I have taught many of my friends to sew for their home. The hardest part is making the pattern. Any one can make them look professional just remember to make your side seams 1 1/2 inch DOUBLE seams and top and bottom seams no smaller then 3 inch DOUBLE. Thanks for posting this. It is the best one I have seen.
Very nice tutorial! Pinned it!
You really took a lot of time to detail every step of the way here. Thank you
my windows are 72 inches wide and I want 2 panels to divide the space. How wide do I make the finished width so that the pleats will look good ??? Just found your blog and am inspired. Thank you for being here 🙂
I love this and you did such a good job with the tutorial! I am going to try this when I make window pants (lol) for my son and daughter in law!!
Thanks
This is genius! I never would’ve thought to do the side hems that way but, holy cow, that’s so easy!!! I’ve had fabric for months waiting to be sewn and I finally plan to do them this week. My only question is, after stitching down the bottom of the tabs, doesn’t that stitching show on the front of the panel? Does it look weird (and unprofessional) to have random one inch lengths of stitching on the front? I can’t tell from your photos.
Kelly. I’ve sewn all my life and have made lots of curtains. I lived your tutorial though, very entertaining and you made the process of the lung very easy to follow.
On another note, I noticed that your bed it folded so beautifully on the end I have tried and tried to figure this out but still end up with just” hospital corners”. I’d really appreciate your direction on this subject. Thanks Kelly!!
Would linen be ok to use? Would the lining still provide a good ‘black out’ affect?
Wonderful tutorial on the back-tab draperies. I have a question….can you see the stitching on the front for the bottom of the tabs?
Thank you for your easy and explicit instructions. I have sewn (mostly clothes) for the past 50 years, but have also made some home decorations. I was looking for simple curtains to make for our new guest room (our 35 year old son finally moved out), for which I had purchased sheets (plain color and pattern complimenting color) and I wanted to line them so white faced the street instead of the pattern. I also didn’t want to have to figure anything out because I am too old for that. Your site was the first one I read and with your how-to, I will not have to spend (brain) time to figure it out myself. Thank you so much.
I have to say, I don’t have a sewing machine, don’t know how to sew, and have no immediate plans to need or make curtains, but I just read your entire tutorial with a lot of interest. You, my dear, got my attention and now have me wanting to make curtains sometime at some point in the future…whenever that may be. So that means you can never take this post down because I’ll NEEED it when that day comes. 🙂 🙂
Just finished my curtains, thank you! So easy to follow & very professional results. Someone posted upthread that sewing the bottom part of the tab results in stitching on the pattern side of the curtains and it’s true, but the only way to avoid that would be to sew to the lining only (or blind stitch hand sew the tabs to the lining?) and that be very difficult. You’d have to pin your tabs to your curtains before you flip them inside out and fold the tops…. a lot of precision measuring.
Listen. I don’t know what bias tape is either. it isn’t even tape. i bought material, beautiful full of aqua, but never sewed them yet. I am not saying i will do it tomorrow either, BUT, after reading your instructions, i now KNOW i can make them. I wasn’t even going to attempt a lining but now i will. Thank you.
Love, love, love your post (and your entire blog even more!). I will definitely be making these curtains! How far apart did you space your back tabs? Or how many did you use?
Clarity, brevity and wit. The tripod of great writing. Thanks.
I just made curtains following your directions and they look great in the room. However, the view from outside is really bugging me. These curtains are hanging at the front of my house and I hate how you can see the printed side seams from the outside. I’m actually considering taking them all apart and making that overhanging side seam smaller. Dreading the extra work though, as it took me 2 days to make them! Is anyone else bothered by this?
Erin, glad you mention that. I hadn’t thought of that. I am going to use the cheap “drapes” that I currently have hanging to line my new ones. I plan on using a very dark brown face fabric, and my current “drapes” (I use quotes because these really should never have been called drapes) are kinda light brownish. I will repost with the results when I’ve finished.
Thank you so much for this detailed tutorial! I’m planning to make my own curtains with back tabs and I so appreciate this. Did you find it difficult to work with the large amounts of fabric? – Cutting each panel from one large piece?
Your tutorial is so easy to follow, and your witty remarks are funny and refreshing! Now I can sew my curtains with more confidence. Thank you!
Your home-made curtains are so beautiful! I am in the process of re-decorating my home and my old curtains need to go! I am not very good at sewing but I will give it a try. If all else fails, I will hire someone to do it for me. Thanks for the tutorial. http://www.coverupdesign.com
um….THANK YOU! This was the best tutorial I could have ever seen on this. Your sewing skills are super on par with mine…I tried to take a sewing class…but on the way there, sewing machine in hand, this boy talked me into laser tagging instead. And so…that’s that. I now want to go try this, right now!!
I totally enjoyed your tutorial it was amazing. I was just talking to my sister about these exact curtains. I’m so excited to try making them. Thanks you for your fantastic and enjoyable tutorial.
LOVED this tutorial! Are you my American/canadian(please don’t hate me, this is the only thing of yours I’ve read, and I’m a kiwi and can’t imagine a world where trump would get even 3 months through his campaign trail, which shows how much I know) twin?!? Crack up and LOL-hilarious even when I’m in the room by myself AND genius-helpful like so bonus!!! Can’t wait to try xxx
Great article i would love to see a blog on making blackout curtains!
This is definitely the BEST tutorial for sewing curtains I’ve come across thanks for making it easy to follow & thanks for not including lots of terminology!
What is the width of the final panel? My fabric isn’t that wide and I’m not sure I can give up 6″ of width for the wrap around on the back.
You made a fantastic job on these curtains, I’m making sure I keep this on my pintrest page for future reference.
I am preparing for making these and was reading some of the comments. I am a sewer. Thinking about the tabs, sewing the bottom of the tab onto the lining before the lining is attached to the front panel would hide the stitching, then stitching the top of the tab on when finishing the top of the curtain. Like someone else said, I guess it is most important when working with solids.
It only took a year to finish them. Quality takes time
Do you think homespun fabric would work for lined back tab curtains?
You are definitely my favourite DIY blogger, I just love this tutorial!
I didn’t think I wanted lined curtains, so I skipped this tutorial. Then, when we decided lining was a good idea, I read through this again. I do sew (the sewing teacher!) and your idea about the side seams with the lining is genius! I love the tutorial and finished product. Mine will be in my first grand-baby’s nursery! Thank you!
I just finished the first of three sets using your awesome tutorial that I grabbed from a Pinterest search. Wow! It was great. Just the right amount of instruction and comprehensive illustrations. This was the first pair of back tab panels that I have made. It’s been years since I sewed any draperies and the rod pocket was my standard method. Not anymore! These were super easy (good measuring and pressing everything made for a perfect finished product) and looked great. On a 55″ width, I spaced my tabs out every 5″ on center and that spacing was just right. Thanks for taking the time to put this out there.
Thank you for this tutorial. I’ve never made curtains and haven’t sewed anything since I was in middle school until I found this article. It gave me inspiration to buy a sewing machine and make these curtains for my son’s room. I’m now inspired to make curtains for my daughter’s room and other rooms in my house. I’m also a blogger and can only hope that I’ve inspired others like your article inspired me. 🙂 Thank you!
I’m still learning a lot when it comes to sewing but these instructions were nice and clear! I needed curtains or some sort of covers for the windows in my loft and they turned out amazing! I’m planning to use this again to make curtains for a friend who moved into a new place.
Hi Kelly, we moved in a new flat and as I have to hem 14 curtain panels, I am browsing the web for both good looking and easy to hem curtains, found your tuto! Looks great, just one (maybe weird) question: does the curtain open and close easily along the trail? Thanks and greetings from Paris.
These curtains are pretty easy to make, but you really need enough space to lay the panels out to get measurements correct. I made mine with blackout lining which is pretty heavy. I don’t have space to easily lay everything out so it was difficult to get them line up and straight.
Wow. It took longer to scroll through all of the comments than to make two panels! ???? extreme beginner here and they came out awesome! This was only my second project!
I love your tutorial. It is exactly what I’ve been looking for.
I just used this tutorial to make some curtains for my empty, bland guest room. They look awesome and this tutorial is awesome. Thanks!
Such straight-forward, simple instructions! Thank you. I’m starting tomorrow!
I loved the tutorial. I do know how to sew, but have a question that I didn’t see asked. What seam allowance did you use, 1/2″?
Thanks, thanks, thanks for a great tutorial. I actually made some, and they look gorgeous. I agree, the hardest part was cutting the fabric straight. My next purchase will be one of those folding boards with a grid on it, plus some nice sharp new shears. I used a PB duvet cover I got on sale, and lined them with some cotton/poly blend sheets that I didn’t want to use on my bed. The draperies look super-elegant, and I am inspired to do more! Thanks again.
Kelly, This is a great and entertaining tutorial…. I just made my daughter panels for her kitchen before Christmas and we used the little clip on rings…so it was easy…but my daughter in law wanted these hidden tab panels and I have never inspected any to see how they are done…so thanks for the demo….I bought grosgrain ribbon to use for my tabs…one inch wide. It’s heavier than the satin and strong enough……I had to laugh at your Curtain Nazi warning….My 84 year old mother came for Christmas and I took her to see Jennifer’s curtains….she said to my daughter, as she flipped them over to look at the back “Did she line them?” I said yes, Mama I lined them. ….Thank the Lord.