I’m trying to act cool and chill about the fact that I’m FINALLY posting my six-months-in-the-making over-promised laundry room reveal, but inside, whole parts of my brain are in various stages of explosion.
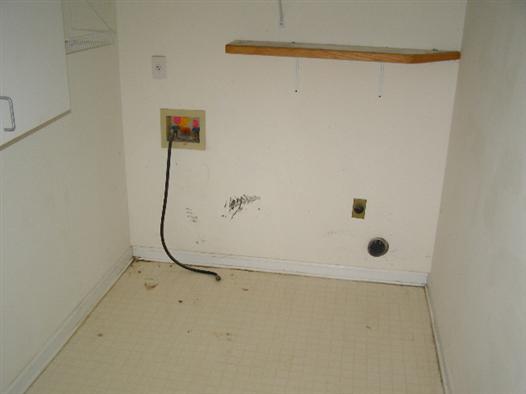
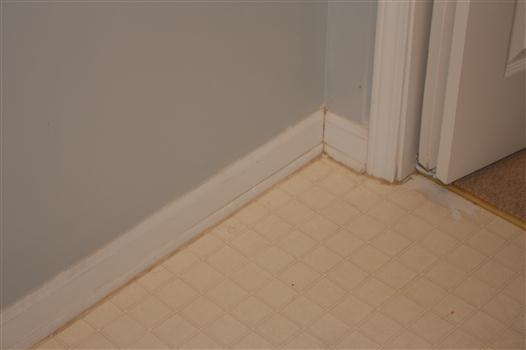
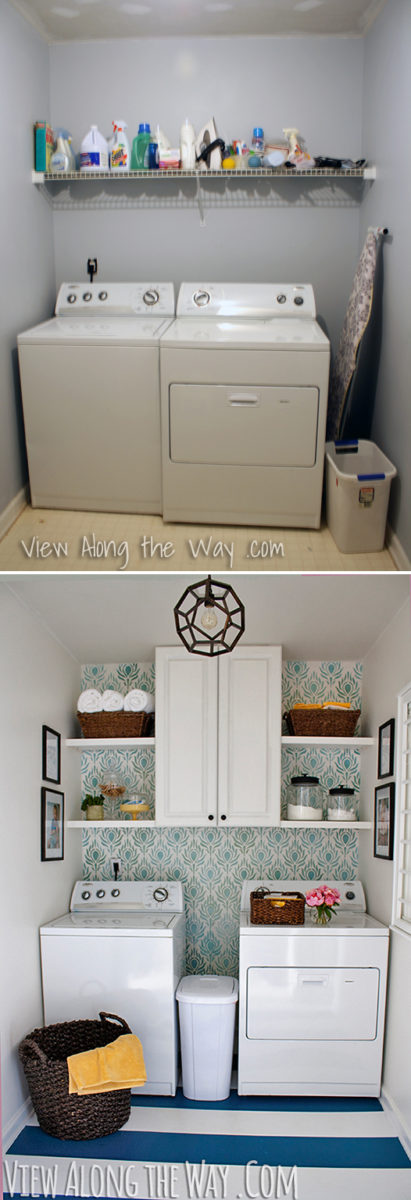
Because look what happened to my laundry room! Here’s how it looked when we moved in:
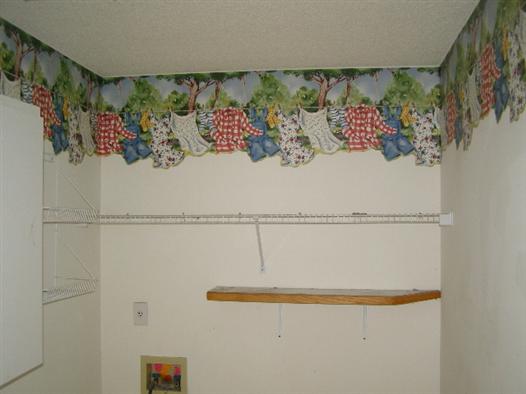
That clothesline border helpfully clarified the purpose of the room, in case we ever got confused.
Right after we moved in, we slapped a coat of paint on the wall, removed the popcorn ceilings, and left it that way, until last summer.
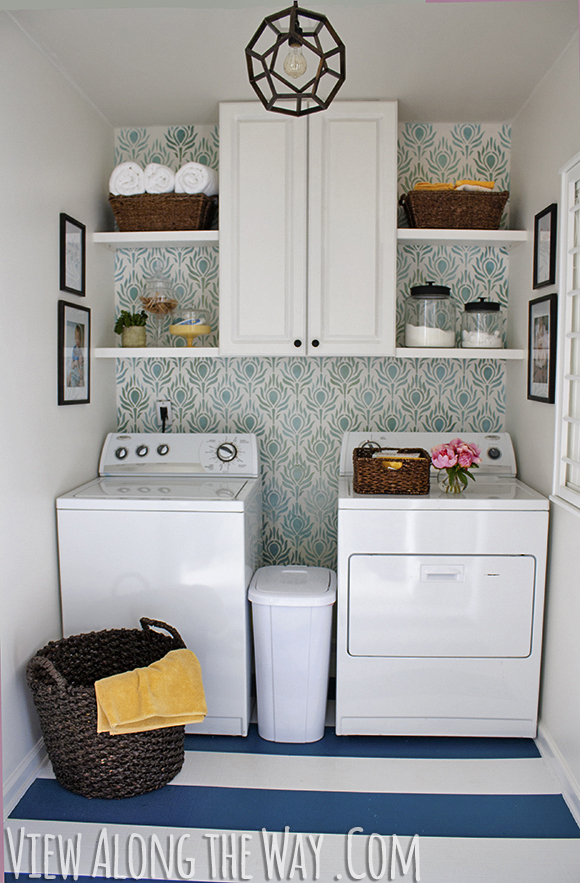
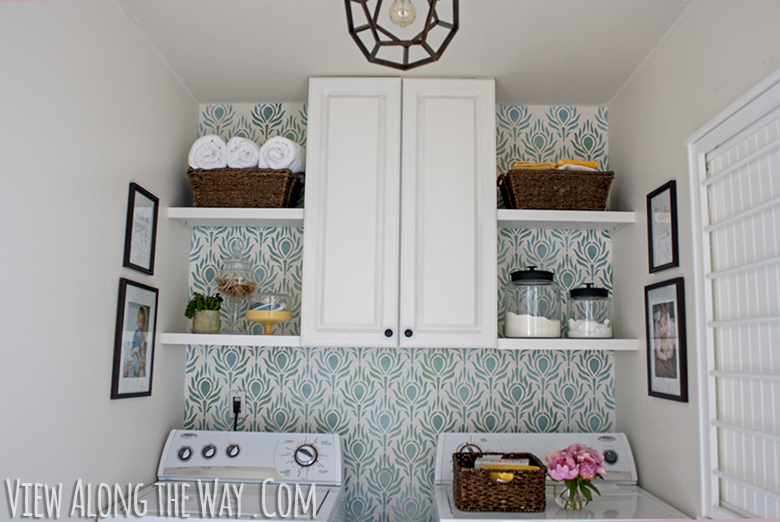
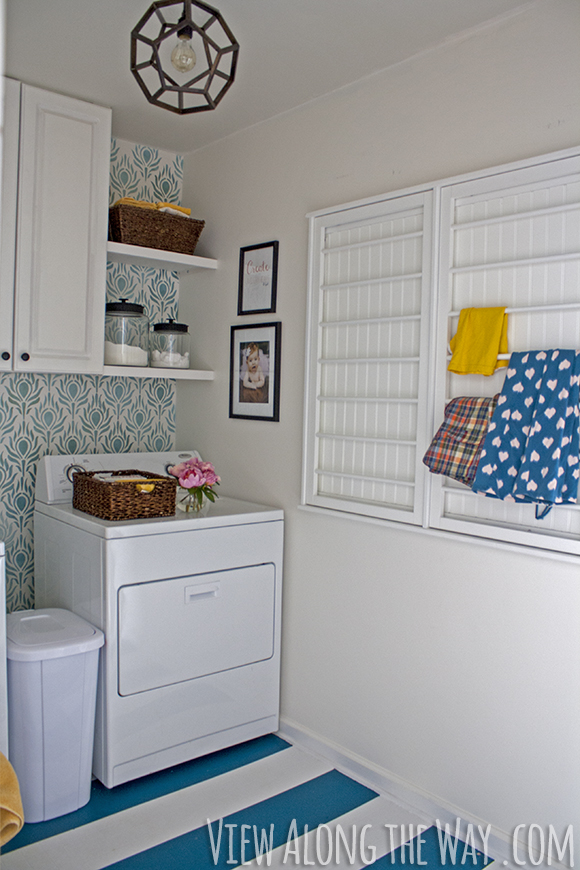
And today, it looks like this:

I mean whatever. No biggie. *Casual shrug.*
*Simultaneous happiness explosion. Smoke coming from ears.*
It’s SO MUCH MORE FUNCTIONAL.

- Pretty it up.
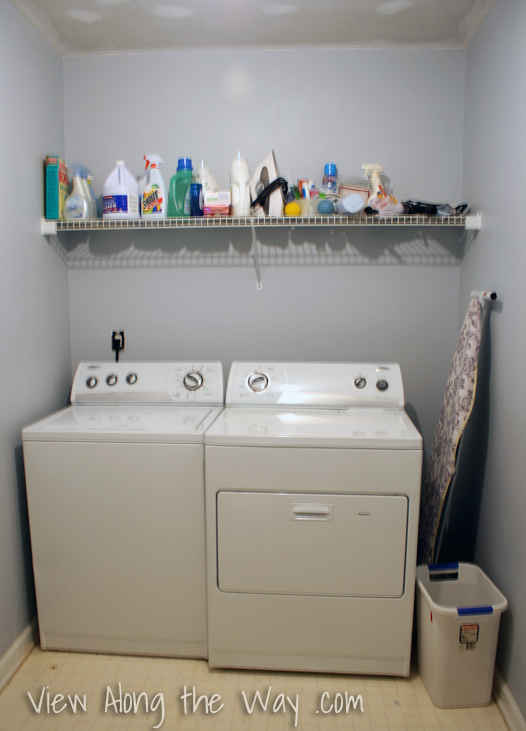
- Fix the storage problem. (The single wire shelf was not doing the job.)
- De-grossify (real word) the flooring.
- Create a DIY drying rack.
And we hoped to do it all for $100 total.
Goal one: Pretty it up
I’m the only one who uses the laundry room, so for the first time ever, I sat down and considered the kind of room where I want to live. NOT what’s trendy. NOT what’s in style. Just what makes me happy, even if posting this on the blog caused whole interwebs to collectively point, laugh and shun me forever. (A little inspiration to help you do the same in this post.)
I will admit I’d prefer to avoid the collective shunning.
I decided these things make me do a happy little jig:
- Teal
- Wide horizontal stripes
- Sparkle and bling
The sparkle didn’t so much make it in the end result, but you can see where the other two ideas did:
Little note: In some of these pics, the walls look bowed or the room looks a little fish-eyed and distorted. It’s just a weird thing our camera did as a result of trying to take pics of a tiny room.
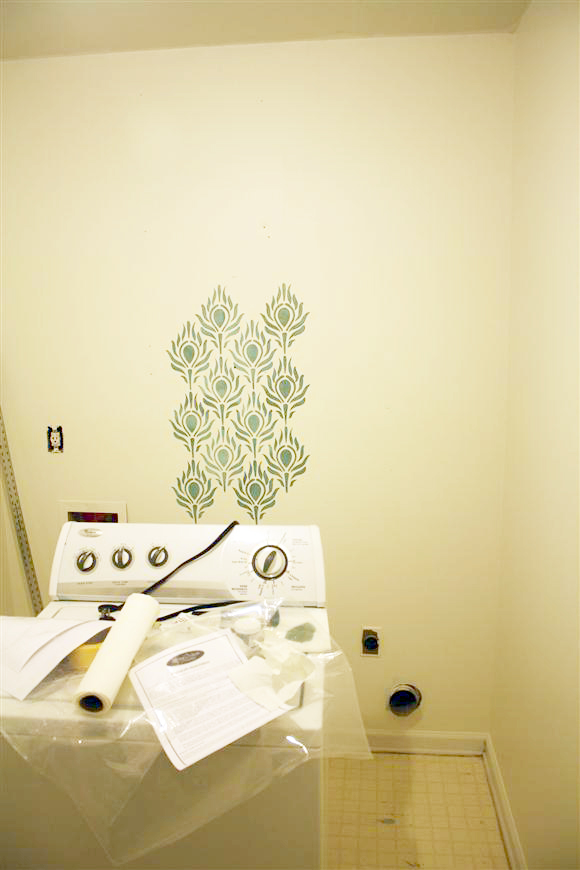
First, we cleared the room and slapped a fresh coat of Benjamin Moore Atrium White on the walls and Benjamin Moore Butter Pecan on the ceiling.
Then, I stenciled. Day and night, night and day for many moons did I stencil. (Or maybe it just felt like that.) Here are all the details on the stenciling, including a few lessons learned from this newbie stenciler. And RIGHT NOW there’s a giveaway too so you can win your own stencil free. Check it yall!)
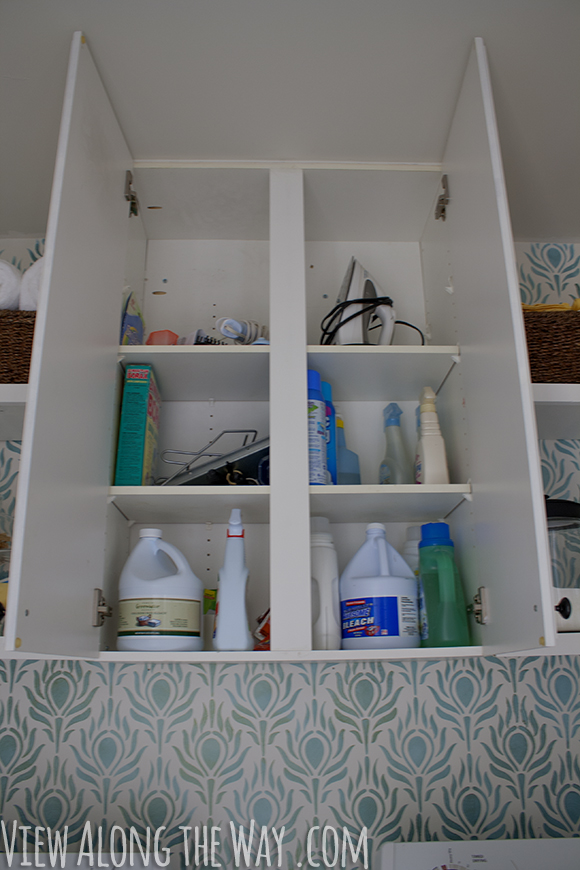
Goal 2: Fix the storage problem
Once that whole wall was done and I’d moved past the persistent nightmares in which some twisted person forced me at gunpoint to re-stencil the wall again, it was time to add cabinetry. We found this cabinet at a yard sale for only $20.
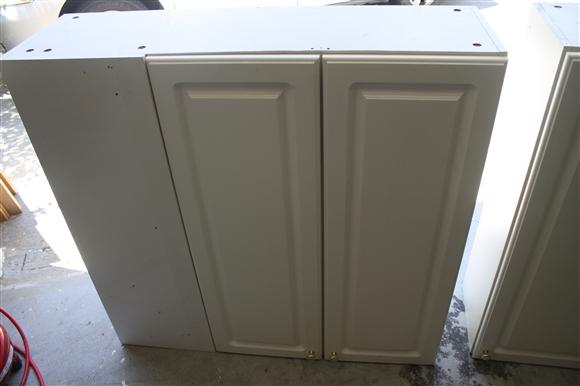
Buying a new one would’ve blown our budget completely, so we were happy to snatch this guy up. It was originally a corner piece, but Andy worked his magic on it to remove that weird corner section and add a new side. (See that post here.) We peeled the cracked laminate off the cabinet doors and repainted them white. Finally, we sprayed some oil-rubbed bronze spray paint on those shiny golden knobs. Then Andy hung up the cabinet. RIGHT on top of all that stencil work. The nerve!
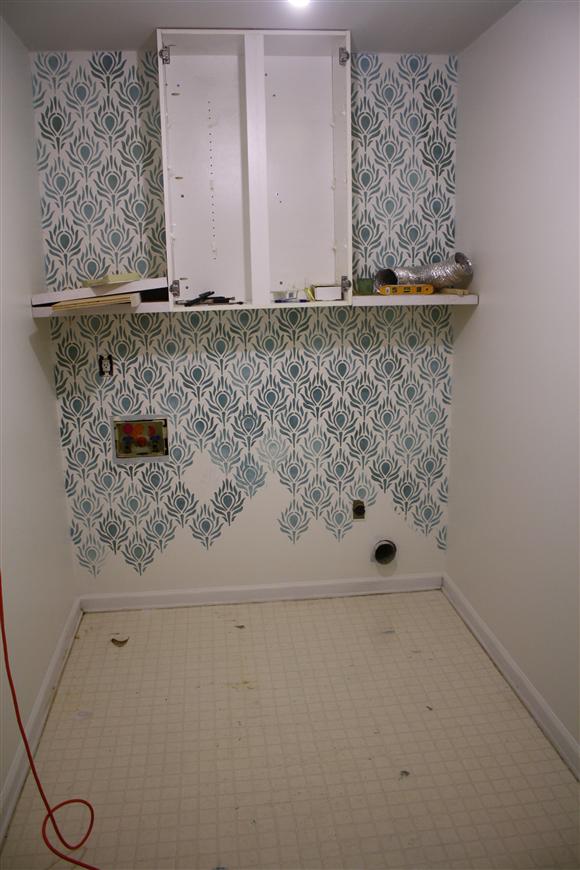
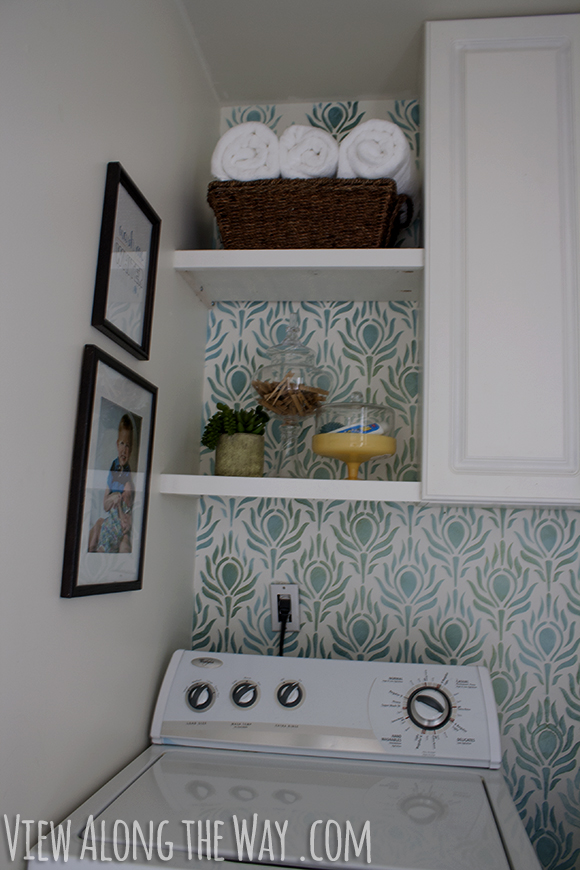
Okay, I forgive him. He also built and installed shelves on either side of the cabinet using scrap wood and his trusty kreg jig.
At this point, I had STORAGE. I was so happy to have a place to put my starch that I’d often go missing for several hours, then be found standing in the door of the laundry room, smiling and sighing blissfully. My life felt complete. But we still had another goal to attack.
Goal 3: Un-nastify (yep) those floors
The floors were an ugly vinyl that never looked clean no matter how much we scrubbed.
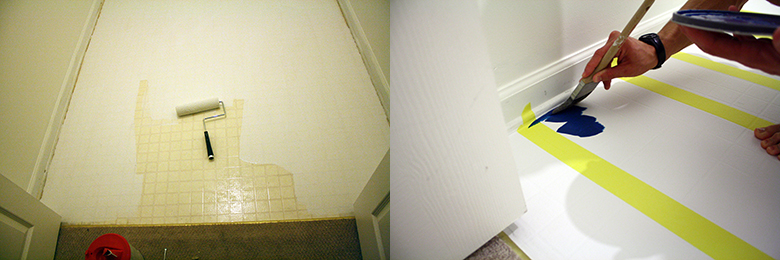
To stay on budget, we’d planned to spend no more than $1 a square foot on the floors. In this post, I shared our options for redoing vinyl floors on a budget. The riskiest option – but most exciting for us DIYers-at-heart – was paint. We didn’t know anyone who’d ever tried painting vinyl floors, and the guy in the paint section at the hardware store expressed his concern about this wacky idea (and our sanity) but we could not be dissuaded by “facts” and “expertise.”
I’m thrilled to report that it worked! (Score one for impulsivity!) Here’s the full tutorial for how to paint your dated vinyl floors.
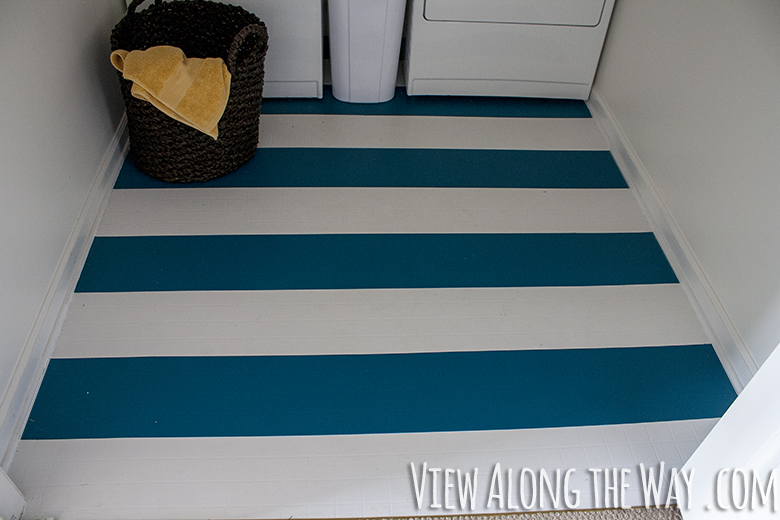

We’ve had these floors painted for about five months now and they’re holding up perfectly. At first, like those people who buy nice furniture and then cover it in plastic, we were hesitant to actually use the floors. We were afraid to get them wet in case the water made the paint bleed, and afraid to vacuum or put laundry baskets on them in case the paint scratched, but they turned out to be SUPER durable despite lots of action from our feet, vacuum, baskets and children. More on that soon!
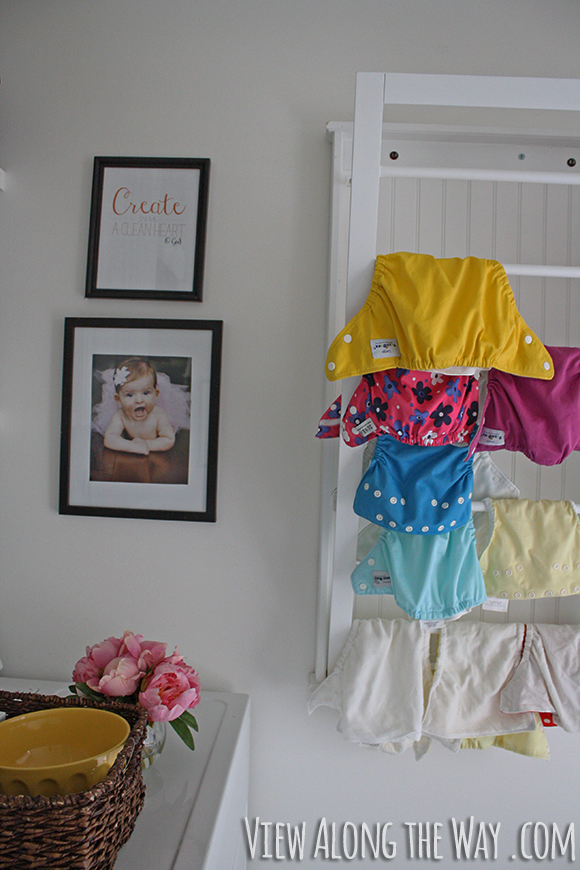
Goal 4: Make a DIY Drying Rack
This goal was a fail-slash-win. We’d planned to build our own because the manufactured drying racks always seemed to be priced as if they’re built from the hides of majestic unicorns. Then one day while I was shopping the Ballard’s Backroom Outlet, the clouds parted and the sun shone upon a pile of their drying racks. They all had slight damage, but they were marked down about 90 percent off – only $25! – so I went for it. The beadboard backing on my drying rack is slightly bent, but it’s virtually invisible. (They must’ve built my drying rack out of a defective unicorn.)
And that little hunk-a-wood has changed my life. We use it almost constantly to dry Mila’s cloth diapers.
Now it was time for the fun part: putting the room back together!
I filled that cabinet with all my laundry junk: iron and various sprays, brews, concoctions and poisons.
On one side of the shelves, I popped all my travel-size and sample-size detergents in that sweet yellow plate and cloche. The apothecary jar holds clothespins and I dropped in a little pot-o-succulents to add some life. I’m using the baskets on top for extra towels and linens.
On the other side, I’m storing my detergents in pretty glass jars, because it makes doing laundry feel fancy, like I’m scooping piles of gummy worms and chocolate sno-caps from those candy-by-the-pound stores. The larger jar holds our clothes detergent and the smaller one holds the special detergent we use for our cloth diapers.

A while back I showed you how I found those yard sale picture frames and spray-painted them, then added some pics of my sweet babes and a couple of DIY cleanliness-related Bible verse printables I made. (You can download them free here.)
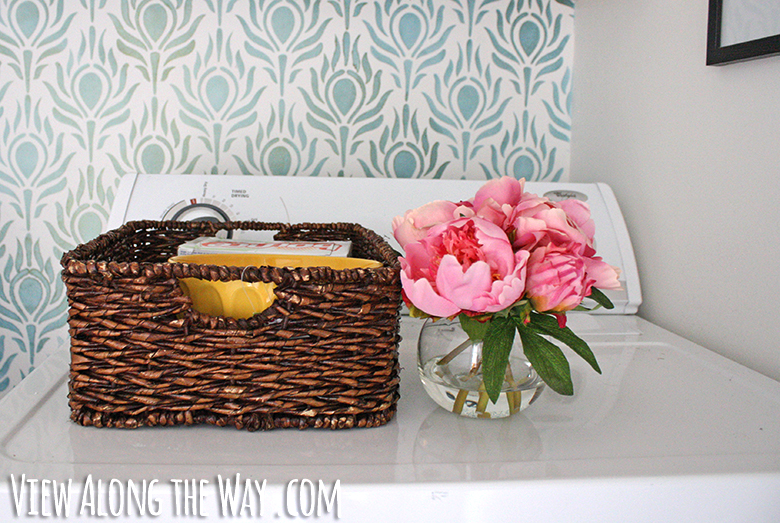
All spare change I collect from the pockets of jeans goes in that yellow bowl, which lives beside our dryer sheets in a tidy little wicker tray.
And here is a universal life truth: you could plop a few pink peonies on an old crusty toilet and it would instantly look beautiful.
But why are we talking about dryer sheets when we haven’t even mentioned *THAT LIGHT.*
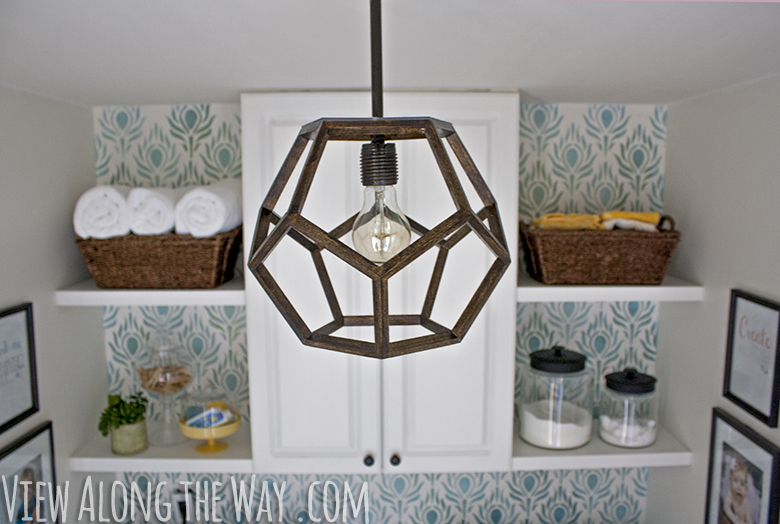

That is the very dodecahedron light I challenged my brilliant husband to make and he DID it. Without breakin’ a sweat. It’s our DIY version of the Ralph Lauren Dustin pendant which costs $440 for the small version. You can see how we made it, and how you can have your own, right here!
I am madly, deeply in love. Every time I look at it, I feel giddy-happy.
And also? It cost us about $10. (And a lot of hours.)
Andy proclaims it to be his best work yet, and that kid has made some pretty amazing things in his time. *Happy sigh.* (Click here for the details on the light!)
The wall on the left is still empty for now. Eventually we want to add some kind of ironing board storage – right now the ironing board is propped up against the wall in the master bedroom – and some hooks for clothes hangers, but I can’t tell you how much more useful and comfortable this room has become already. It’s a happy place.
Now let’s see how we did on cost!
Painting the Floors
- 2 gallons of porch and floor paint: ~$55
- TSP cleaner: $7
- Sandpaper, paint brushes and rollers, painter’s tape: Already had on hand.
- Total: $62
Dodecahedron Light
- 8-foot piece of poplar: Had on hand (normal cost is about $7)
- Stain and poly: Had on hand
- Small piece of acrylic to hang it: $5-10
- Pendant hardware: Hacked a pendant we bought at a yard sale for $3
- Total: ~$10 (!!)
On the walls:
- Paint: One gallon of wall paint: $25. (Trim and ceiling paint were leftover from the rest of the house.)
- Stencil and stencil creme: Stencil creme was a prize from the Haven conference and stencil was given to me by Royal Design Studio. (They’re giving one away to you too right here on Thursday. Be there.)
- Cabinet: $20
- Shelves: Built out of scrap wood we already had.
- Drying rack: $25
- Art: Four frames, mats and prints: $15
- Total: $85
Total cost for this room: $157
We went over budget by $57, but I’ll call that a raging success. That light alone would’ve been $440 new!
And just ’cause we can, let’s do a before-and-after one more time, shall we?
(Yay!)
Did you think this room would ever be finished? I’ve been teasing it for months. Have you ever redone a laundry room? Is there anything better than having a finished room? (I submit to you that there is not.)
P.S. Just click right on over here for more room makeovers!

This post contains affiliate links.
 Hi, I'm Kelly. Glad you're here! This little blog is where I chronicle our efforts to fix up our beaten-down home on a tiny budget. We're not there yet, but here's a peek at the view along the way...


Hello Gorgeous!!! I love love love it! Not sure what I love more, the striped floor or stenciled wall, the .light fixture, ok, all of it! I just posted how i am repainting my laundry room today and here this is to inspire me. WOW!
Going to really love this pin not very crafty but going to have ball trying so many thing to chose from…cool
I was scrolling and scrolling waiting for THAT LIGHT FIXTURE to be mentioned! haha. I downright love it.
Kelly!!! It’s beautiful!!!!!! I love the stencil, the way you placed the cabinets in the middle of the shelves, the FLOOR, the light!! The drying rack! It’s fantabulous!!!
OMG everything is so flippin’ gorgeous!! The stencil, THAT LIGHT (big props to your man), and the storage! It looks amazing and what an awesome feeling it must be to have only spend $157!
oh, wow–I LOVE it! I’m very excited to read the posts about painting the floor and the light. I think DH would make me a dodecahedron light tomorrow if I asked (and could tell him how). Math and building stuff are two of his favorite things!
I’m going to call it right now and say that this will be your most popular post of 2013 — THIS IS AMAZING! I don’t think there is a spot in your laundry room that I don’t absolutely-head-over-heels love. The wall! That floor! The LIGHT! The everything. I think my husband better start brushing up on his carpentry and painting skills because I’ll be adding this to his honey-do list 😉 Thanks so much for sharing (and I’ll definitely be pinning this!)
YAY!!! Congrats on a finished room! I love your stripes! I painted a linoleum floor last weekend. I figured that’s what “Porch & Floor” paint is for! I am interested in seeing how it holds up as well.
um. wow. worth the wait. amazing!!!! love the stencil, the floor, colors, light, all of it!
I love EVERYTHING about this! Bravo! xo
Beautiful!!! Will you come help me with my laundry room? Can i send pictures for your brilliant ideas? Only half kidding. You did inspire me and we paitned the walls a pretty light steel-blue color. The next step to beautiful evades me…
It’s beautiful! I cannot wait to see the rest of the posts. 🙂 I haven’t even begun to tackle our laundry re-do…but soon!!
Nancy
Kelly it looks fantastic! I LOVE the painted vinyl floors – you’ll have to go back and tell that hardware store guy that he was wrong, wrong, wrong! $157 is frickin’ unbelievable. Looking forward to the light tutorial.
I LOVE it! – The laundry room is the next room we will be tackling…I am hoping it will make spending time in there a little nicer…great work!
I’m sitting here swooning … so lovely! I cannot believe you stenciled the wall and I rushed through the post because I needed to know about THAT LIGHT! YOWZA! She’s a beauty! Can’t wait for the diy details on that baby …
🙂 Linda
It’s okay. I kind of like the before better.
I kid. I kid. It’s so pretty! Almost pretty enough for me to want to do laundry.
And that light. That light is drool worthy.
It looks amazing!!!
OH, Kelly! That space is so pleasant! I absolutely adore your DIY pendant fixture! It looks fantastic! xo Kristin
Ok, I NEED all of you to come immediately to my house and redo my laundry room. I have been dying to start on it but lack of $ is the biggie reason it isn’t done. One question, is that a waste basket between the washer and dryer? It looks so nice!
PS I will cook while you are here, think of it as a mini-vacation while both of you work. lol
This room looks amazing!!! When I tackle all of the other mess in house, the laundry room is definitely on the list. Yours looks fantastic. Great job.
I cannot believe how INCREDIBLE your laundry room looks! I love the layout of your shelves & cabinet–I’ll have to remember that when we get into remaking our laundry room. Well done!
dottedandlime.wordpress.com
WOW. Oh I’m so jealous! It’s beautiful. Love the stencil and the LIGHT!
The painted floors are right down my alley.
WOW!!! It looks amazing! I cannot believe that floor is painted! Everything seriously looks incredible!
Also, I am super jealous of that drying rack deal that you scored. Lucky!
Yup, you knocked it out of the park with one. Awesome, awesome job!! I hang my head in shame at the state of my own laundry room. Laundry room envy!!
Oh my goodness! It looks absolutely gorgeous! Can I please come over and do your laundry? Please please please??
All I can say is WOW! Amazing job. I love the stencil work and the color you chose – I’m a turquoise/teal loving girl, too – and the light is stunning! Great work!
Ok… Stop being so fabulous.
That looks awesome. I love the painted floors and the nice storage you have.
Lisa
Creative Raisins
See, I don’t know. That humongous border that borders on being wallpaper was PRETTY sweet.
😉
I kid. This is all fantastic. The colors, the style, the PRICE… amazing. Highly inspirational. Thank you for sharing.
This room is beautiful!! I would be doing laundry all day, with a smile on my face no less…
WHAT! My brain is exploding too! I’m seriously, seriously impressed. The walls! The floor! THAT LIGHT!!! Fan-freaking-tastic. All of it.
It looks awesome! You are motivating me to get moving on my own laundry space. I especially love the clearance drying racks!
Did you keep some of that wallpaper for your home scrapbook? 🙂
This is beyond gorgeous!! I love soooo many things. That light is unbelievable. Seriously… I must have it! The floors are gorgeous too- way to go against “expertise” because it looks amazing! The only downfall may be that you couldn’t work that clothesline border into the new design… Please come build and then decorate my laundry room! haha.
Dear Kelly,
Please come over and re-do every room in my house.
Sincerely,
My brain can’t handle your awesomeness.
No seriously, your laundry room is FABULOUS!!! I can’t get over the fact that Andy MADE THAT LIGHT!!! What?! And those floors!!! I can’t. Amazing. Simply amazing 🙂
That was WELL worth the wait! My first thought was ooh! where can I get that beautiful wallpaper? The work you put into stencilling paid off- it’s gorgeous! All of it. You rock.
OH MY GOODNESS! THIS IS RIDICULOUS. I’m sooooo jealous of your laundry space…it’s beyond fantastic! And that stencil….that light?!?!?! I want…no wait…I NEED them both! Great job! 🙂
What a amazing transformation, love it all!!!
Wow! Love your laundry room. This is magazine worthy, my friend. Initially, I thought it was wallpaper at the back of the wall it’s stencil. Love your mad skills. There is so much to love, the light fixture, the stencil, the striped floor and the way you styled the space! Great job, you both!
By the way, I am hosting a fabulous giveaway! Come by and enter for a chance to win $100 credit towards some gorgeous wallpaper/ mural/ decal if you like!
http://www.mixandchic.com/2013/01/giveaway-100-wallpaper-update-gift-card.html
This is a giveaway you don’t want to miss!
Jessie
http://www.mixandchic.com
OMG!! This is amazing! I love it ALL. I just can’t even pick a favorite part. But, I will say that I’m amazed painting over vinyl work — way to take a chance 🙂
oh. my. word.
This is sooooo gorgeous!! I cannot wait to read about the painted vinyl floors – every bit of our house has the most disgusting vinyl flooring and I’d really like to redo it on a budget!
Also, this is weird, but can you do a post about your cloth diaper choice/routine/thoughts/suggestions? I need some help from my cloth diapering mamas. (Or if you did I’ve forgotten.. have you done one?)
You never cease to amaze me – I absolutely LOVE this!!
SHUT. YOUR. FACE!!!! This is freaking amazing! Oooooh I so so so love the stencil, I was sure you got some fancy shmancy wallpaper at some super discount but no – you just have awesomeness growing from your fingers like nails. (that totally sounded better in my head)
I love the light fixture, so lucky to have such a handy hubby!! And love love love the stripey floors. Oooh and the pretty stuff on the shelves. And the drying rack!! I need to get something like that. No idea where the heck I’d put it. I don’t have a laundry room but if I did, it would totally wanna look like this. I just know it. Fabulous my dear!!! xxx
Well CRAP! I just photographed my laundry room this morning, sat down to edit pics, and then saw this! (Buries head in sand!) Girl, this is gorgeous! You knocked it outta the park, and that LIGHT! I’m speechless! Beautiful job!!! xo
Holy COW, this looks awesome!! I LOVE it! And that stencil work is FABULOUS!
Can’t wait on the details for painting the floor. I’ve been thinking about painting the floor in our powder room but haven’t had the nerve yet.
STUNNING. You could charge big bucks to rent out Andy. Seriously. The stencilis gorgeous. I will never stencil. You should rent yourself out to stencil – I’ll babysit the kiddos. WAY TO GO!
Holy cow, you were keeping all this laundry room deliciousness to yourself! Amazing, colorful, fabulous. Home run!
xo Heidi
That room is beautiful and for only $157, I think you did fantastic! Yes, you went over budget but you redid that ENTIRE room for only $157! AMAZING!
No wonder you were so excited about this…it’s amazing! I love, love, love the floors and stenciled wall! The hanging racks are fabulous, and the cabinets and open shelving…just awesome! I am super jealous of this one, because my laundry “closet” is under our stairs…not much I can do at all.
Love love love love it!!!!! You took something “functional” and made it “happy”. Seriously when I looked at your final before and after pics, I sighed with contentment.
It looks amazing. And I’m in love with that light, too. I have the perfect spot for it in my house. Wait, what? You’re giving one away? I’m the lucky winner? I’ll email you my address! Thanks.
O.M.G. I mean, seriously, you MADE that light? I’m impressed, draw-on-the-floor impressed. Totally worth the 6 month wait! Pinned:)
Jessica
It looks amazing! I love that stencil. And that light?! I’d never guess it wasn’t purchased for AT LEAST $440. 😉 I’m pretty sure that since you saved $430 on the light you can now go buy $430 worth of gummy worms to indulge in.
Yay – well done, it’s beautiful Kelly!!! I love that stencil wall and the stripey floor and WOW on that gorgeous pendant!!!
absolutely worth the wait. Just gorgeous!! But I must tell you, my laundry room is literally half the size of yours. Yes half. It’s depressing. I so wish I had a bigger one. You packed a bunch of punch into such a small space. I can’t tell you how much I love it!
I love it so much. Seriously, it’s my favourite laundry makeover of any blog I’ve been reading in the past 2 years. That light is to die for as well.
I have a question though, I love the paint color of the walls. Not the peacock ones, but the wall the drying racks are on. Are those atrium white as well? It seems like a different color. Pleaseee tell me. I have been dying to find a good gray white for my kitchen! Thank you 🙂
The walls are all atrium white, but it’s not very gray-white, at least not to my eyes. (I wouldn’t trust my photography skills to accurately translate the color either!) It’s more of a clean, warm white in my opinion. I see pink it in but everyone else says I’m crazy when I suggest that. 🙂
Looks wonderful Kelly!
Two questions: how big is your laundry room?, mine is teeny (I think smaller than your from the pictures/layout), but I’d love to try and squeeze some of this in if possible (I have those impractical wire shelves and storage issues like your b4 pic.
also, we live in the same vicinity, do you think those marked down racks are still at Ballard?
Thank you! I think our laundry room is about 6 x 9 feet. I picked up those drying racks a long time ago – I think last summer – but it’s worth a check! You could always call the Ballard’s backroom and see if they have any. It’s like a Ballard’s outlet store, and since they still sell that drying rack, I’d bet they still have to offload some damaged ones now and then.
It looks sooo good! I can’t wait for your post about painting the floors!
Wow! What an amazing transformation! It looks great! I love the pattern on the wall and the stripes on the floor. They go so well together. You’ve made it functional and totally beautiful! Enjoy…and want to stop by my house? 😉
Holy crow, girl!! It is almost as stunning as you!!! I am so in love with every part of it, but those floors made my mouth hit the floor!! Now I want to copy you EXACTLY for my laundry room (that has been ignored completely for the 5.5 years we have lived here)!! Off to share now, you rock!
I want your stencil wall! SO GORGEOUS!
amazing
beautiful
gorgeous
make me a light like that NOW!
I LOVE YOUR LAUNDRY ROOM! I am jealous of your laundry room. weirddd
Gorgeous! I love the striped floor and the stencil wall. Really, really love it!
Holy cajolies, I love it. Everything is perfection. Don’t even get me started on how awesome your husband is for making that light. My favorite part is the stencil paint. Did you spend forever dipping and mixing and blending colors or is this just special magical paint that does that itself? Please tell me your secrets!
Ack! I think I’m going to faint from how awesome this is!
Wow! Looks amazing. Huge improvement. I love that floor paint. I would’ve never thought of that. High five!
I just found your blog through pinterest and I am so happy I did! Your laundry room makeover is awesome! Looks wonderful….I would love to have a laundry room just.like.this.
Holy worth the wait!!!!
That floor! I SO need the deets on how you did it. I wanna paint my laundry room floor so bad! Who knew you could paint a vinyl floor?? Awesome. I love it all Kelly! You rocked that laundry makeover.
Oh em GEEEEEEE! It’s amazing. And awesome. And almost makes me want to come and do laundry. Well done!
She’s so purdy!!!! Well worth the wait!!
Totally love it, Kelly! Great job! Can’t wait to hear more about that light fixture. I might come steal it.
I can’t wait for the post about the floors! This room is gorgeous and re-doing our laundry room on the cheap has been on my list since we moved in. Tons of inspiration here. You did a beautiful job!
Your laundry room looks gorgeous!! I love that stenciled wall, the striped floor, & that fabulous light fixture!! Well done girl!!
Every single part of the room looks amazing! Great job!
Wow, every single little bit of your laundry room looks absolutely gorgeous, Kelly! I hope you’ll go into more detail about the floor, because I’m currently helping my sister redo a bathroom, and her vinyl flooring is yellowed, but they’re not ready to replace it yet. I wonder how paint would hold up in a bathroom, though. Love that stencil, and your hubby should go into production mode and sell those light fixtures!
Wow!!! Fantastic job you both did turning your laundry room into a magazine worthy space! So functional but gorgeous too! I’m smitten with your new light!
Feeling so inspired right now. I’d love to paint our floor, but how did you do laundry whilst your washer and dryer were away?
Oooh! I love it! I’d totally live in this room. I’m digging that wall stencil and the striped floors. High five for getting the laundry room done, friend!
Seriously? This is amazing. I LOVE that stencil and the colors you used. And the light fixture is amazing. AMAZING! Seeing gorgeous laundry rooms like yours, makes me continue to hate that I don’t have a laundry room in the house (it’s in the garage).
You did an amazing job! My goal this year is to tackle my laundry room and you have given me great inspiration! I love the shelves on the sides of the cabinets. Could you elaborate on how your husband made those and how they’re hung? Have a great week.
Leslie
It’s basically just a piece of plywood as a shelf. There are little strips of wood screwed into the wall and the side of the cabinet, and the shelf is screwed into those strips. You can kinda see the strips of wood that the plywood shelf is sitting on in the pics. I hope that makes sense!
I have an ironing board that is stored in the wall. It fits in a cabinet that fits between the studs. You can buy them at any home improvement store.
I’m swooning right now over your new laundry room. I mean, I might even be drooling. just a little. 🙂 It’s so beautiful!! I’m completely giddy myself just to see the tutes on how you made the light fixture which is every kind of awesome and the painted floor! We have that same funkified linoleum in our master bath. Now if only there was a way to make the clothes fold themselves. !!!! 🙂 Pinned for inspiration on my future laundy room makeover!
I also thought you had wallpapered. The stenciling is awesome as is the entire room. Great Makeover!
So pretty and I’m sure much more functional!
wow. i found this post via pinterest and i absolutely LOVE this room! you are incredibly talented. i hope you don’t mind, but i featured this room on my site just a few minutes ago. check it out here- http://www.2ndandstrand.com/1/post/2013/01/laundry-room-makeover.html
Love the stenciling and the painted floor! Can not believe you MADE the light fixture. It’s awesome!
Oh. My. Gosh. I just stumbled onto your blog because I fell in LOVE with a picture of your laundry room on Pinterest. I love your writing style and your home is beautiful! I’m definitely going to become a regular visitor. : )
Really, really beautiful. Isn’t it great having a husband who not only can do these projects we come up with but WILL do them?! You mentioned hooks for clothes hangers… We hung a towel bar underneath the cabinet in my laundry room (attached to bottom of cabinet). You have the perfect spot right under your cabinet in between the washer and dryer. They’re great for hanging some of those heavier items that can be a little scary on a drying rack as well.
All good…
Beautiful room! You did a fantastic job! Question for, I’m also considering adding a wall mounted drying rack in my tiny laundry room. Do you feel like it leans too far into the room (as in gets in the way of accessing your dryer)? It’s so hard to judge. Right now I’m using a standing drying rack which is ok, but the wall mounted option is very intriguing. Thanks for any insight you can share!
It’s in the way a little bit when it’s down, but it stays up most of the time. You could also shorten the strings so it leans out a little less than normal. It’s worth it to me to have the floor space instead of using our old drying rack.
Lovely and so inspirational as I’m approaching my laundry room redo. I have a small budget too, love the idea to paint the floors. Found you from a pinterest search. Also, I have a Mila too 🙂
This is so pretty! And functional. I love it. Good job.
We did our bathroom last year – you can have a lookie here:
http://jessicaletchford.com/2012/03/22/renovated-bathroom/
And sometime this year our family is going to redo the laundry, hopefully!
Ohmygoodness! LOVE the floors and the stenciled wall. Looks absolutely fabulous!!!
Where did you find those great canisters you store your laundry detergent in? I have been looking everywhere for ones like those and have had no luck! Also, are they airtight?
I think I got them at Ross and Garden Ridge. I think they are airtight but I’m not 100% sure. I saw some at Marshalls and TJ Maxx too! Good luck!
This make over is amazing. The room looks happy, and bright. Very clean and crisp. The stenciled wall is my favorite. I just knew it was wallpaper and was thinking when is she going to post where she got the wallpaper.
This looks amazing Kelly!! Just beautiful, I love it!
Holy cow! I’m totally not going to lie and say I read the whole post because I didn’t. As soon as I saw the reveal picture my mind went crazy! Our laundry room looks EXACTLY like yours did before the remodel. Um, I knew I wanted to change the shelving in our room (I despise the wire shelving) but your reveal is absolutely amazing! Okay I’m going to read the post now, I just had to get out my awe in the heat of the moment… =]
I forgot to reply again once I actually read the post – I did go back and read it! I’m kind of intrigued by the painted linoleum/vinyl BUT I don’t think my husband would be down for that… I think we can find some (not cheap but) inexpensive linoleum to put back down though. I just read your About Me and loved it by the way. We moved into our house almost two years and so much has happened since then that we really haven’t been able to work on our home like we want to. Plus we have a tiny budget. I mean, really small. Almost non-existent. When I read blogs and they say things like, “DIY” or “Budget Make Over” etc. etc. and their budget is $2000 or more in my head I’m like, “… that’s a budget?” When I read that your budget was $100 I was totally excited about reading it. I know that means that you have to hit second hand stores which I’m totally fine with! I think blogging gets a little discouraging when you want to do things on your own and you want inspiration but it seems like everyone’s “budget” is double what yours is. (Okay, so I really don’t know where all of that came from, maybe frustration?? But I’m done venting now. Ha!) Sorry. Anyway, I looove this post and I think I will hit the ReStore here in the next couple of months! Woo!
Found your link on The DIY showoff link party. LOVE your laundry room. The stenciling absolutely makes the room and you are a VERY patient lady to take that on, but it totally paid off! I just started blogging and linked up my first project at the party if you’d care to take a look! 🙂
WOW! I cannot believe how gorgeous that little room looks! And there are so many fun things… like the painted floor, that’s genius I tell you! I love that room probably almost as much as you do and I hope to have one that cute soon! :o)
Tania
Hi, can you tell me where you bought that stencil. It is EXACTLY what I had in mind for my bookcases, and now that I have seen your beautiful laundry room I can’t find anything else I like as well!
Your laundry room is so stunning, the only thing missing is a chair. I’d want to sit in there to enjoy all of it’s awesome-ness. 😉 Beautiful job!
Great budget makeover!
Such a pretty room <3, did you repaint your appliances, they look new.
Thanks! Nope, those are the same appliances in the same condition.
I love this! My little laundry room could certainly use some life (and a light, too!).
Love the stencil, love the makeover. That light is just mind boggling. Wow, I looked at how he did it and that’s certainly something for the patient. Not me! Brilliant! No pun intended, ha!
Wow! Love it all!
I’m in love with your laundry room, especially the floors and light! I almost wish we had crappy linoleum (instead we have boring old ceramic tile) just so I could paint it like yours.
You mentioned peeling off the laminate on the cabinet doors…We have a few doors that have peeled as well and I wonder if it would be worth it to peel and paint it. How is it holding up? Would you recommend it?
Thanks!
I keep meaning to write a post about this! It worked well for us and is holding up perfectly. We peeled it off in large sheets, then wiped off the glue with a wet cloth. I’m not sure that step was necessary though. It probably depends on how old your doors are and how well the laminate peels off. In our case, it was really easy and I’m glad we did it.
Thanks for the quick response, Kelly! I guess my biggest concern is that the door itself appears to be some type of mdf (mine anyway). If it gets wet, it expands and ours are in the bathroom and kitchen. Maybe I’ll tackle the master bath door first to see how that holds up since we’re really the only ones that see it.
Thanks for sharing!
Kelly! Wow, I love everything about your laundry room! We have lived in our house long enough that it is time to start the redo process and one room we have to do is our tiny laundry room. I love your idea of stenciling the wall behind the cabinet, beautiful! I love what you have done with the rest of your home as well. Like most of us, I am on a low budget as well and it is inspiring to see what you can create with little money. Just beautiful!
xoxo Michelle. thebashfulnest.blogspot.com
I like that light fixture! You can hear my mom complain “But you can see the bare bulb”! LOL
What a beauty! Great job! I have been wanting to redo my laundry room and you have given me the inspiration to get up and get going!
I love the stencil in your laundry room! I painted 3 of the 4 walls in our laundry room — and have yet to get to the fourth! Maybe I should stencil that last wall (the one behind the machines) — I love the way it looks in yours! Congrats!
I am lazy, too! 😉
WOW! AMAZING!! I’ll have to send this to my mom for sure!
Beautiful ! Thanks for sharing, you did an amazing job! The secrets are priceless, the stenciling is very nice also! it turned out perfect! And the colors excellent choice. You did magic with that budget! but also consider all the hours you put into it! you must be feel very proud about result.
Oh my goodness. This has to be the prettiest laundry room i have ever seen! Makes me want to come and wash your clothes just so I can stand amidst the prettiness. Lol What colors did you use on your stencil!? I saw this on pinterest and assumed it was wallpaper. Amazing job!
Thank you so much!! I used a stencil creme from Royal Design Studios. I think it’s called Patina Green, but it’s what gave it that iridescent look. Hope you’re having a great weekend!
This is absolutely adorable! My boyfriend and I are renters so we have some issues with changing too much in the house, but we would love to be able to actually LIKE being in the laundry room. Ours is more of a narrow walk-in closet really but still – as we both work in messy places we do laundry A LOT! Thank you so much for sharing this beautiful room! You’ve given me some motivation to see what we can do about ours!
Hi! Wanted to let you know that I love this laundry room design and I’ve featured it on my blog here: http://www.marshallhousematters.com/2013/04/laundry-room-awards.html
Hi – Wanted to let you know that I loved this laundry room makeover and featured it on my blog here: http://www.marshallhousematters.com/2013/04/laundry-room-awards.html
Oh my gosh, I LOVE YOUR LAUNDRY ROOM!!!! I’ve been searching for inspiration and you have provided that in spades! 😉 Thanks for sharing!
Richelle Nicole @Dollusions
Im grateful for the blog post.Thanks Again. Want more.
Words cannot express how much I love your laundry room. I wish you could come give me ideas for my dirty, dark, creepy, bug covered basement laundry room. Also love the drying rack…although if I had one, my neighbors wouldn’t be treated to seeing my son’s diapers drying on our deck railing : )
I found you through I Heart Organizing, and I’ve Feedlied you, which is a way big thing to me! Thank you for the printables (#love), and your awesome ideas. Great job! Off to read your other posts while I should be doing something else. You know how it is… 🙂
Oh my word…I LOVE IT! We are in the middle (towards the end…FINALLY), of re-doing/creating a laundry room in our house! One of my favorite details is the bible verse art….think I might steal that idea for our laundry room. Way to go, girl! Glad I stumbled across your blog today… I’m following! 🙂
You and your husband did a beautiful job on your laundry room. How did you move the washer and dryer back into the room without damaging the painted floor? I’d love to try this in my laundry room. 🙂
Thanks Ann! We moved them verrrrrry carefully! 🙂 We put a little piece of felt under each leg and slid them across. We were SO NERVOUS, but it ended up being no problem. Good luck!
WOW! This looks awesome! Just a thought, if you decide you still want a little bling you could always do a little modpodge/glitter on the edges of the shelves. Would add just a touch of blingy glitter without going nuts 🙂
This is so inspiring! And beautifully well done! I am redoing my laundry room and your cabinet shelf configuration is precisely what I was looking for. Would you mind telling me more about how your husband hung them? I have a Kregg, and was wondering if he had studs to hit r did he place a joist between the studs, or did he just shoot right into the sheet rock? Please, Please tell me that he didn’t have to place a joist! I already had to do that to hang the cabinet, and I really, really don’t want to do that again LOL.
Thanks!
Thank you! He hit a stud on the wall side, and the shelf is resting on a little piece of wood (can’t think of what that’s called!) which is also screwed into the wall. (You can see what I mean here:http://viewalongway.wpengine.com/wp-content/uploads/2013/01/ed_WMIMG_9708.jpg) The studs that he screwed into aren’t in the ideal place… they’re kind of in the middle of the shelf, but he just caulked like crazy and they’ve been really sturdy since. Good luck with your laundry room!
Kelly
Thanks so much for fast reply. Aren’t builder’s grand, the way they put studs right where we need them? Yeah…not so much. I was thinking about using little whatchamacallit braces, but was afraid they would be way too visible, but I can’t even see yours! Looks like he put a little face on the front of the shelves? Sorry for asking so many questions. This is why all my projects take so long. I get bogged down in the minutia. :/ Thanks again for taking the time to reply.
And by the way, the BHG photo is stellar and well earned!
Thanks!! Yep, he put a little face on the front mostly just to make them look chunkier instead of like they were made from scrap plywood, which they were. 🙂 We did the same thing on our bookshelf wall: http://viewalongway.wpengine.com/2012/03/the-office-built-in-wall-is-finished/. Total cheater move!
Hahaha! It’s not a cheater move. It’s called custom trim work! 🙂
What a fab job on this project! FYI; I buy sheet flooring at the box stores (usually 6×9) and prime the back side for murals and floorcloths. If you have pets, it’s way better than traditional rugs and you can match any decor or colors. I’ve occasionally done the embossed side for texture and haven’t had a complaint about wear. I just give it a couple of good coats of water based urthane.
Wow! I just saw this lovely room featured in my June BHG magazine. One snoopy question: did they style in those Method wipes or did you switch things up? (Just curious because when I saw those I instantly wondered why anyone would have THAT many containers of wipes. But maybe they really are yours and you’re just really into cleanliness…?) I’m glad I came to see the full feature, because your unicorn jokes were the best!
Noooo! We are not into cleanliness at ALL. hahaha. 🙂 They brought in a LIFETIME supply of wipes. I seriously don’t know how I’ll ever use them all. You should see all the clothespins and yellow sponges they left behind too! 🙂
Thanks so much for stopping by and saying hi!
OMG!!! This is A.M.A.Z.I.N.G!!! I just love everything about it!! We’ve just bought our first home…and I have a European laundry….it’s cute and teeny…and I can’t wait to D.I.Y the living daylights out of it!! I love your work…just inspirational!!
I saw you (and this room) in Better Homes and Gardens!!!!! How cool is that? Great job!!! Now you must add BHG to your featured page! :o)
cute! i like how you did the cabinet in the middle and left the open shelves on the outside.
Hey, I just wanted to let you know that your laundry room was featured on my blog here, I’d love it if you came by and grabbed my Featured On Button!
Merrit
Label Me Organized
You did a great job! I would probably have found a wallpaper I liked instead of having the stenciling project hanging over my head. It would have gone up in a couple of hours. I have painted vinyl floors myself. Ours had those little diamond shapes on the corners of the squares in a dated sage green. I masked them off with painters tape and filled them in with black gloss rustoleum using a small paint brush. Magnificent! Somehow the solvents in the rustoleum bond/melt with the vinyl and it wears like iron. So far (5 years and counting) they’re not showing any wear or scratches.
This turned out great! I love your work! I can’t wait till I get my own house so I can use some of your ideas because they are amazing!
Just found your blog and love it! I featured/shared your laundry room makeover on my FB page.
https://www.facebook.com/pages/13-Canadian-Cottage/212948478842264
Hugs, Diane @ 13 Canadian Cottage
Hi Kelly ~
I wanted to let you know how much courage your laundry room make over gave me. No stranger to renovation, we recently acquired a warehouse that had been vacant for 15 years! You can only imagine the splendor that needed to be cleaned up before we could even begin renovating!
Using the ideas that you gave me, I am going to paint the floor of the break room, office kitchen, bathrooms and halls! These areas would otherwise require tile . The project is something that will keep us busy for the rest of our lives!
We wouldn’t be where we are if we weren’t hardcore DIY’ers. Rebels all the way! Great minds think alike! 🙂
I was wondering what the dimensions are for the cabinet. Thanks! Love the room
Oh bless you. You make me feel not so crazy, like I’m NOT the only person who stands for a solid 30 minutes looking at a finished project just because I’m so happy with it or who leans against the doorway, staring into a room, trying to figure out just the *right* things it needs to finish it off (or ways to tear it apart). When I finished my hard fought battle with the Mister for the nautical theme in our family room (like you, the wall above the fireplace looked like there had been a paint can explosion of every aura) and it was done I sat in that room for hours, just looking at it, taking it all in. I can certainly understand why you would just go to your laundry room just to go, even when you don’t have laundry to do.
Yall did a wonderful job! This has given me some inspiration and ideas for my own home!
I love this! My laundry room is screaming for a makeover. It’s actually a laundry closet and so not functional. Your lovely laundry room has given me lots of great ideas. Thanks!
You have given me hope for my laundry “area”!!! My fiance and I just built and moved into our first home and the ONLY thing I don’t like about it is that the laundry is in the garage. Now I have a clear vision of what my little laundry nook could look like with a little bit of hard work!!! Thank you!!! Yours is beautiful!!!!
I love this tutorial. I’m about to do a very similar post on my blog about our laundry room! We just knocked everything off the walls and are starting our painting tomorrow! We’re also on a budget, so I’ll be keeping track how much we spend. We’re buying new cabinets so that will be our biggest expense. I also just spend an absurd amount of time going through your blog…my husband is a math teacher as well! I’ll be back…gotta go to sleep! 🙂
I absolutely LOVE your laundry room redo. Been looking for ideas for our redo and found lots of good ones here. Since your room is about the size of mine I was also thinking about how to store my ironing board. What about this: what if you raised the washer & dryer up on a platform and slid the board underneath? Just a thought, off to look through your other redo’s!
Just wondering….. Where did you find to stash the ironing board. That is always a problem for me.
It’s a problem for us too! Right now we don’t have a good spot, but we’re working on a solution right now and hopefully we’ll be able to post about it soon!
Oh my gosh no joke, our laundry room looks like your before pic… Nothing horrible… Just no storage. Well my husband is out of town for a week and I think I know what I’m going to do. Thank you for the awesome inspiration!!!
Adding my comment to the many many many you have already received on this post, but WOWOWOWOWOW this laundry room is AMAZING. I love that you painted the vinyl floors too- how awesome!!
Seriously, my mind was blown by your laundry room transformation. Your post totally inspired me to transform my own laundry room! I recently started my own blog (www.trappeddesigner.blogspot.com) and credited you for my laundry room inspiration. I also added you to my blog list because I LOVE your blog. Thanks so much for the inspiration! -Tasha
Hi there! I’m not much of a blog follower, but your site is inspirational! I can’t wait to tackle a list of projects I’ve been too nervous to start! Thanks for sharing!
I LOVE your updated laundry room! I think my absolute favorite part (besides that head-over-heels awesome light) was that I saw the cloth diapers hanging on the drying racks. Everyone thinks I’m crazy for using cloth, but I love them!!! 🙂
I love your laundry room makeover! I found it on pinterest and pinned it to my own board to save it! I want to re-do my laundry room. New follower here!
Wow!!! So pretty. I’ve seen these photos often on Pinterest and I was curious in how you did this. I’m looking to buy a house in the next few years, saving like a mad person, so I wanted to see what you used and how you did it. I am so happy to see that you are a budget person and careful with your money. I cannot wait to do a DYI like this someday. Looks so beautiful!! When I get my house, can I hire you? 😉
This has given me the inspiration and motivation to try and spruce up my laundry room. Mine looks a lot like yours did in the before picture. I cannot wait to start! Thank you!
Hello again!! I was wondering what paint did you used for the cabinets? The Atrium White also? Another question. I am trying to decide which brush I need to buy. I see that you got more that 1… can you tell me which one you used? the 2”? Thank you!!
We used the Atrium White for the cabinets too. I like the angled 2″ brushes for painting trim and the details in the cabinets. We used a roller for just about everything else. Hope that helps! 🙂
Truly beautiful. My favorite part is that you worked to make something beautiful and happy for YOU. Isn’t it great to know what you like and be able to create it? Bravo.
Love this!!! Our kitchen floors are so nasty yet my husbands refuses to do anything until we redo the entire kitchen! My stepson is off to college in the fall so that is a few years away. This I can actually do myself and not spen a fortune! Do I dare do our high traffic kitchen like this???
Ha! If you do, I’d love to hear how it holds up! I’ve had a few friends try it in a bathroom with good results but I haven’t heard anyone report back on a kitchen.
I love that your goal with this room (other than convenience, of course!) was to make you happy… And with that you created possibly THE MOST pinned laundry room I’ve ever seen. (Yes, I spend a lot of time on Pinterest :P). I think that’s what makes the most beautiful and exciting places – not following trends, but your own heart and sensibility.
I was so excited to find this lovely make over on a small laundry, but was saddened to find that there was no explanation on how you made the is DIY wall mounted drying rack. 🙁 I can’t find ANY store that has anything like it mounted on the wall. How did you do this? Where do i find a drying rack like it?
Thank you for your help.
I love your laundry!! 🙂
Yes, please tell us how the laundry rack tilts.
There’s a hinge on the bottom and it opens out. There are cords that keep it from opening all the way out. 🙂
Add a dowel rod for your clothes hangers! Mine is the length of the entire wall and it uses the “wasted” space between my shelf and washer/dryer.
You inspired me to redo my laundry room. I love your website. How did your husband attach the side shelves to the cabinet and wall. I am wanting to do the same thing but don’t know how. Have the cabinet but wanted to add the side shelves like you did. Thanks for your help!
Karen
Hi Karen, we screwed small boards into the wall and set the shelves on top, then screwed the shelves into those supporting boards. You can see the supporting boards under the shelves in this photo: http://viewalongway.wpengine.com/wp-content/uploads/2013/01/edWM_IMG_9706.jpg
Good luck!
It looks so great! Did you guys hook up the washer by yourselves?
Thanks! Yes we did.
I love love love what you’ve done! You’ve inspired me to attempt my laundry area. 🙂 The light fixture is a beauty.
Hi! I just found your website through Pinterest, and had to tell you, I have had the BHG picture of your laundry room hanging on the wall in my laundry room, (similar size) and am just ready to start putting together the supplies to do it. Just wanted you to know you are my inspiration!
Un-nastify…I love it! I was to adopt that word and make it a permanent addition to my vocabulary.
Brilliant job on this room. Who knew a laundry room could be so pretty? I love the stenciling on the wall.
I just read a couple of your blog posts and they made me giggle several times! I thoroughly enjoyed your unicorn references. Oh and the room makeover…that was enjoyable too 🙂
hi..friend.. wah ! i like your laundry room..so nice , i put your picture on my blog.. i want share with my friends.. it make inspiration for us.. thank you
So, somehow I’ve been under a rock and not reading you. I adore you. You’re hilarious, talented and kind of amazing. LOVE this room. Love it. I’m snagging that vinyl trick for our small bathroom. And I’m subscribing right this second.
Loves it!
Shannon
I was interested in your deck over patio project – and have a similar situation. But how do you clean out underneath? I would think debris would fall between the cracks, and then there is the moisture issue. Any ideas? how has this worked for you?
Wow – I have never seen so many comments on a DIY project before – way to go! Just goes to show how many of us are desperately seeking inspiration and help on our own at-home projects (myself included). Great job on the laundry room! I found your blog while searching how to paint a Formica countertop. First, I’m going to enjoy more of your blog.
So simple and elegant and gorgeous and clean and blue and white and hyperventilate and breathe and *sigh*
Regarding painting vinyl floors. I did this with my kitchen right after I bought my house (thank you Trading Spaces…yes, it was 11 years ago this summer). I used porch/floor paint (at least two coats) topped with as many coats of poly as I could get from a one gallon can. It started showing signs of wear about 3 or 4 years ago, but has held up remarkably well and will carry us through until we’re ready to tackle the full kitchen renovation. I imagine a laundry room will see less traffic than my eat-in kitchen, so your floor should look good for quite some time!
Wow! I would love a laundry room like that. I do laundry in my unfinished basement where there are spiders and the rain comes in. It needs a lot of work. I did have some nice things for the wall in my old house, where the utility room was part of the house but I haven’t been able to use them in the new house. I’d love to get the basement fixed and less creepy then pretty up the laundry area.
I usually never comment on blogs, and I know this is an older post, but WOW! What a fantastic difference. Your room is gorgeous. You have totally inspired me! I know now that my ugly laundry room doesn’t need to stay that way. Wonderful work!
Hi there, just found your blog while reading some of Dave Ramsey’s stuff. Been following him for a few years now and I have to say that your blog about getting out of debt on his site has been my favorite so far. Quite hilarious and totally relatable! Love your laundry room makeover. Have my own nasty laundry room and this inspires me to tackle it now. Will start looking for cheap cabinets and the like asap. Thanks for the great info. Have subscribed to your site now.
Keep up the funny/good work,
Colleen B.
Hi there!
Errrmmm, whoever made fun or shunned you has it all wrong. Infact, in my world you are a hero. Like propped up on someone’s shoulders to be paraded around and fussed over hero. And a genius. Your laundry room is beautiful and there are people out there that love to make uggo rooms that get used friggen daily, more functional and beautiful. Kudos. And kudos on the diy and budget. Long live your amazing laundry room that I’m completely envious of and will soon be making it’s mark at least on my pintrest boards and probably repinned across my friends. Thanks for the share, and again, you are my hero.
Great job! Where are you storing the ironing board?
How gorgeous is this laundry room re-do!? Perfect job turning this space into a functional, stylish space! I would love to do laundry here! Thanks for sharing!
Have the floors still held up? Are they sticky at all?
I am also curious about the floors. Can you see the imprint from the vinyl floor through the pain? I hate my vinyl floor but can’t afford to redo them right now. I didn’t even think about painting them. I am not sure my husband would go for it.
I love love love the “Create in me a clean heart” print!! What does the other one on the opposite wall say, and where did you get them?!
So impressed you managed to do this for under $200. Absolutely stunning transformation.
Impresionante cambio!! La verdad que cuando tenemos un piso con poco espacio me parece un poco mas sencillo decorarlo ya que sólo necesitamos de un poco de imaginación y una pequeña ayuda de blogs como el tuyo. Gracias por compartir!! Yo hace poco compre papel tapiz en esta tienda http://goodvinilos.com/es/7-fotomurales. Hecha un vistazo que merece la pena
Ok, so now I’m just super envious of your precious house and seriously wishing you lived next door so I could run over and get you to help pick my paint colors and such, lol. Awesome job on the laundry room-it would actually make me WANT to do more laundry, which is saying a LOT. Thanks for sharing-pinning NOW. 🙂
Cannot believe that wall is stenciled!! Thought it was wallpaper! Love the light and the drying racks!! I do wonder, though, why your detergents are over the dryer instead of the washer. 😉
I, on a personal level, am obsessed with this laundry room. Absolutely obsessed. Hope you don’t mind, but I’m working on a blog for our website, “All Across Africa,” and it’s on multiple ways to use baskets per room. I’m on the ‘laundry room’ section, and I’d love to add this to it! (I know the basket wasn’t a huge deal in this re-model, but it’s just so cute in general that that picture itself would look great!).
I literally melted into my floor laughing while reading your post! Particularly about the clothesline border! I was literally crying. LOL Love your humor and love this idea. It came together very well.
Wow amazing! Very impressive! Will definitely give this a go!
such a neat tidy laundry room- a lovely addition to a home!
We are really grateful for your blog post. You will find a lot of approaches after visiting your post. Great work.
Ironing isn’t my first love but it’s not a beast with Best spray fabric starch and a good steam iron takes the work out of it. Also a wide sturdy frame ironing board.
I think if you made a ironing board cover by copying your present one or painting one with fabric paint over the one you now have and by the looks of your iron placement, you rarely plan to use it ( lol). Or by a cute twin sheet new or thrift shop or junk it shopping cover your ironing board using sheets.( always pad it by placing a blanket or flannel sheet under neath. Makes your pressed shirts look better. Don’t want to iron? Take the legs off, paint it, stencil a bible verse or saying and hang it on your left wall. Put “S” hooks on it to hold various gadgets or paint bright colors vegetable tin cans , drill a hole and hook onto the board for a handy pen/ marker or screw driver holder.
Oh, put your ironing board wedged in between W/D leaning on the back wall.
Love your make over! M
http://www.labtronixedinc.com/fume-hood.html
It is additionally a really sensible post that I actually enjoyed reading. it’s not every day that I actually have the chance to examine one thing like this.
I love your suggestions. There is a store that I love and I think you’ll like it because it has much to choose from http://goodvinilos.com/
I thought the stencilling was wallpaper! I was in shock when I found out you did all of that by hand. You nailed every part of this. I especially love that the picture frames are symmetrical so they keep the balance of the room. Amazing!
Hi! I LOVE this laundry room! We are in the process of building our house and my one negative is it’s a tiny little laundry room! This gives me some hope that it can still be functional! Do you happen to know the dimensions of your laundry room? At least how wide it is where you have your washer and dryer? It would be a big help for me to plan my laundry room project! Thanks!!
Wow. I am thoroughly impressed on all accounts…design/pretty factor, functionality, and most of all- cost! You did an amazing job being thrifty and your room turned out gorgeous! Just shows that with a little creativity, you really can have the room you want and not break the bank. Great job!
Can you share the dimensions of the room?
May I ask you how you made and attached your shelves to the cabinets? I have two cabinets, one over the washer and one over the dryer, and am looking to put shelves in between the cabinets and I don’t know the best way to do it. Your laundry room is beautiful!!
Great blog thanks for sharing!
I just love this, such a transformation!
Great blog, such a great transformation!
Just love this, fabulous design, the room is completely transformed!
Just love the transformation. The room is so much brighter now!
How has the painted vinyl held up? I can’t seem to find a vinyl in that is blue like this? Thanks for your help.
Such a transformation! looks wonderful would love to create something similar
I want you to thank for your time of this wonderful read!!! I definately enjoy every little bit of it and I have you bookmarked to check out new stuff of your blog a must read blog!!!!
I love your suggestions
Love the room. Currently working on a remodel of my laundry room. I’m wondering how is the painted floor holding up? I’m looking for a cheap way to give a floor an update without replacing.
It’s an awe-inspiring Makeover.Am sure that no one will have such as thought towards their laundry room.People will not think much about their laundry room,as well as they will not give that much importance to it while decorating their other rooms or spaces. But this blog is quiet interesting “Decorating a laundry room”,surely I will suggest these ideas to my customers also.
Laundry room reveal it was such amazing images i love all of them to watch and the content was so useful for the purpose that are made keep posting more on this
Hi Kelly,
Your laundry room looks great! I feel so inspired and I’m going to give stencilling a try! I love your before and afters and the tips. Thank you!
Thanks for your great page.
haerhehuihruiiuiuay
Oh my gosh I love your blog! You are so refreshingly authentic, and adorable. I’m impressed with the time you put into stenciling, and the absolute cuteness of your remodeled laundry room!
I would think debris would fall between the cracks, and then there is the moisture issue. Any ideas? how has this worked for you?
Woooow! I love that tile! My laundry room is in our basement and I hate it. Although, it could be worse… I could not even have a place to do laundry and have to go to a laundromat. So I can’t really complain. I love this laundry room!
just look at the laundry room it looks so amazing.it has been decorated so well by you.Thanks for sharing such beautiful posts.
Great post thanks for sharing this
I am very happy to discover your post, This is an excellent post. It is really what I wanted to see, hope in future you will continue for sharing such a excellent post.
Everytime i see this post, it’s like the first time. I think i am addicted to this gorgeous room.
I love the way you have managed the laundry room.it looks so organised with all the necessary materials required in laundry room.
Great post
Just love the transformation. The room is so much brighter now! hahaha
Post informative.
In this way, in the event that you’ve mounted obligations and can’t reimburse the advances, don’t get hindered by the telephone calls and reimbursement operators. Plan a free directing session with a payday credit union organization and end your anxiety.
So beautiful! Please tell me…after all this time, how are those painted floors holding up? I was considering doing the same thing, which is how I ran across your website…
Beautiful! Love the striped floor! Every room needs to have a surprise element that nobody expects and your floor is just that. Nicely done!
What a stunning transformation, love the colours & its so bright!
It looks amazing! Wish mine was big enought so I could take a piece of your idea.