
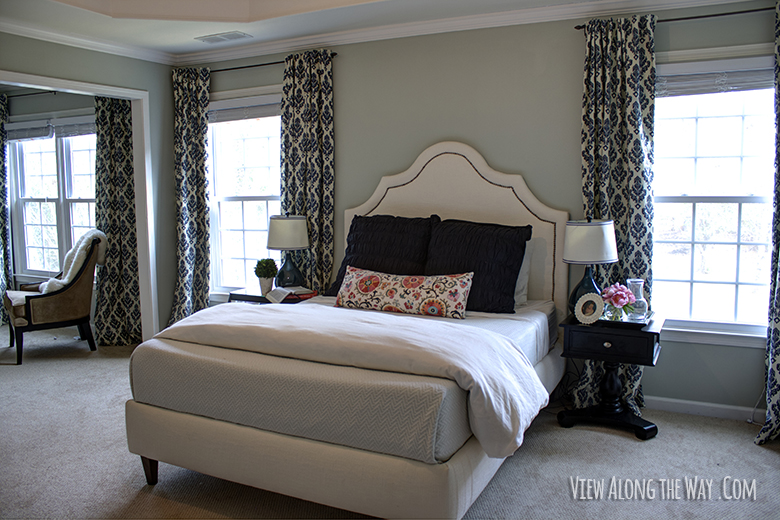
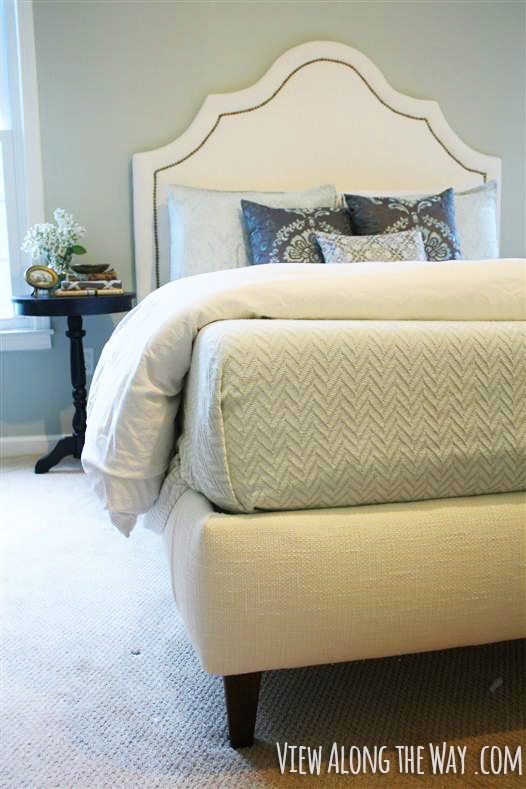
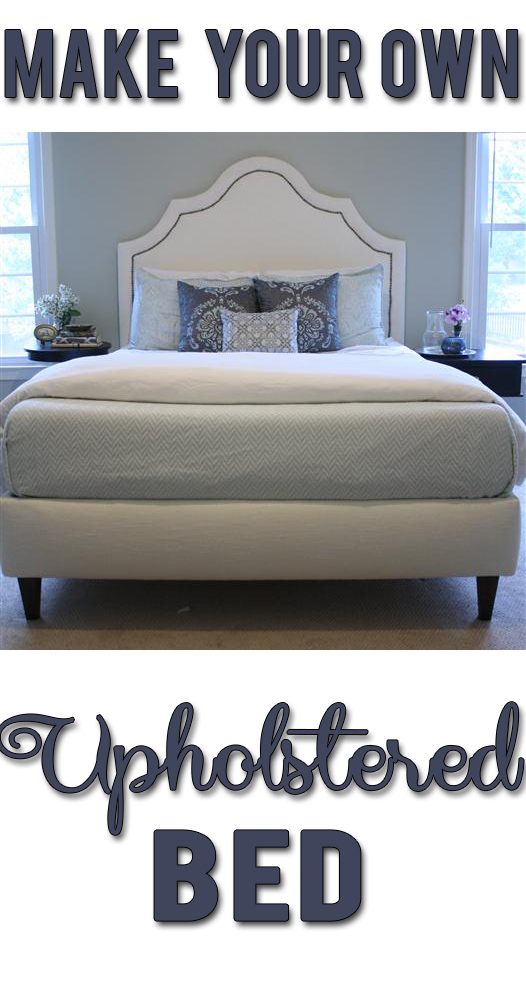
Soooo a couple years ago, Andy and I built this upholstered bed:
We were inspired by this bed by Jonathan Adler which costs about $2,500.

I blogged the whole process, and I still get lots of questions about it. I completely understand the questions, because I think the way I wrote it all out – over a bunch of different posts, with no common list of materials or costs – was a little confusing. I definitely could’ve chronicled the process in a much clearer way!
I’ve been wanting to collect the tutorial for the whole process start-to-finish all in one place so you can get right to making your own, if you’re so inclined. Plus, it’s fun to look back on how Andy and I tackled something we weren’t sure we could do. So finally, I’m pulling the tutorial all together for you – materials, costs, and all the steps.
Deal?
Okay great! (See what I did there? Give you no room to disagree?)
If you’d like to make your own queen-sized DIY upholstered bed, here’s your materials list:*
- Six yards of pretty fabric. (Here are some tips on the best kinds of fabrics for this job.
- Six yards of inexpensive muslin.
- Six yards of 8-pound batting. (You can use more or less for extra cushiness. Totally up to you.)
- Nailhead Trim in whatever finish you like. (Here’s antique gold, silver and brass.) I think mine is closest to the antique gold finish. The color on mine is called French Natural, and I ordered it from here, because at the time Amazon didn’t carry it.)
- One sheet of 1/2″ thick plywood. (For the headboard.)
- One sheet of 3/4″ thick plywood. (For the platform.)
- 12 boards for the bed slats: 1″ x 4″ x 8′ each
- 2 boards that are 2″ x 2″ x 8′ each
- 1 board that’s 3″ x 3″ x about 6′ for the legs
- 4 boards that are 1″ x 2″ x 8′
- 2 2″ x 4″ studs
- Pnuematic staple gun and staples. This is the one we have. (We tried building a bed with an electric staple gun, and I can tell ya: the pneumatic kind is a MUST-HAVE! SOOO worth every penny.)
*Amazon links are affiliate links, which means if you click through them to purchase, you’ll support View Along the Way, and I’ll be so thankful!
Step 1: Cut out your headboard
Using a jigsaw or a skillsaw, cut your headboard shape out of the 1/2″ plywood. Here’s a diagram we made if you want to duplicate the same shape we did, or you can get creative and make it any ol’ shape your sweet little heart desires.

(Here are the details on that step.)
Step 2: Build your platform
Time to build the incredible spectacle of engineering that will soon hold your mattress! You’ll use your 3/4″ plywood sheet to make the sides. This diagram will be extra handy for you. I fixed it up and make it a little easier to read from the initial version:
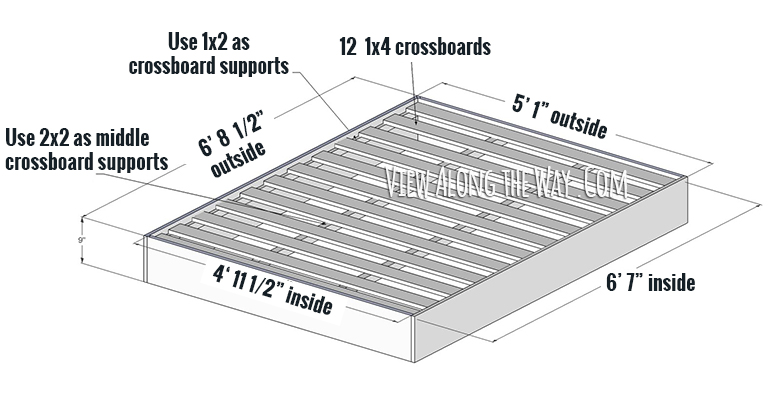
This post has a complete cut list and step-by-step instructions for assembling your platform.
Step 3: Upholster the headboard.
You’ll start by laying this on the floor: enough muslin to cover the headboard, followed by about three layers (more or less if you want) of the batting, then the plywood sheet you cut out for your headboard.

Then you’ll staple it all to your plywood sheet. (There’s a learning curve here, so make sure you read over our lessons learned from this post before you start!)
Then you’ll lay the muslin-upholstered headboard on top of your pretty fabric, and upholster it with the pretty fabric. (You’re going to think the muslin step was unnecessary, but friend: I implore you not to skip this step! The muslin makes the finished product SO much better and more professional looking. I’m as thrifty as they come, so if I tell ya it’s worth the extra dollars for muslin, you KNOW it is.)
This is what it’ll look like from the back once you’ve stapled on your pretty fabric:
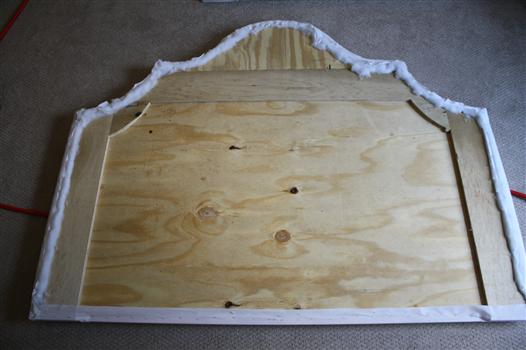
Then you’ll add your nailhead trim in whatever design you want. Click here to follow along with how I added mine and see the step-by-step instructions for upholstering the headboard.
Almost done!
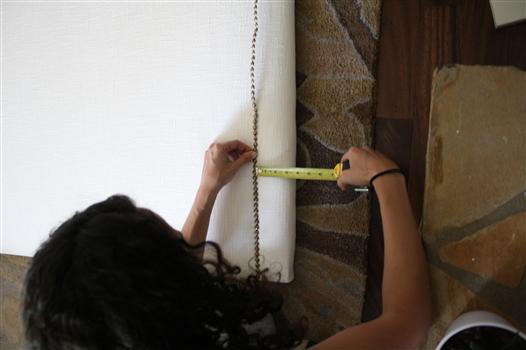
Step 4: Upholster the Platform
This post will give you the full run-down on how to cover the platform with your batting, muslin and pretty fabric, including the process of finishing The Dreaded Corners.

Step 5: Add the legs
You can actually just buy the finished legs at the hardware store if you want. They sell a few options, but nothing was exactly what we wanted so we made our own.
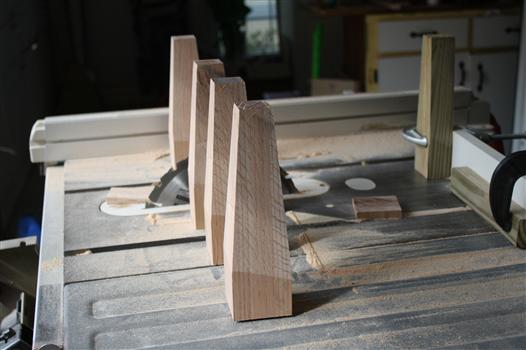
This post will tell ya how we made and attached ours. Aren’t they snazzy? I love ’em.
Step 6: Attach the headboard to the platform
…And pat your handy self right on the back, then lay in your fancy new bed and take a well-earned nap! (Here’s how we attached it all together! Yay!)
Costs
We used coupons and shopped sales and came away having only spent about $278! (Compared to $2,500 for the inspiration!) Here’s the breakdown:
| Wood supplies (see details here.) | 88.82 |
| Batting (6 yards at $4/yd) | 24.00 |
| Muslin (6 yards at $4/yd) | 24.00 |
| Upholstery fabric (details here) | 141.00 |
| Staples (Spent ~$10, used ~10%) | 1.00 |
| Total | 278.00 |
It’s been a couple years since we finished this project, and we are still SOOO very happy with it! There’s just something so satisfying about creating something from scratch that you see and use every single night.
Have you ever upholstered anything or built your own furniture?
Linking up to: TT&J
 Hi, I'm Kelly. Glad you're here! This little blog is where I chronicle our efforts to fix up our beaten-down home on a tiny budget. We're not there yet, but here's a peek at the view along the way...


Love it so much and pinned of course!
This is so pretty! I always wondered why the bed must be off the ground? I’s much rather have the bed on the ground so no worries about dust bunnies!
So great Kelly! Upholstered beds are the only beds I adore. I’m such a bed snob! xo Kristin
Blown. Away. This post is amazing! Thank you for all the sources too. I would LOVE an upholstered bed and a custom one would be over the top. Stunning.
i just love your bed and love the shape! gorgeous!
I like your bed better than the Adler. Great job, Kelly! Your room looks so pretty.
Hmmmm…. we have a frame dilemma on a set of twin beds. I had not considered upholstering them. It would work. But I would have to do it. It would never get done.
Bliss
I agree with Miss Charming above me, I like your version better than the inspiration photo! 🙂
Thanks for sharing the cost breakdown and where to get everything!
I do love this bed so very much! I need to re-write our headboard post. Your post may push me towards getting that done!
Awesome, love that you summarized it all here! You know how much I love this bed. 🙂 And that chair, that chair, where have I seen that chair? 😉 So funny that we have the same one and it’s in our bedrooms, which by the way I finished and is on the blog today!! Woohoo!!! xoxo, Sharon
You KNOW I’ve done one! 😉
Very nice! I wish I would have known about your tutorial before I made Henry’s upholstered bed. I sort of just willy-nilly cobbled it together. Let’s just say your’s is much better. 😉
This is such an awesome bed!!! I can’t wait to get to the making a bed stage. Ahh, one can dream … even if it is from a mattress on the floor. 🙂
Absolutely beautiful! You guys have some serious skills!!!!!
What great timing – I just bought materials to make my own for the guest bedroom this weekend so will very much appreciate your tips! And I totally got the muslin, too.
Your headboard tutorial was so helpful when we designed and built our upholstered headboard! Which we love, so thanks for that! 🙂
Great job putting it all together ~ that was a lot of work and MANY of us are so thankful you shared with us!
love it! upholstering scares me, but you make it sound….possible. If I ever get my guest room back again (like if we finish the basement someday), I might just have to try this.
Sooo, I totally love it (no surprise) and I’m in teh market for a new upholsted bed, but (and here’s the tricky part) NO WAY is hubby building it for me. I showed him your swingset last summer and jus just bought the wood for ours yesterday! So it would take years for him to actually do this:) But in better news, i might have a play structure by the end of summer, or just a lot of umber in the garage:)
Jessica
You guys are so so resourceful and handy! The bed is beautiful and I and sure every night when you go to bed there’s a since of pride knowing you made it! Thinking of making a little headboard similar for my daughter so I might be using your instructions!!!
Blessings,
Kayla
I REEEEEEEEEAAAAAALLLLLLLLLY want an upholstered headboard – so – I’m totally showing thos to Aaron. 😉 hint hint, hubby!
Great tips, and just in time for my headboard making journey, LOVE the bed, I would have never known it was a DIY of you hadn’t said it, looks pro for sure! Thanks for the great post!!
dang – now i feel super lazy for buying one. it’s getting delivered on Saturday, too. we’re so super excited about it and now seeing this tutorial, i wish we had done it ourselves LOL, much more redeeming than spending $1600 on it…sigh
Beautiful! I can’t believe how inexpensive that was. It looks awesome!
I want adam to build this with me…this weekend!!
too bad we have 800 other things to do but….want!!
beautiful Kelly! 🙂 pinning this, really love it! 🙂
You’ve got some mad skillz there, Kelly! Awesome project, fantastic tutorial. 🙂
xo Heidi
I have really been considering this since we moved. I packed our bed away in the POD, so I don’t have access to it. The mattress and box spring on the floor is annoying. I would have already made one if I wasn’t considering getting a king size bed in the new place. Oh the travesty!
Your upholstered bed is gorgeous, and your tutorial is awesome! My hubby and I built an upholstered bed a few years ago. It was our first time doing a big upholstery project – definitely a learning experience! Our platform corners are nowhere near as nicely done as yours. But, for a fraction of the price of buying the upholstered bed that I wanted from Restoration Hardware, I can’t complain 🙂
Ooh I love this, Kelly! So classy! And your version looks so, so similar to the expensive one! Wow! Thanks so much for sharing your process–pinned for future perusal! 🙂 Hope you’re having a wonderful week!
~Abby =)
this couldn’t come at a better time! you guys are seriously so talented. I’ve wanted an upholstered bed for my daughter and have been debating what to do. after seeing your post I think I have my answer. the first piece of furniture we built was a trestle table, inspired by one at restoration hardware:) I can’t wait to get started. we will be building a twin sized bed, so I assume we take all your measurements and adjust them to be standard twin size? definitely a new follower of your blog
Your bed is so so so amazing!! When I was having nail head trim woes, I visited your blog to look at your bed more than once and try to figure out what I was doing wrong. Apparently you are just super awesome, that’s all. I love the upholstered base (boxspring) in addition to the headboard….such a beautiful finishing touch.
That is such a beautiful bed and I love your new and detailed tutorial. What really stood out to me was the neat trick your did with off centering the 12 inch circles 3 inches out. I just loved that little detail. So great!
Great and valuable bit of blog post revision/editing. The updated post is now a wonderful stand alone how-to article that perhaps is more valuable than the sum of information that was previously scattered in several posts.
Wait, you probably already thought of this: Could this type of customizable DIY project from a complete, in-depth, easy-to-follow, photo-illustrated, clearly-written, how-to article represent a potential *new product* for “View Along the Way … (self-) Publishing”
??
What a beautiful bed, I can’t believe you made it, let alone under $300! If you get a chance, please share this on my linky party: http://suburbsmama.blogspot.com/2013/06/sunday-linky-party-12.html
Fabulous how to! I already have a headboard but could see making the frame part around the bottom, I wonder if that would work? I’ll let you know if I try it!
Hey! My wife and I are going to build this bed. Do you have a materials list for a king size bed?
Awesome! No we don’t… but hopefully you can just scale up by a few inches — a slightly bigger headboard and longer front and back boards on the platform. Good luck!
Is this for a king bed??
Love the bed and love the curtains even more. Can you tell me where you got those from?
Thanks! Yep, I sewed ’em myself. Here are the details: http://viewalongway.wpengine.com/2012/06/tutorial-how-to-sew-lined-back-tab-curtains-drapes-curtain-panels-whatever/
I love your step by step explanation process to build an Upholstered Bed. I don’t have skills to build it, my cousin is a carpenter, I asked his help to design a bed 2 months back and i would surely show this blog.
Upholstering anything intimidates me…but a tute as detailed and enjoyable as this one makes it seem really really do-able. Props to you for going back to revisit this and give us all the juicy deets! We thank you!
Hi Kelly,
I’m in love with this bed! I’m trying to convince my husband that we can make this. It seems pretty straight-forward (I say that now…haha) but I did have one question. Looking at the back of the headboard, it looks like there is an extra 3-4″ reinforcement of plywood along the edges of the frame. Is that correct? Is that just for added stability? Do you think that if I did 3/4″ plywood for the headboard, I could skip that step?
Thanks!!
You can totally do it! 🙂 Yes, we added a little extra plywood around the edges. It’s not for anything except looks. We just wanted the headboard to look a little chunkier, like it wasn’t just made of one thin piece of plywood, and it was more cost-effective to use wood than to add tons more foam. (We could’ve just made the whole headboard extra thick, but we had those scrap pieces laying around, so we just lined them around the edges.)
Perfect – thanks for the quick response!!
Sorry to be a pest, but I’m trying to adjust the dimensions for a king sized bed and have another question after spending more time looking at your plans! For the platform, it looks like the interior dimensions are 59.5″ x 79″. Given that a queen sized bed is listed as having dimensions of 60″ x 80″, I’m wondering if the mattress is resting on the outer frame of the platform (which is sort of looks like in the final photos) or on the crossboard supports. Given the weight of a king, I think we definitely need to make sure the mattress is on the crossboards. If that’s the case, would you recommend widening and lengthening the dimensions a bit (so for a queen, perhaps having the interior dimensions be 61″ x 81″ or something)? I recognize you’d just be speculating, but any thoughts would be appreciated. Thanks!
When we built our bed the first time, we made the platform an inch or two wider than our mattress, and it ended up being awkward. You could see the inside of the frame, and we hit or legs on the frame when we got in and out of bed, so we shortened it a bit the second time around – it’s a very snug fit – and it’s MUCH better now. I don’t know if our mattress is exactly standard queen mattress size, but I’d say make the interior dimensions pretty close to the exact size of your mattress. It will look like the mattress is resting on the frame, but that’s a much better look than being able to see the inside of the frame with the raw wood and everything. Does that kinda make sense? 🙂
Yes! Thanks!! 🙂
I have been daydreaming about building a headboard for myself while living in a tiny one bedroom apartment for the last few years with no space to build and no room for a big girl bed. During said time, I have scoured the web for tutorials and advice and never did I even THINK to upholster the frame as well. Moving into a place with a garage and this is numero uno on my treat-yo-self list. Thanks for all the tips and details 🙂
Hey! Finished my headboards (3). I told you I would send pics but lost your email. They look great. Would love to share what you inspired!! Email me! Deb
WOW! this is so inspirational! My husband and I have our current costco bed on CL for $350 and the whole plan was to get rid of it and do a DIY upholstered headboard……but now you’ve got me thinking, why not do an entire bed?! If we sell our bed for $350 it’ll fit in the budget. How long did the actual construction process take? Do you think a Saturday is enough time to complete this job? My husband is pretty handy dandy with power tools.
You know… it’s hard to predict how long it will take. It probably took us longer because we were documenting the whole process as we went. (And it seems to take me longer to do projects that it takes my readers to do them!) You might be able to knock it out in Saturday, but if not, it shouldn’t take you too much longer than that. Good luck!
Hey can u send me the supply list if I were to make this headboard in a king size? I am looking to do this shape headboard in a mad men style turquoise velvet and tufted thanks again jonna 🙂
Really well done. I am looking for something similar but have a king size bed with box springs and a metal frame. I was hoping to create an upholstered frame to wrap around the box spring as I need them for the memory foam mattress we have. Does anyone have ideas for that?
Thanks, Susan
So, what is your mattress?
My husband and I made this bed over the past two days. It looks great and I want to stay thank you for the fabulous instructions on everything!
Hi,
I’m in awe! I know that this is an old post, but it is SO helpful.
We have a designing dilemma, in that we have a king size bed (width 80 inches) but only have 73 inches wide higher up between two windows where the headboard would be – so it would be ideal to build our own headboard, 73″ wide, and attach it to our own platform, which is 80 inches, if that makes sense. And it’s the only wall for the bed.
Anyway, we already have a king size box spring – how would you (re)design the platform to accomodate the box spring?
THANKS!
If I’m understanding your question right, you’d just make the platform wider to accommodate a king sized boxspring. Good luck!
I love this post! My husband and I are getting ready to make our second upholstered headboard and we’re going to adjust your headboard design for a king. I love the long lumbar pillow on your bed! Did you make it or find it somewhere?
Thanks!
C
If you are like me and don’t have the time and are not too crafty. I found a similar headboards at Big Lots for $199-$299.
HI- LOVE this post and am getting ready to make a headboard of my own. Do you happen to know how much fabic would be required for the headboard alone, as opposed to entire bed?
I think you’d need 3 yards to be safe.
I was just wondering what size bed is this???
It’s a queen.
Hi Kelly, I am so glad to see you are still answering questions on this tutorial. It is by far the best I have seen yet on building a complete upholstered bed. I am in the process of making one for my daughter now. I was wondering if you can tell me how the bed is holding up after a years time. I read some things on the internet that said regular wood nails would not hold up after time. I appreciate any feedback. Thanks.
Yep, they’re still doing great. It’s just as sturdy as the day we built it. I think we used more screws than nails though.
Hi Kelly,
I tried to find the exact fabric you used through your link, but it seems to be broken. Do you by chance know the type of fabric/brand you used? Thanks!
Hey, I was hoping to do a similar project for our master room, we have a king bed so our measurements will be different but I was wondering if you would happen to know if we would have to do more re-enforcing in the frame as it is quite heavy!
I’m not sure because I haven’t tried it myself, but I’m sure it couldn’t hurt!
Love it. Y’all did a fabulous job. I am looking at the same robert allen tex weave snow fabric for the bed we are building. It is more expensive now, $27/ yd half off. How has the fabric held up– stains, wearing, pilling, etc on your bed?
And is the weave open to the point that it snags easily?
Thanks! The fabric is actually doing really, really well – no complaints and no visible snags so far!
Thanks for the great tutorial. It gave me the courage to modify and upholster my IKEA frame. Now the headboard is taller and the room feels much more inviting. I was actually considering spending a bunch of money on a bed frame. Instead, for a few dollars, with some found materials, and a couple days I had a blast improving my bed. My only snafu was that six yards of batting was not enough, I barely made it doing two layers. Did I mis-read something there? Wish I could show you pics…
Hello- I am making this bed this week! I have a few questions though….I cannot find any batting sold in “pounds”. I know this probably refers to the density or thickess, but I just can’t find it! Do you mind telling me the kind you got or some other type of reference to find it? Also..The linen I am getting is 56″ but the muslin is sold as like 46/48″…is this okay? Thank you!
You did a beautiful job! This is a project my husband and I are considering doing ourselves here soon too! I have went back and forth so many times, as to do it ourselves or just spend the extra and buy one. Your breakdown makes me feel more comfortable and allows me to design exactly what I want!! Wish us luck 😉
So great Kelly!
Upholstered beds are the only beds I adore. I’m such a bed snob!