UPDATE: We’re going to be recreating this bed with full tutorials, measurements and cost breakdowns, so if you want more step-by-step tutorials, follow along right here.
This is a story about a project spiraling out of control. All I really wanted was a different look for our bed.
We have a simple rectangular upholstered headboard that I picked up a few years ago from a big-box store somewhere, and I decided I’d just pick up some fabric, throw it over that headboard and call it a day.
At this point, I was already out of my league.
But then, I saw this blog where a guy actually upholstered his entire bed himself. Um, you can do that?! I’m in. We need that.
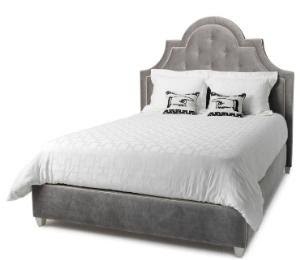
The inspiration? This beauty from Jonathan Adler, priced at $2,500:
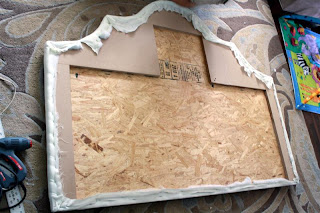
So I called my handy contractor (who was sitting next to me on the couch) and put in a request. He cut this for me out of plywood using a router which I very wisely bought him for Christmas a couple years ago.
(You know those horrible people who buy you gifts secretly hoping to personally benefit? That was me! My evil plan was working!)


He beefed up the sides by adding some MDF. This would give us the depth we needed to screw the headboard to the bed frame, and I think a chunkier headboard looks better anyway.

Then he cut away the extra using some kinda jig or wizardry or something.

This is a good time to interject and say that if you want to attempt this yourself, this is a really, really hard shape to upholster. A little rectangle would entice much less self-hatred than this shape. I promise.

This project would also be easier with a fabric which doesn’t show every single imperfection. Bad call, Kelly. (But it was on clearance!)
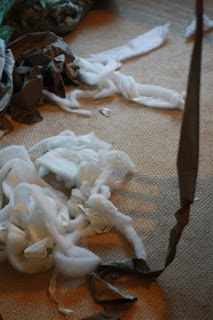
We picked up six yards of very difficult fabric, six yards of upholstery lining fabric (a MUST-HAVE), four million staples and an electric staple gun, and some thin batting.
The thin batting was a bad idea too. We needed seven layers to get to a comfortable cushiness. I’d recommend about 3 layers of the 8-ounce stuff in the future.
Then we laid the upholstery lining fabric on the ground, plus a million layers of batting, then the headboard, and started stapling.

It was not smooth sailing, my friends. Those inside corners next to the half circle on top? IMPOSSIBLE. At this point, I thought we should throw in the towel, cut off that top circle and start over. Andy was more insane confident, so we kept going.
I should also say that this is absolutely not a one-person job. You need a buddy. A good buddy, who is required by law and marriage to remain your buddy when this project is over.
Upholstering a headboard is a lot like taking a long road trip – if your relationship can survive this, you’re set.
After a hours of tugging and stapling, we arrived at this:

Not good.

Next, we upholstered with the real fabric.
Starting with the upholstery lining was clutch. It made upholstering with the real fabric sooo much easier, and having a little practice under our belts didn’t hurt.
Turns out there are three secrets to upholstering around the curves.
The first is tug and staple as tightly as you can on one side, then do the same to the other, then return to the first side, remove your staples and start over. It’s the only way we could get it all tight enough.
The second secret is to cut little v-shapes into the fabric like this:

And the third tip is: just don’t do a headboard with curves. Seriously. You don’t need this stress in your life.
When we had the headboard all upholstered, I got another harebrained idea that we needed nailhead trim. They sell this stuff that comes in strips, so you only have to nail in every fifth nail. GLORIOUS!
Still, it was not was not easy keeping the nailhead lined up with that outside edge, but I just knew this baby needed some bling.

Meanwhile, Andy was busy building the bed frame. He created a simple box out of 9-inch wide MDF strips.
(Disclaimer: we had just painted when I took this picture, so tools and furniture were everywhere. Plus a tornado had just blown through. This is not what our bedroom normally looks like.)

We added a rail across the center, and 1×4 boards across the sides to hold the mattress, so the frame looked like this: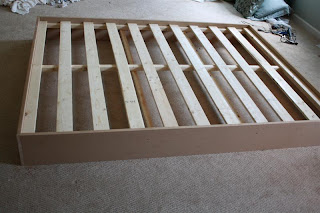

Time for the legs! You can buy them pre-made at Lowes or Home Depot, orrrr, you can have your husband make your own tapered legs out of wood and manliness, then stain it yourself. I did the latter.

He added some supports in the middle of the frame to supplement the legs:

Then, added three boards to the end of the frame so we could attach the headboard:


Then, we stepped back to admire:

Added a mattress and some bedding, and ta-da!


Final, most important tip: if someone wakes up from his nap while you’re taking pictures, you should probably let him get in front of the camera.


The end! Can’t wait to get this room decorated!
UPDATE: We’re going to be recreating this bed with full tutorials, measurements and cost breakdowns, so if you want more step-by-step tutorials, follow along here.
 Hi, I'm Kelly. Glad you're here! This little blog is where I chronicle our efforts to fix up our beaten-down home on a tiny budget. We're not there yet, but here's a peek at the view along the way...


The only good thing about having so many pillows is that I get to throw them across the room. I hate those freaking things.
Bravo!! Looks beautiful!! Even if Andy hates the pillows 😉
Love it! Great work – and I'm glad the marriage survived ;o) Also, what a cutie at the end! I cannot believe how big he is now!!
This is AMAAAZING! Do you read Young House Love's blog? They would love this post I bet. They do this thing called Reader Redesign where people send in stuff they do and then YHL posts it for all the world to see and ooh and ahh over. You should send this to them. Super impressive! 🙂
Wow, you guys! This link came up in my stats and I had to come over and see– you did a KILLER job! Hope my little tutorial helped, but you took it like a zillion steps further… so impressive. And yeah, YHL would totally love this!
Thanks, Daniel! Your bed was *amazing* and a huge inspiration!
i'm totally blown away. it looks awesome.
Wow!!!!! I am loving loving loving this, well done, can't wait to feature, you're amazing!
DANG! This is incredible!
I can so see my DIL making this bed. I am forwarding this post to her. It is FABULOUS!!!!!!!!!!!!!!
I linked over from Centsational Girl. This is one amazing project. The finished project looks incredibly professional. I am so impressed. I'm so glad you added the nailhead trim. I know it probably was a stressful project, but the end result is gorgeous. I am going to become a follower. I'd love if you get a chance to come check out my blog and follow me back. Thanks. http://www.diybydesign.blogspot.com
Wow! I love this project! Amazing work and have fun decorating!
That is incredible! I am sooooooo impressed!
Fantastic job! Congrats to you and the hubby! Plus, love your writing style and how casual and light you keep it!
Thanks,
Amanda
Kelly, you and Andy are ninjas! First: upholstered bed (with curves!) next: television marriage counselors (think Dr. Phil!). Seriously, if you guys completed this project with leftover love to spare, you could conquer the world! Great job. It looks like a million bucks!
Sincerely,
A fellow bed pillow hoarder.
WOW!! Beautiful job!! Thanks for the tips and humor.
Absolutely phenomenal job { and I loved your witty play by play! }
So amazing! I have a platform bed with hard wood corners that I always end up running shin-first into and a fabric base would prevent a zillion and one bruises and tears. omg… I love this project! Thanks girl! <3
xoXOxo
Jenn @ Peas & Crayons
I ADORE the headboard!! Also, I absolutely must know where you got the pillows — they're exactly what I've been looking for!
stunning!! well done!c
Wow, you have the best husband in the whole world, he must adore you!! (or secrely want to throttle you ) after this project. It is phenominal. I say go into business!!
xoxo
Karena
Art by Karena
Wow!! way to go! I'm in the beginning stages of a similar headboard so I GREATLY appreciate your tips!
standing up in the middle of my family room jumping with happiness for ya'll and applauding. sure hope my neighbors arent looking out their window- oh heck, I dont care if they are..
Ya'll did a fabulous job and you deserve every flattering word of praise you get and then a million more.. it looks fabulous~!!!
Sonny
Wow, wow, wow. Impressive! Great to have such a great hubby! Looks awesome! Came via Censtational Girl.
Hopping over from CG to admire your handy work!! LOVE!! I am putting this on my already very long To Do list for 2011. I just did a bed frame with a curve and it turned out awful! Now that I know your trick I am willing to give it another go.
Simply fantastic! I have a platform bed and this seems like it could be the answer to my prayers – new bed w/out the price?!?!?!
AMAZING!
I have seen a lot of DIY upholstered headboards, and this is one of the best I have seen. Great job!
DIY-ing in Portugal and linked over from Centsational Girl… and grinned the whole way through the post! As newlyweds, we're discovering that your partner guaranteed to stay post-DIY by marital law is a good person to have! 🙂
Laughing so hard I need a 'Depends'…sounds like my luck. The final product is beautiful AND the headboard shape is just what I have been dreaming about. Though, you scared me. Perhaps I should get you and your hubby to make me one…OR maybe the designer one is more affordable. hehe Thanks to my fave Centsational Girl for sending me over to check out your project!
I came over from Centsational Girl. Holy Moly! I can't believe you actually made this! It looks amazing!!! Great job!
Wow! This is stunning! I'm off to discuss making a bed with my husband now. 🙂 Thank you for being so inspiring.
What a great job! Looks like a huge project ~ one you would never want to repeat again, but glad you did it once. Looks good ~ enjoy the fruit of your labor.
Cindy
Unbelievable, people. This is gorgeous! There will be great things in your future, I'm sure of it!!
Wow wow wow! I'm a big DIY-er, but I don't think I would even tackle this. But this is beautiful! You must LOVE it. Congrats on such a handy man!
Amazing! Bed looks great and your commentary is hilarious!
WOW! I literally JUST made a headboard in this exact same shape!! Those inside corners were SO hard! (check it out here: http://thischarminghouse.blogspot.com/2011/01/headboard-instructions-part-i-making.html)
I love the base you made! I was thinking about doing something similar, but in the end I decided to bag it (although yours looks so good that I may need to rethink that decision!)
I think it's really beautiful but the first thing that came to mind after I saw how much work you put into it was: I hoped they sprayed it with a million coats of scotch guard! There is a bed in my house that doesn't have a headboard at all and I notice the wall gets a little discolored in the area where a headboard would be . .
Hi I saw you on Censational Girl and had to come over and say great job. Love your sense of humour, I too am guilty of buying tools for a certain person to do certain jobs that everyone else makes look so easy! Love it and good luck with the rest of the room decorating. It takes a while to piece it all together, my master bedroom is still unfinished 1 yr on. But so long as you have a comfy bed thats all that matters 🙂
Found you guys via CG. As I said there, this is an amazingly well-done reproduction of the Adler bed. Very impressive!
Jeez, if it weren't for physics and the long arm of the law, you guys would be UNSTOPPABLE!
Kimberly
That is amazing! My husband and I are going to try and do the same, sans curvy headboard, very soon. Thanks for the great advice, it looks beautiful.
Also, what kind of fabric did you buy?
First of all after all that hard work it turned out fabulous! Second, THANK you for this post, I will not be trying a curved headboard anytime soon 🙂
Wow! Your bed is absolutely amazing! I just found you on CG and couldn't believe that the photo of that gorgeous bed was a diy project! Way to go!
Omg I love how the bedframe and headboard came out, I soooooo would love to do something like this. Im not as talented though, I think I may stick with just a rectangle with the nailhead trim.
Can I please borrow Andy?
Thank you very much.
Ellen
PS FABULOUS job Team VATW!!!
Your headboard looks great! Wish I had the power tools and skills that you all have… I'm too nervous to attempt this project on my own.
AH! This is so fun; I'm finding so many more fun blogs to read today from all your comments!
Thanks MILLIONS for all your sweet notes!
I'm going to try to answer all the questions…
1. Megan – The sparkly pillows came from Marshalls, and the others from Target.
2. Tanya – YES. You've given me a whole new life course: TV marriage counselors. Andy and I are LOL-ing at what THAT would be like!
3. Jennifer, you can SO do it. Do it for your shins! 🙂
4. Sonny – you have me *cracking up.* I'm sure my neighbors are often thankful for window blinds in our house! 🙂
5. Kristen – I am DYING over the amazing fabric on your headboard! Looks awesome!
6. Bryana – OOOH. THIS is a great tip! We didn't scotchguard it, but I will be doing that right away. Thank you!
7. Kimberly @ The Sterling Cherub – ROFL. It's that pesky long arm of the law that stops most of our funnest endeavors.
8. Heather – It is technically a "jacketing" fabric, so I think it's meant for clothing. It feels kinda like a windbreaker jacket, if that makes sense. It looked pretty shimmery and incredibly wrinkly to start with.
THANK YOU to everyone for your comments! Can't wait to dig in to all these new blogs!
good job!!! I also made our headboard (not NEARLY as great as yours) but it was also a pain in the butt to upholster! I thought it'd be a breeze, but no way.
So, kudos. IT looks wonderful. 🙂
Nouveaustitch – Sure thing! I only had to promise to spend my life with him and give him children in exchange – steep price, but worth it! 🙂
this is a BEAUTIFUL bed! congrats!!
Your bed turned out BEAUTIFUL!! The trim really makes it pop. I wonder if I can get the motivation to do this some day….
You have a new follower, I'm just getting started 😉
Omg … ok… end of story. Must make myself a bed. STAT! I have been admiring all these new beds people are making online and … well. Your {hysterical} post was the straw that broke the camels back. Bed just got bumped up to #1 on my to-do list.
Thank you for the {again, hysterical} inspiration! PS: I am totally your newest folower.
Gina – Fun! I'll be following your blog to see what you create!
That is how our ENTIRE house looks right now! Trying to pack so we can (hopefully) move in a couple of months! Wowzers. We have to check under all of the debris to make sure we still have two live children in this place.
just headed over from censational girl. your tutorial is amazing… might even try and help my sister tackle this in her bedroom!! looks amazing.
What a beautiful bed! I LOVE it! Seriously – great job. And an entertaining read (at your expense, sorry!!). I want to attempt a slipcover for our sleigh bed this summer. Crossing my fingers!
Beautiful!! You did such a great job! Bravo, bravo! And I think the pillows look great, though I can kinda sympathize with Andy's "pillow-throwing" fun as my hubby is not an extreme fan of lots of pillows like I have. 😉
Sweet work!!!
Amazing, wonderful job!! LOVE the results! SO worth the hassle!
Absolutely gorgeous! The hard work paid off, I love the detail the nailhead trim added. Also, my husband needs a compound miter saw as a gift. Hahahah!
It looks great! Funny you posted this because I just finished an upholstered headboard for our master bedroom an hour ago.
If you spray glue on foam (i used 1 inch foam) and then batted and covered it, you will get that cushy feeling without a billion layers a batting!
Wow! This is amazing! Your hard work paid off! I have a plan to also make a headboard for my guest room. Thanks for the inspiration and tips!
Saw this on CG and had to hop over! I've seen people DIY headboards before, but never an ENTIRE BED! Seriously awesome! I loved reading all about the adventure and then it was so cute to see the little baby at the end!!! I always say, "thank God for naptime" 🙂
came over from CG. LOVE the headboard! I've been planning to make my own for way too long and you've inspired me NOT to do curves when I finally get around to it 🙂 Also, totally hear ya on the 500 pillows (even if they're rarely actually on my bed and not on the floor)
i love this bed. i will pay you $20 and all the pizza you can eat to do my guest room 🙂
but honestly, bravo!!!!
Nice job! You are great!!
This is the most amazing DIY project I've ever seen! I love it! The shape of the headboard, the fabric…its beautiful! Also, I love the pillows. 🙂
Amazing. Well done. I LOVE IT! You and your hubby should now receive special 'marriage survival' prizes!
Beautiful! I have always wanted to do this myself, but it kinda scared me! You make it look so easy…
This is amazing! Awesome job guys!! 🙂
so so SO glad I hopped over from Centsational Girl! This is amazing! Bravo to you for having the guts and gusto to just get it done and what a blessing to have a hubby who will just jump on the band wagon and help. Does that come in a pill form you think? Hmmm. Either way – beautiful work and can't wait to see the rest of the transformation! I am def following you now to see how it all turns out!
Wow! That's impressive. I don't think I could convince my carpenter (the guy that sits on the couch next to me) that making our own headboard is a good idea. But, on the flip side…he loves pillows!
Nicely done!
Actually, Shirin is right–using foam first then batting gives you more ooomph with less work. Plus, the batting won't go flat eventually. It's also easier to upholster if you start at the top center and work toward each side. Get it all stretched side to side, the go to the top. Work outward from the center and change sides often. That way, there is no (or less) unstapling. Aaaah, you have more energy than I right now!
Coming over from CG! I'm so inspired! Going to try and do an IKEA hack on my bed and do something like this! Amazing, great job, and thanks for the inspiration!
Love the headboard and love how honest you were with the difficulty of making it! Glad you guys are still married because my husband and I will be attempting this very same project soon! Your son is precious!
Found you from Centsational Girl and I love, I mean LOVE your bed. I only ever wanted to attempt the headboard, but the whole bed frame too?! WOW, WOW, WOW!!! Thanks for the inspiration!!!
Shirin and Practical Parsimony –
Thanks for the great tips! Wish I'd had you in my life a while ago. 🙂
We considered using foam, but we were nervous that the edge wouldn't lay right, and that it wouldn't work with nailhead trim. Do you think it would have? Bummer! Next time though! (haha)
Kelly,
Foam and nailheads go together just fine. There are a few tricks though. First, remember the thicker the foam the more the effort required. I use 2″ foam and nail heads almost exclusively. While not easy, it is doable and great looking. You can do it a few ways: compress the foam around the “trim line” for the nails by stapling the foam to your backer board prior to laying down dacron (batting). Essentially, you are making an ant trail with staples where your nailheads will be. This will give you a channel to lay the nails. Not every staple will ‘catch’ the foam so it will take a bit of work, time and repitition. It is easier if you compress the foam with one hand and staple with the other. You can also cut the foam shorter than you would normally, to the measurements of where the nails will be, then adhere more foam past the trim line to the end of the board. Essentially cutting out a strip of foam where the nails will be, but before you are adhering it to the backer board. Keep in mind foam is expensive. It is made just like other synthetic materials, with crude oil, so foam prices reflect current oil prices. Hope I didn’t confuse anyone, have fun!
you really did a wonderful job!! love the color too!
I absolutely LOVE your bed, and a big high five for hanging in there, even when you wanted to quit! I have zero patience, so I'm assuming I should start with a plain retangle when I do attempt to make/build my own headboard. Great job 🙂
This is awesome! I love it. Great job team.
You are AMAZING! I attempted this shape months ago and got so angry when my fabric wouldn't lay right that I threw my staple gun across the garage and ended up with a straight headboard anyway. You have my undying respect for perservering! Bravo!
good for you! As I giggled my way through this post, I became inspired that my handy manny of a husband needs to build me a bed! ohhh…THANK you for trying this shaped headboard first and telling me not to, that is something that I would have done, and *itched the rest of the way through it. I think i'll go square, and with button details….but anyways, great job! love it, off to snoop around your blog
Cheers
Karina
Project K
I admire your patience! Great job! Oh, and adorable baby.
This is absolutely amazing! Nice work. I have been wanting to make a headboard for our bed for a while now and your project is both inspiring and LOADS of lessons 🙂 Thanks! 🙂 Barbara
Wow!! I'm so loving this bed!! You two did a terrific job! I was linked over from centsationalgirl.
My big questions are… skills aside, how long did this take you two? and, how much did this cost? I'm looking for a glorious cost effective approach to making my own bed. I would LOVE to recreate something like this. amazing.
–Sarah
Sarah, I kept a pretty good log of costs, then promptly deleted it. :-/
I'm pretty sure the final total was around $150ish. It could be done for cheaper if you didn't have to buy a staple gun, or if you bought cheaper fabric or something.
And we tried to remember how many hours it took and that was a little fuzzy too. Maybe 4 hours for woodworking and 600 hours for upholstering? (Okay, 4 for upholstering.)
So I'd guess 8 total hours, which we stretched out over about a week.
You can definitely do this! I'd love to see what you create.
This looks amazing. I particularly love the sides and frame. We did a wooden platform bed frame, but now I'm thinking I need an upholstered version. Great work!
WOW – phenomenal! We did a good old rectangular headboard (of which the first choice of fabric didn't work so we re-did it), and I'm happy I didn't have those curves for my type-a-personality to deal with. You guys handled it very well though! I'm excited to read more on your blog.
Hmmm, nailheads into the foam. Gee, I would have to think about that. The way I learned upholstery was to take a class at a junior college. Actually, I took for several semesters.
People/students brought in a piece of furniture to upholster and learned as they upholstered. The class is cheaper than paying someone to do the job.
Your headboard would still leave you time during a semester to upholster something else. Plus, you take a skill with you. Oh, at the college they furnish ALL tools and thread, glue, staples, etc. You get to feel what is right to you.
We were required to buy only a tack puller that worked on staples and nails. The school did furnish the tack puller until people stole them all.Your headboard looks exceptionally nice.
I finally got my headboard done. I worked on it over the weekend. It does not a bit compare to yours, but here it is. simple.http://jandjhome.blogspot.com/2011/01/diy-upholstered-headboard-using-ikea.html
good job! giving you the virtual high five! lol i love it!!! and envious. been trying to get the hubs to cut the same headboard… for me to upholster. lovessss it!
I love it! I am amazed and definitely will be checking in on your blog for some more of your decorating experiences!
You will have and love this bed for the rest of your life, I'll bet. It is just amazing. Totally worth all of the work and stress.
And I love the pillows.
This is so awesome! I had been looking for a good platform bed tutorial. Thanks for sharing!
I absolutely L-O-V-E this project, I am currently in the process of convincing my husband to do one too!
Hey guys!! My friend Courtney (who is a photog) linked you guys in Facebook. Little did I know it was you all! The bed looks awesome and I applaud your effort. After all that I think Dave and I would have had to separate into our own corners for awhile 🙂
Found you from a link from another site. I looked over tons of headboard tutorials but was afraid I wouldn’t like mine enough if I DIY’d it, so I ended up buying a linen-upholstered headboard and frame instead. If I had seen this tutorial first, I would have gone for it. I’m so impressed with your skills — not just on the headboard but the whole frame! Who needs to pay hundreds of dollars? You did an awesome job.
I love how you said, “Then I accidentally read too many DIY blogs …” So true! Oh, and it was at Welcome to Heardmont that I had seen a link to your bed tutorial.
very interesting, thanks
It turned out great! But, sounds like a pain. Helped me decide if I want to take it on or not. 🙂
Love the cool fabrics you chose here, and the headboard came out great!
Kelly, I just found your blog, and I am thrilled. Not only, is it a wonderful tutorial, your humor is great. You sound like me…I use a lot of sarcasam..and people love it. I think it makes us, more down-to-earth, and people, can identify. I hate these tuts, that make you feel like a total idiot, if you don’t get it right the first time. Thanks Kelly, and I look forward to following all your tuts. By the way, I do woodworking, and I love different ideas. You, and your family, are precious !!
Are there dimensions to cutting the wood? 🙂
Yes! See this post for all the details: http://viewalongway.wpengine.com/2013/06/how-to-build-an-upholstered-bed/.
I will have to keep in in mind for a future project. But first I am working on plans for a loft bed.
Should have used a layer of foam under the batting. You wouldn’t have needed all those layers of batting and you get a more cushiony look. Looks great though. I have tackled this project alone with a manual stapler, got the blisters to prove it. Bravo! Well done!
Where did you get the textured chevron sheet from?
I love this bed my daughter would like to give it a try for her room what would be the sizes she needs for a twin bed