%20Easy%2C%20inexpensive%20update%3A%20how%20to%20remove%20popcorn%20ceilings)
When you’re in the middle of about six different projects at once and you start to get overwhelmed, I find the best remedy is: Start a New Project. (That may not be the best advice.)
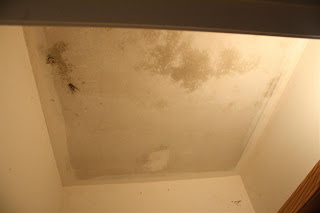
So, surprise! We’re doing a closet reno! First up, taking down these beauties:
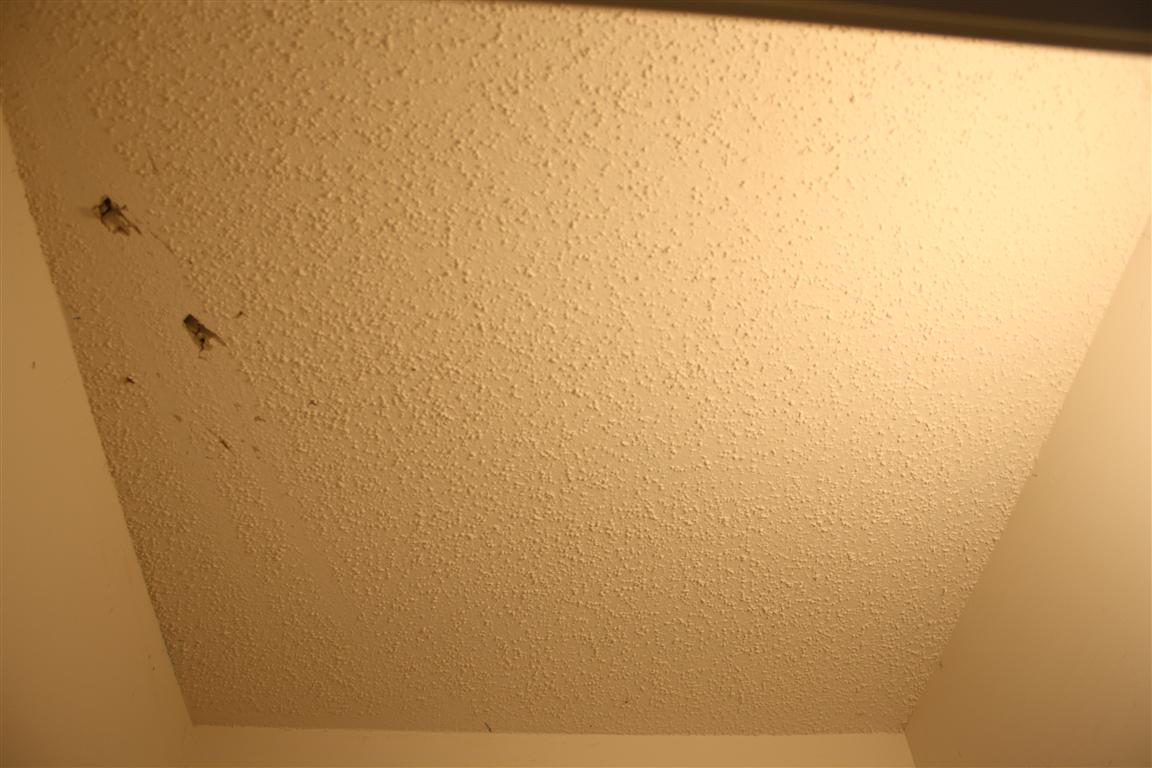
YESSS. Popcorn ceilings in all their early 90’s glory!
Now. To whoever decided this was a fashionable look which should be installed in all homes, I have an important question for you:
WHYYYYY?
When we first moved into our house, step one was to remove the popcorn ceilings. We took them out of the entire house, except our coat closet.
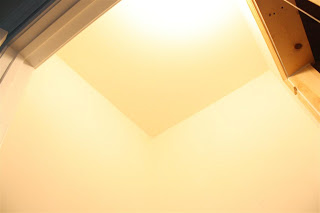
I hadn’t realized until then how much light popcorn ceilings suck out of a room. All those tiny shadows make it feel so dark and yucky, but a flat ceiling bounces the light around and does wonders for the entire space. Check out the difference in our living room.
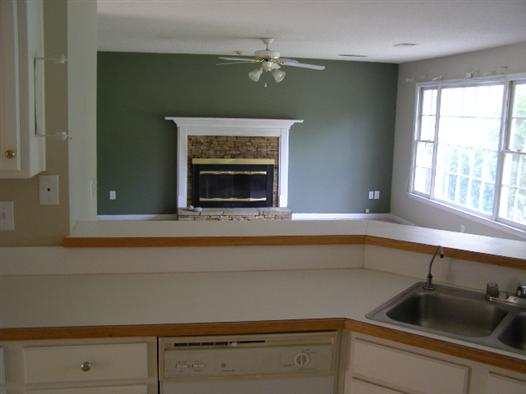
And after:

See how the light spreads across the ceiling without all those little chunky things to cast shadows? Yes, there are other things that make it look brighter now, like the paint colors and whatnot, but if you look at the ceiling specifically, you can see a difference. (More before and afters in a sec!)
Luckily, removing them is cheap, easy and SO insta-satisfying. If you were cursed with this kind of textural sin on your ceilings, here’s a quick how-to for taking those guys right down.
You’ll need:
- A spray bottle like this (for small spaces) or a lawn sprayer like this (for larger rooms)
- A popcorn ceiling scraper like this which will catch all the mess for you. (We’re using a putty knife because we had it on hand and weren’t concerned about the mess in this small space, but the idea is the same!)
- Good ol’ high-quality H2O. (I love you forever if you know that movie reference.)
Step 1. Make sure there’s no asbestos! They stopped using asbestos circa 1977, and since our home was built in the mid-90’s, we knew we were in the clear. Otherwise, this is not a DIY project. You’re gonna want a pro.
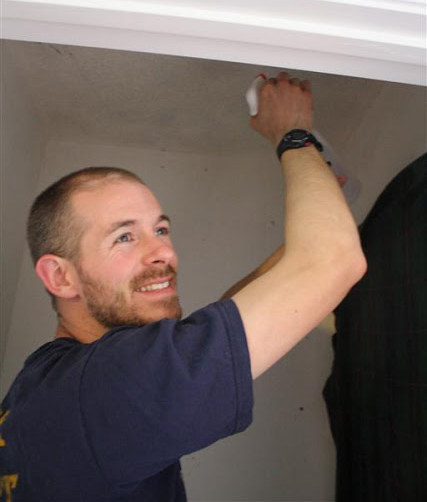
Step 2. Wet that bad boy down! You’re gonna want to soak the ceiling pretty well with your spray bottle or lawn sprayer. Don’t be shy! Work in small areas of a few square feet at a time so you can obtain maximum soakability.
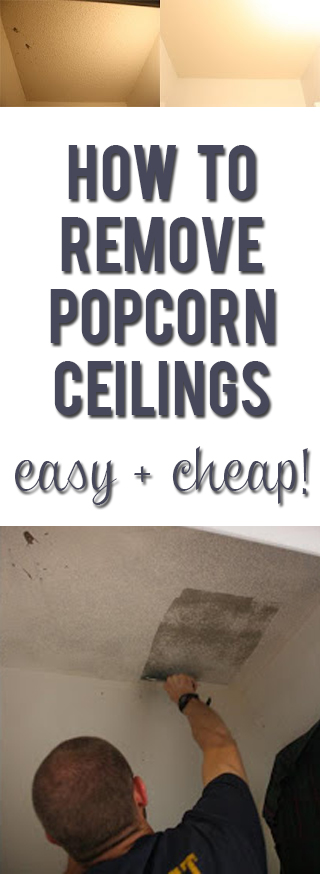
Step 3. Scrape. We used a putty knife, and just gently ran it along the (still wet) ceiling.

This part is SOOO satisfying!
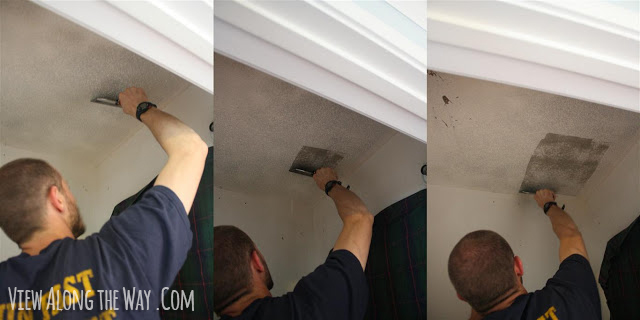
You get to watch as your home instantly teleports to present times. Here’s the ceiling with popcorn removed:
Yep, just good ol’ sheetrock under there.
5. Sand (if needed), prime and paint! Our ceilings didn’t require much sanding, but if there are any spots that don’t look perfectly flat to you, you may want to run a piece of sandpaper over it.
Flat ceilings = happy Kelly. Easy job, with HUGE results. Before and after:

(Sorry for these tiny pics! My other posts have bigger ones, promise.) See how much brighter the “after” looks in the pic above? Those two photos are taken under the exact same light conditions and settings.
FACT: Popcorn ceilings are BEARERS OF DARKNESS.
Okay, that’s a little dramatic. But seriously, this job is easy, fast and provides instant gratification, which always gets a thumbs-up from me.
Have you tackled anything like this recently?
Don’t forget to pin this so you have the instructions when you need ’em!
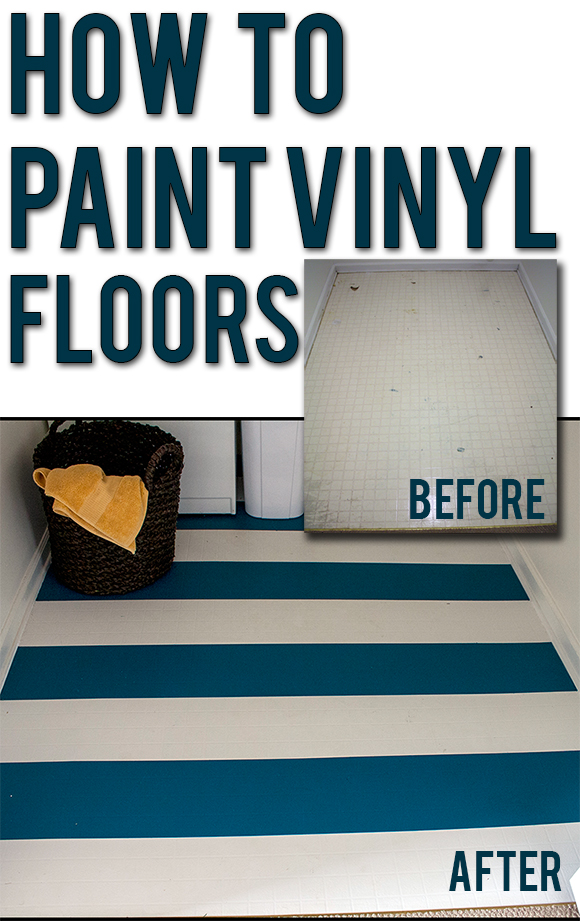
P.S.: If you’re looking for more easy-to-follow tutorials, make sure you swing by the project gallery. There are so many fun DIY ideas there, like how to install crown molding like the pros, or how to paint linoleum flooring. (YESSS!)
 Hi, I'm Kelly. Glad you're here! This little blog is where I chronicle our efforts to fix up our beaten-down home on a tiny budget. We're not there yet, but here's a peek at the view along the way...


We don't have popcorn ceilings in our current home (THANK GOODNESS!) But, truly, I never realized what a huge light suck they were!
We need to do this too. My husband stepped through our living room ceiling while doing our attic remodel, so its either scrape the popcorn or replace the drywall on the entire dang living room ceiling. Thanks for the reminder. 😀
i want you to come do this in my entire house. i mean, your hubby looks so happy doing, he would certainly be willing to volunteer at my house, right? thought so 🙂
I talked my hubby into helping me take down popcorn a few times and boy it is a MESS especially if it is a big room. We laid down painter's plastic and just folded it up and threw it out BUT beware! An 8'x 10' sheet of plastic is VERY heavy when full of popcorn. I have to say though – its all worth it! A lot of work but SOOOO worth it.
Looks like a lot of work but well worth it! We have swirly drippy plaster-ish ceilings (yes, that is the technical term) that I would love to get rid of…but the 2 workers we've asked at Home Depot say it's impossible. :/ Rick says he's going to try your method, anyway! 🙂
OMG! Your results are WAAAAY better than mine! I did my daughter’s room and it was a freaking mess…on the floor AND the ceiling. Some places I scraped too hard so gouges in the ceiling. 🙁
I suck… 🙁
The popcorn is totally different product than stipple ceilings. I could be done by a drywall pro. That is Not a DIY project.
I just wanted to tell you, my SIL has that swirly ceiling, and it’s true you can’t just scrape off, but she did sand it down a bit. You still get a little texture and the basic design (hers looks almost like flowered LOL) but it does greatly improve the overall appearance and gives it a more modern feel. It breaks up the pattern a lot and makes it less noticeable….your eye doesn’t travel up and “see” it as much. It too is a lot of messy work though. Her whole house is covered and she’s only done one small room so far.
I never knew how to do this! I'm glad to know that it isn't too complicated. Why did people think this would look good?
We have removed most of ours…still have a kitchen and hallway to do.
It is sooo messy but sure pulls your house into the present. It really doesn't take much time…just so messy, I keep putting it off. Gonna do it this summer, tho.:)
xo bj
Popcorn haters unite! I did this to the whole downstairs portion of my house! Every time I go upstairs I cringe because that ugly popcorn is staring back at me! My downstairs ceilings are not perfect, but flaws and all a smooth ceiling is awesome!
Looks great! Definitely a project worth tackling. Thanks for sharing 🙂
Hi Kelly, I came by via Cassie! I just had to see how you removed that stuff. When we bought our house some of it was removed but not all. I don’t know why they stopped! I really want to get it out of our hallway. It does suck up the light! Thanks for the tips! 🙂
What type of outdoor hardcore lawn sprayer are you referring to? I need to remove the popcorn in my entire house 🙂
Just wondering if this will work on PAINTED popcorn ceiling?? I have heard that if it has been painted you are S.O.L. And just so you do not feel so bad, I have it on the WALLS going to my basement too!
If the popcorn is painted, it’s harder for the water to sink in. You might need to scrape it just a little, then spray it, then scrape it. I’d probably start in a closet or something and try it out first. Hope it works for you!
Yes! You can remove painted popcorn ceilings! It comes down looking like lace. The water spray method is a must though. I had a lot of fun seeing how long I could get it to hang all lacey and pretty. It was my daughters ceiling and it was painted purple.☺️
I have used this method for years throughout my entire house. Messy, but comes off like butter.
Little unknown fact we have come across- if the ceiling has been painted, add liquid fabric softener to the water before spraying it on the ceiling and it keeps the ceiling more moist and makes it MUCH easier (plus it makes your house smell awesome if you get a good scent!)
It’s still difficult, but that will help some!
Or add a couple drops of dish soap, this will do the same as well. I know this will sound odd, but it makes water wetter longer – they’re surfactants –
we just removed you painted popcorn ceiling last night while the kids were in bed, yesssssss!! super easy and comes out in clumps, no dust!!
So I know this is like a REAAALLLY old post in blog-time, but wanted to tell you we banished our popcorn with a neato tool. Here’s a post we did about using it: http://cottageinstincts.blogspot.com/2010/11/score-is-harveys1-cottage-cheese.html
We decided not to patch, but used beadboard wallpaper on the ceilings: http://cottageinstincts.blogspot.com/2010/11/um-score-was-at-wallpaper-2-harveys-0.html
The result:http://cottageinstincts.blogspot.com/2010/11/fireplace-before-and-afterwith-some.html
Love your humor, btw.
I thought I might let you know the WHY of popcorn ceilings, just so we all know this was not a “it’ll look good” kind of thing. Popcorn ceilings help hide imperfections, in sagging ceilings and in seams etc etc. It became popular in the affordable housing because there wasn’t as much time spent floating ceilings to get that nice flat look. I wanted to let you know just in case someone decides to do this in an older home or in something that might not have been constructed as well. If you are willing to put in the work to float the ceiling if needed I definitely think this is a great diy home improvement project. The light like you mentioned, a more upscale polished look, and it also brings it back to the present.
Also helps to hide cracks in areas of the country where settling is an issue.
Those aren’t the only reasons. I bet anyone that has hard floors that has taken down their popcorn (acoustic) ceiling realizes how much their house echos now. As much as I hate my “popcorn” ceiling, I know I’ll never be able to take it down because my entire house is tile and wood flooring. I’d prefer to deal with it being ugly and light sucking than hear every little thing in my house. 2 dogs and 2 cats are noisy enough at night haha.
I know your post is old but it gives the suggestion that keeping an ugly look in the home outweighs hearing noise. Thays nonsense. Of course you are entitled to keep your fugly popcorn walls but let’s face it, removing them isnt going to mean a marching band will suddenly visit your house nightly..put so.e art on the walls, add a heavier drape, sideboard tables or accent tables …they all help with absorbing those “echos” and sounds.
Right you are. And they also are great at controlling echoes in rooms with high ceilings….but they have had their day, and they must go….even though the removal on my (affordable) home will require new ceilings…. : (
Thanks for the tips for removing the popcorn, but I really want to say “Remember the time Bobby Boucher showed up at halftime and the Mud Dogs won the Bourbon Bowl, do ya?”
Popcorn ceilings are the Debil, I tell ya!!!
We have popcorn ceilings in our home as well and I too believe they were installed as an efficiency thing rather than a beauty feature. I had always thought there would be lots of repairs on a ceiling when the popcorn was removed so I had hesitated to do it to ours. I’m glad to know you just had to scrape and sand a little and then paint. I just might add it to my summer list.
Not all ceilings are ready to paint after removing popcorn. Some may need taping and mudding….big job. You will need a professional.
If you end up chipping or damaging the ceiling, it may need to be taped and mudded. We do that ourselves too. You don’t need a pro if you’re willing to watch a few youtube videos. 🙂
was that an adam sandler movie reference??? My family uses many a quote from his various 90s movies in our everyday conversation. Legendary.
Such a difference! We have plaster textured ceilings AND walls. It has pros and cons. It makes it way easier to fill in nail holes! But I still think I’d prefer to have plain, flat, ceilings and walls instead of these “bearers of darkness!”
We have done this in our last home. Two warnings: expect to do a lot of mudding and sanding to fix the imperfections the popcorn was hiding and turn off your ac during the sanding. Sucking up that dust can kill it. Don’t ask how I know….
The main difference in the brightness of your living room pictures before and after is the paint color on the walls, not the popcorn ceiling. Of course light blue walls are going to make a room appear brighter than that green color. It’s NOT a good comparison.
Oh for sure, but I’m talking about the ceiling alone. Check out how the light spreads across the flat ceiling vs the textured ceiling. The other stuff is brighter as a result of other changes, but the ceiling is brighter because it’s flat.
So you just painted right over the sheetrock? Nothing in between? This might make my day….I thought we had to do more than that once the popcorn was gone, so I’ve been dragging my feet on this project.
I think you do have to use a primer directly on sheetrock, but it’s the same as painting, and it lets you use fewer coats of more expensive paint. Thanks for bringing this up! I’m going to add that to the post.
An post stated it best. Be prepared to do more work to the Sheetrock to get a smooth finish. But if u can live with ceiling imperfections then go for it. I have never seen a ceiling that didn’t need sometime of work after the water and scraping. My husband and I have been doing drywall since 84. Yes he sprayed lots if popcorn. And now, has been removing it too
After scraping the popcorn from my ceilings and patching and sanding to my satisfaction, I just rolled on latex Kilz (no other paint) and have been very satisfied with the finish. I didn’t have to buy flat white paint.
Of course, if you take the before picture at a time when not much light comes through the window and the after picture when more light is shining through and at a different angle, it sure makes it look good.
Hmm… I think you might’ve missed the bottom before-and-after pic, where it’s the same lighting conditions and settings.
To keep the mess to minimum, we duct taped our putty knife to our shop vac and scraped away! Worked great – hardly any popcorn on the floor. After the scraping it does take a lot of wet wiping to remove all traces of popcorn, but well worth it.
Great instructions, LOVED the Waterboy reference! Lol
I would add a suggestion to wear a mask – asbestos or not, breathing in dust and debris is not a good thing.
The Popcorn Ceiling blog was hysterical and really hit home with me. Yes, I am another lucky homeowner who has popcorn ceilings and immediately saved your tutorial for future use. I also shared it with others who face the same dilemma.
Thanks so much!
Oh wow!! I was just staring at my yucky popcorn ceilings and thought it was going to cost way too much to take them down. Now I can’t wait to try your method out!!!
My entire house (walls included) is done in popcorn texture! I always wondered how to remove it even though this might take a while to get off the ceilings AND walls.
Would this work on popcorn walls, too? Some genius decided that was the best idea for our stairs leading to the second floor and ALL of the upstairs rooms. And in our laundry room. (and by genius, I obviously mean total and complete moron!!!). Ugh! Anyway… We had painted some animals in my sons bedroom wall, would this method remove the pictures from the wall??
“They stopped using asbestos circa 1977”
This is a huge myth. Asbestos is still being used today in building materials – paint, caulk, glue, tile, etc… Maybe not as widely as it was, but it is not illegal to make products with asbestos in it – unfortunately!
Make sure to soak it good and wear an approved mask just in case if you’re going to do it on your own – but I would not recommend. On bigger jobs I would definitely have it tested.
Yes, asbestos in popcorn was banned in the mid 70’s. In WA. State however, contractors were allowed to use what they had on and it has been tested positive in houses built ads late as 1984. We own a drywall company and always have the homeowner get it tested. We have never had a test come back that said it was more than 5% and was told that they are usually 2%-3% but by law, they have to put 5%. Homeowners can legally remove it and it needs to be disposed of in special bags and refuse only accepts it on certain days. I’d check with refuse in the area in which you live. On another note & food for thought, if the law allows a homeowner to remove it, what does that say about danger?
We removed popcorn ceilings (easily because they had never been painted) in our 1300 sq ft rental property, but there was no way we could have just sanded and painted. We (actually my husband) had to redo the ceilings with an orange peel (think that’s what it was) texture. We live in central Texas, so maybe it has something to do with how they build houses here? We then bought a 3600 sq ft fixer upper with popcorn ceilings that had already been painted and decided we weren’t up for the challenge. We have way too many other projects to tackle, so we decided we just weren’t up for that amount of work because taking them down meant that they would have to be redone with a new texture. I knew the work involved in an empty, 1300 sq ft home and decided that 3600 sq ft of living space that is full of furniture just wasn’t happening. For the record, I hate them…but I hate the work involved in changing them more. Yours look great! And I agree about the light factor…just wish it wasn’t so much work.
Oh, we later learned that there actually was a possibility that the 1984 popcorn we removed from the rental property actually could have had asbestos. We were under the impression, like many others, that if they were done after the 70s we were in the clear but our former neighbor had an asbestos removal company and told us that just because they stopped allowing it in the late 70s didn’t mean that the supply of building materials still available didn’t still have asbestos in it. I think I remember him saying something about being allowed to phase it out over a few years. I’ll never know if it contained asbestos, and that’s probably a good thing for my sanity.
I plan on taking the popcorn down myself, but I have a contractor who will texture my ceiling with the knock down you’re talking about (orange peel). It has to have some or it would look cheap if it were perfectly plain – I think. I am quite positive I have asbestos in mine, but when it is wet it is contained, it is only when it is disturbed while dry that there are issues with it floating in the air and into our delicate lung tissue, so sanding afterward is not going to happen, I’ll let the pro’s take that on.
Thank you for this information – 2 rooms to remove it from. H2O – a cute teen mermaid series from AU. I have enjoye finding it. Is that what you were referring to?
You have no idea how happy I am to have found this post! You are AWESOME! Thank you! I HATE popcorn ceilings with all my heart and soul. (And I caught your Water Boy movie reference – LOL) 😉
This works for non-painted popcorn ceilings, but not painted. I have both in my house, and the family room is painted. What a royal pain.
Yeah, the ceiling looked brighter? Think it had anything to do with painting the room a light blue? Yep!
This only works if the popcorn has not been painted. 90% of popcorn ceilings have been painted. It is cheaper to hire it done because of the gouges you will put in your ceiling if it has been painted.
Ok so some one LOVED popcorn so much they popcorned the ceilins and wals of my house upstairs. ….can I use the same technique on the walls?…it took almost 3gallons of paint to paint my boy’s room and its not a very big room…just because I had to keep repainting over the stinkn popcorn
It’s worth a try! Start in a small closet and see how it works 🙂
Gatorade is better – you are awesome for posting this. I have been plagued by these things for years… hovering over me with, watching, waiting until its time for them to strike. Well NO MORE CEILINGS CAUSE THE H-H-H-2-oh! is gonna get you popcorn! Seriously – thank you for posting this, a guy wanted to charge me 2 grand to do each room of my small ass apartment (I told him to GTFO) but now I know how stupidly simple it is I have a weekend project coming up.
Thanks for the tips…I’m a little surprised at how CRITICAL people are!
Add a cup of Downey Fabric Softener to the water and mix before you spray it on. It will come off much easier and smoother and will smell good. I owned an apartment complex and did this when I rehabbed all the vacant units.
An even better idea I saw that was less neck breaking was on Divine Desine (bc they didn’t have the time or labor budget) was to simply cover them! i.e. bead board, luan and then put nice molding beam strips in between for a great ceiling pattern.
Popcorn ceilings were never a design statement. The were sprayed on by lazy,or cheep builders to disguise how badly they were at installing ceilings or because it cut labor costs and the time it takes to throw up a house in all of our copycat housing developments. It only take a couple of hours to spray that stuff on and it takes days to properly install drywall. If you want to be able to remove it never paint over it. I made that mistakkee trying to get more light into a room. Big, big, big, mistake. I just sealed it onto the ceiling.
So if it is put up to cover sloppy sheet rock (which is what I thought too) how does the ceiling look good when you take it off? I want to do this, but I’m worried it will look worse without it. My house is a “throw together” sadly. So I’m particularly worried about that.
We just did this, made a huge mess! Some of it stick to our hardwood floors. It comes up just with a lot of work. Definitely put drop cloths down! Also our shoes tracked it around the house. But still amazing that have it gone from the ceiling!
Thanks a lot. I was just making peace with these ceiling and then this showed up in my Pinterest feed. Now they are ugly again, well they never were not ugly, but I was tuning out the ugliness. So I can either start in the hall bath when we re-do it next month or try to chase down that peace I was making. You are a peach Kelly, a peach. 🙂
Stay tune to see how this hall bath plays out.
What if your popcorn ceiling has been painted, can you still take it off the same way. Please let me know.
I’m not sure… it might be a little harder in that case. I would probably try it out in a closet and see how hard it is there. Good luck!
Our house is older than the 90’s and we have the popcorn ceilings (covers a world of flaws, I’m afraid). Anyway I’ve been wanting to get rid of them but my husband says that the “popcorn” is made up of asbestos. I was going to see if there was somewhere I could take a piece to have it tested.
Good luck having it tested! I tried and tried to get someone to test a piece I had scraped off, even tried calling the EPA in our state, but got NO answers from anyone! Does anyone even care about our health? I tackled the job anyway and removed all the popcorn from all our ceilings except for the kitchen. I just really dread all the mess. I did have to resort to hiring a professional to remove the stuff from the ceiling on our stairwell because I didn’t want to rent scaffolding.
So has anybody done this to find that the sheet rock underneath is not done well? I’m worried because my house seems to be slapped together and I figured popcorn was done so people don’t have to be as careful installing the sheet rock (seams and such). Just curious if anybody did this and regretted it because of what they had to deal with underneath.
A wise painter once told me to never wear shoes when you paint. You won’t know that you stepped in it with shoes but definitely will barefoot. When doing this old flip flops or bare feet keep you from tracking it. Two trashy towels and a foot washing bucket before you hit the clean zone will avoid a lot of extra work later!
Yes, that’s exactly why it was easier to spray on than to properly finish the sheetrock seams! You most likely will discover this yourself when you scrape the popcorn off. Use drywall compound to patch the flaws, let it dry overnight, then sand smooth. I used latex Kilz, which is a primer and skipped the paint as the Kilz left a nice flat white finish
Tried this with water in a small bathroom in case it didn’t work out and decided to skip the water. Ended up removing popcorn from our entire kitchen-dining-family-entry room that was painted (aren’t all ceilings painted?!) by scraping the ceiling while dry. No sanding, no patching, and painted the same day. What was left behind after the scraping looks like orange peel. Scraping debris made a holy mess. One person was dedicated to vacuuming the floor as we went to avoid tracking popcorn debris around the house. Covered everything in plastic we didn’t want to have to clean after (windows, cabinets, walls/floor boards) except the floors–I accepted cleaning those. So, a $20 big scraper with bag attachment, a $10 – 6″ putty knife for the edges and around fixtures, $20 – 400 ft of plastic, a roll of masking tape, and $65 of ceiling paint later (already had everything else–you’ll probably want an extension pole for both the scraping tool and your paint roller, and the other standard painting supplies, a plastic bag, a wet/dry vacuum, ladder, work gloves so you don’t exfoliate your knuckles with the ceiling and other safety equipment), our house finally looks like it was built in the current century like it actually was. If you’re not sure at your home’s asbestos status, play it safe and cover the ceiling with a layer of new drywall instead of trying to remove the popcorn. Think of the added insulation from the second layer of drywall as a bonus.
We bought an early 90’s house full of popcorn and to date I have dry scraped only two ceilings in our home. They both came out great with an “orange peel” look. I am reluctant to proceed doing it dry on the thought that at some point in the very near future we will be selling. I cannot afford to wet the ceilings and hire someone to come in a repair what could be bad taped and mudding jobs. Any thoughts from anyone?
I realize this is an old post, but:
my sons and I removed about 1500 sq ft of pop-corn in a few hours.
To minimize the mess, scrape with one hand, and “catch” the removed pop corn in a plastic garbage can lid in the other, then dump in a garbage can…MUCH neater. I good workout for your arms though!
I laughed at the line about it being in its “90’s” glory. Pop corn ceilings have been around since the 60’s…..including sparkly things called Diamond Dust.
I curse the “diamond dust”!!! my whole living room has the swirl plaster with that horrible idea of putting glitter in it. For heavens sake, who was the silly designer who thought that was a great design! its gross and everyone I’ve asked has no idea how to get rid of it and nobody has painted it since its been done-it. looks. gross!
I’ve finally made the decision to cover it with tongue and groove board so the ceiling will have a beadboard cottage look. Can’t wait til thats covered up-everyone comments on it who decides to look up
thanks
Our apartment was just rebuilt over the last year and they put in popcorn ceilings! I can’t for the life of me figure out why. I wonder if the property manager would notice if I did this…. 😛
Did you cover or remove your furniture before doing this?
Absolutely cover everything in sight. You are still going to have a big cleanup job.
Thanks for sharing your tips. It’s easy to understand.
I am so happy to read this.
Thanks for the informative article!
Your tips are valuable and that will serve as guide for readers.
You mentioned a tool to catch the popcorn as alternative to scraper….what is that? Can you shoot a pic or email a reference so I can find. Lowes didn’t know what I was speaking of?
I used a dustpan to catch the scrapings and then dumped them in a trashcan beside my ladder.
Thank you so much for sharing this information. Great tips! This blog will help me a lot.
I used an old pan with edges from my kitchen to catch the popcorn. I have done 2 rooms so far with plans to eventually do the whole house. It is easy to do! Had to do a bit of light sanding before priming. Looks fantastic! I’m so pleased with the results.
To catch the popcorn or Artex as it’s called in the UK, put a bin liner in a cardboard box, hold in one hand and scrape of the Artex with the other hand into the box.
This saves a lot of mess and a lot of earache from the Mrs.
Excellent job! The steps by steps process is definitely a big help for all those people who is struggling and afraid to do this stuff on their own. I am really grateful that you posted this DIY tutorial about removing popcorn ceilings. I really like the result. Keep it up!
This is a great and informative blog post. I did not realize the amount of light that was taken from the room due to the shadows, but I can definitely see a difference. And great job on mentioning the dangers of asbestos, it’s presence really can change the project altogether.
OMG…..If it wasn’t for your pictures and explanation of how…I wouldn’t be doing as I speak….Thank you so much….. Time well spent
We are doing this very project right now in our entire house. We have already done both of our kids room, their bathroom and hallway and are halfway through our living room/dining room area. Removing the popcorn has made a HUGE difference in our home. While doing the first room we did make a few scraps into the sheet rock which were covered with putty and then painted over with a 3/4 matte roller which hid the imperfections. I really love the results so far and can’t wait to finish the rest of the house. This is a wonderful tip to share with everyone and it is extremely simple yet messy but so worth the mess.
For get the squirt bottle, pump sprayer, etc,etc. Did 1800 square foot vacation home in Florida with 2 helpers in 4 hours. Use a garden hose with a MISTING NOZZLE SETTING.
Idk about you guys but trying to get my sponge like ceiling removed is a complete nightmare. Any tips for that?
That’s such an amazing yet simple way to remove popcorn ceilings. I wasn’t aware that one could do that easily at home. I am in love with this post!!
thanks for sharing, i’ve had this problem for quite a while I hate the style of popcorn ceilings.
Nice post to share. Thanks for sharing your tips. These tips are quiteIt’s easy to understand. Removing a popcorn ceiling is not necessarily hard, but quite messy. You can hire a professional to remove the ceiling. Keep sharing such posts in the future as well.