A while ago I showed you the playground Andy built for Weston, but every time I sat down to write the tutorial, I wanted to poke myself in the retina with a fork. Projects like this – following instructions, putting together puzzles, etc – are just not as fun to me as, you know… picking out fabrics. Laying on the hammock. Eating more cookies.

So guess who’s heeee-eeere! Everybody say hi to my
***
First, I need to warn you that I am a math teacher, with all the nerdiness and illiteracy that comes with that. I don’t do “words” or “sentences.” (But I sure can tear up a graphing calculator and geek out an excel spreadsheet.) So take all your expectations of my wonderful wife’s fancy writing (and pesky things like proper grammar) and throw them out your beautifully decorated windows.
Here are the facts. Please take notes and be sure to raise your hand if you have any questions.
This will be on your final exam.
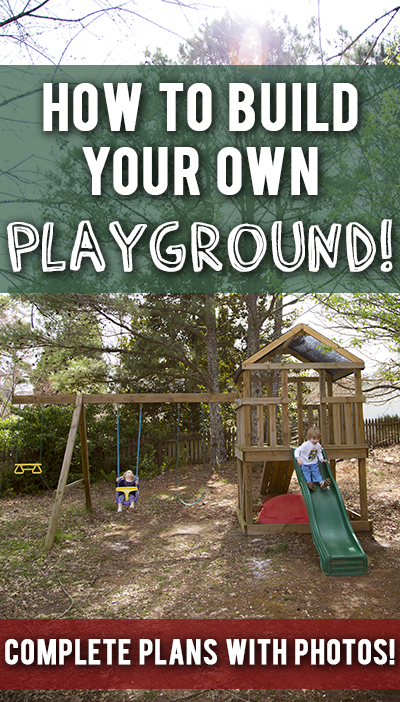
When we decided to get Weston a playset we started shopping around and found that they start at more than $1,000 for what we want – so I decided to build one myself. I googled playset plans but couldn’t find anything I liked, so it was time to come up with our own plans.

I found inspiration online, like this photo, and decided to try to build something like this but BIGGER. HUGE. My kid needs the biggest tower in the neighborhood, know what I mean? I wanted Weston and me to have lots of room for ACTIVITIES!!
(Will Ferrell reference, anyone?) I also want to be able to upgrade and add on things like a climbing wall, a second level, a rooftop pool and other crazy things that Kelly will never approve of.
Here is a list of the materials we used and prices we found. I also included the cost after using a coupon we found on ebay.

We can totally use the $70 we saved to buy a bungee so Weston can bungee jump off of the tower.
(Kelly, please disregard.)
You will also need these tools:
- hammer
- miter saw
- jig saw
- drill with a long 5/16″ drill bit
- and a 1/2″ socket or wrench.
First, find a safe, level area for your playset. The whole thing ends up being about 18 feet wide and 15 feet deep.
Once you have all of your materials, cut and assemble two of these things, which will become two sides of the tower.

Drill holes for each of the 5/16″ bolts, washers, and nuts to attach everything and check to make sure it’s square. I used two bolts to attach each of the 2″x6″ boards and one bolt for the 2″x4″s.
Next we connect both sides of the tower together with 6-foot 2×6’s and 2×4’s to complete the tower frame.

Now you can install the decking support and decking. Cut and install the deck supports with screws like this.

Then cut and install the decking on top using the deck screws. Use a jig saw to cut around the 4×4 posts for the first and last piece of decking. (See pic below.)
Now we installed a piece of 2×2 around the outside of the posts on top of the decking with the deck screws just like the picture below.
 Next we cut the 2×4’s to make 26 slats (Is that what they’re called? Let’s call them slats.) and installed them using deck screws.
 Be sure to leave a hole for the ladder and slide.
 On the side where you’ll attach the swing, leave a hole in the middle so you can build some supports like this later on.
 So you really only have one side completely closed in for now. We’ll close in the opposite side after we install the 4×6 beam later.
At this point I got sick of climbing up into my gigantic tower, so I built a ladder out of 2x4s by cutting side pieces at an angle on both ends and screwing the steps in parallel to the ground, then attached the whole thing to the tower.

For a more exciting dismount while finishing the tower, I attached the slide at this point.
I may or may not have taken several breaks to “test out” the slide.
 And now you have a magical tower you can use for important bonding activities with your kids, like hide and seek, light saber duels, bungee jumping and other important developmental activities.
This should keep you busy for a day or so. Next time I’ll show you how to build the swingset portion… when (if) Kelly decides to relinquish control of the ol’ blog once again.
Update: You can check out part 2 of this post at this link.
 Hi, I'm Kelly. Glad you're here! This little blog is where I chronicle our efforts to fix up our beaten-down home on a tiny budget. We're not there yet, but here's a peek at the view along the way...


Totally hilarious and completely cracked me up! I didn’t understand the directions in the least but I laughed a lot. 🙂 More posts from Andy!!
Woo hoo! Go Andy!!! You did a fantastic job!! That is really quite impressive. I’m glad to see you jumping into Kelly’s forum here – boys can blog too, it’s okay. 😉 In fact, I’m going to get my hubby (also a fellow nerdy guy 😉 to post on some things in the next few weeks, like no VOC paints, etc.
All the best,
Cat@budgetblonde.com
I wish I had kids NOW so we (Rick) could build this for them! We inherited one with the house but it needs some….TLC before kids can play on it. (Like should the swing bar sag and snap when you move the swing?) I raised my hand to ask that question because I am a good student. And I didn’t forget my pencil, either, for note-taking. (Do 9th graders in Georgia have as much trouble with those 2 rules as the 9th graders in NY?) 🙂
And I agree, Kelly, about writing these building tutorials. (Booooooring. But important, nonetheless.) It never occurred to me to poke myself in the retina with a fork. Must remember that in the future.
I love this! Can we please please see the rest- we have been wanting to build one in our yard, but we don’t care for mort of the plans we’ve found, this one is gorgeous though,
Awesome! How fun!
Andy you are a rock star! Will we be seeing you at Haven too? Great post and my eyes only glazed over about 1/3 of the way through. My hubby would thoroughly enjoy this post, he was a math major and is a geek major in real life. Ok he really is and would agree with me on this. Anyways, nice playground!
Amazing!!! My dad built us a playground when we were young, similar to this one. We made a lot of good memories there! 🙂
Wanta come build one for my grandbaby………
Great job! This is pretty much what I had in mind after seeing a lot of store-bought sets and seeing that I can build it myself and with the features I want. One question, what tool do you use for the design pictures? I want to design mine, which will be slightly smaller, and will have other components. Please email me with the answer if you don’t mind.
Thank you for writing this blog! My husband and I would love to build this for our two young daughters, but we would like to make the first floor into a playhouse (with a deck and half walls). Would it change the plans substantially to make the first floor taller? My husband says it’s just a matter of simple trig. to adjust the swing set portion.
If you adjust the swing set portion, the only other adjustment we can think of is that you’d need a longer slide and ramp/ladder. Having a play house underneath is such a fun idea!
Hi Kelly
Just wanted to thank you for posting these great detailed plans, and let you know that I added a link to this page on our new post http://www.totalplaygrounds.com/blog/28-free-diy-playset-plans/
You have some really cool projects on this site btw! Glad I found it.
Important Playset Ladder Safety Notice: This can potentially save a child’s life, make sure that the distance between top ladder step and the deck is 9″. Plans Kits that have been designed to meet exceed ASTM/CPSC safety standards: http://www.detailedplay.com/SwingsetPlans.htm
….make sure that the distance between top ladder step and the deck is less than 3″ or greater than 9″. (blog form seemed to remove the less than greater than special characters, opening 9″
Can you tell me what angle you cut the top and bottom boards for the ladder? Also, how long are the sides of the ladder? Thanks!
It is always important to remember that safety comes first. Here is some safety tips when building your own backyard playset – http://www.playsetsoutdoor.com
Can you tell me where you bought your slide from? I am having a tough time finding a reasonably priced 8 foot slide.
I think we got it from Home Depot. If not there, it was Lowes. Good luck!
Did you have to anchor this playset to the ground or was it heavy enough to support its own weight?
It’s heavy enough to support its own weight.
Hi, I absolutely love this and will build it for my son as soon as I have some extra spare change.
I just have three questions though.
The first is that I don’t know if I missed it or if it was forgotten, but what are the dimensions of the wood that make the “v” on the swing side of the tower?
Also, when attaching the 2 by’s to make the tower, how did you space out the holes for the deck screws so that they didn’t hit each other going into the 4x4s? (Hopefully you get what I’m asking).
Finally, did you use regular lumber and decking or did you use treated lumber and decking to build this?
Probably silly questions but I’m a newbie woodworker and brand new home owner so I’m doing what i can to learn to build and update our home for my family.
1. It’s 2 8-foot pieces of 4×4. We just notched them and opened them up to an angle that seemed sturdy.
2. We offset the bolts so they didn’t hit each other.
3. Pretreated. 🙂
What kind of wood did you use? I’ve started pricing some options, but they are way more expensive. Thanks!
there is no mention of deck screws in the supplies needed section. only until i’m in the middle of building AND after i have left the hardware store is there a mention of deck screws. what size were used and how many? i’m also guessing they were wood screws? later.
Thank you for this! My husband just built this last month and we love it! Great instructions! Would love to share pics if wanted/needed. 🙂
Just like to say thanks a lot for sharing. My husband and I are going to build this for our son.
And you made the impossible possible!!
You guys really seem very nice – fun people.
Hi! My wife stumbled upon your blog via Pinterest and it was exactly what we needed! After the sticker shock of a brand new playscape wore off, we were confident and determined we could build one ourselves. Our boys (4 and 2) absolutely love it. We couldn’t have done it without your step by step tutorial.
THANK YOU!
A picture of ours (with credit to you) can be found here – http://www.bradleyfawver.com/the-structure-of-all-structures/
Did you use pressure treated wood on the playground?
Andy , nice job! A few comments, I build my own for my kids years ago and am going to build one for my grandkids this spring. One suggestion, Your ladder looks and sounds as if the rungs are only screwed to the rails. This is a dangerous thing as over time they will weaken and the rungs break. The rails should either have cleats added below each rung or dados cut into the rails. Screws should NEVER be the sole support of rungs.
Also I don’t use 2x4s for the deck slats. It is way over kill and leaves a clunky stiff looking finish. May I suggest you buy replacement fence pickets at the home center. They come in different shapes, lengths and widths and add a fun fort like look to the deck fencing with no more costs then the bulky and bland 2×4 option. I suggest asking for sizing help at the home center for carriage bolts, lag screws and deck screws based on which beam or board it is used for to get the appropriate structural strength…hardware is the weak link that causes many failures when installed by in experienced builders. Thanks.
what grade of lumber did you use is pt safe ?
Thanks Andy, just finished building one for my kids using your instructions. Came out really well all the way over here in Ireland. I made the roof a bit taller to better accommodate us taller kids but other than that I copied your plans verbatim.
Thanks for the instructions. I added a 30 square foot rock wall on one side and used an A frame bracket I picked up off amazon for $57.00. I also put my beam that’s holding the 4×6 swing beam up at 6.6 feet so there is more clearance under the beam. I then added a camouflage tarp I bought off amazon for 10.00 for the roof. It looks great and the kids love it. If you send me your email address I will send you a picture.
Great stuff – I just completed a build using your instructions over here in Ireland, with a couple of very minor modifications, and it came out great. My kids love it and my wife is happy with how it looks (very important!). A few friends have asked for the plans so I will spread the link to your webpage.
Regards,
Phil.
Nice work! I used your design and added monkey bars and a rock climbing wall, and my four kids are ecstatic with the outcome. Thanks for posting!
Andy the English teacher
Thanks for sharing. Those ideas are wonderful and I like how “modular” your design is, i.e. I can use it as sort of a skeleton for custom playground design, really great thing.
so much room for activities! Great tutorial. I can’t wait to see the addition for the roof-top pool. 🙂
Has anyone actually built this thing? I am in the middle of it now. There seems to be some technical difficulties. Like 5/4 X 12 nobody carries. I think he meant 5/4 x 6. That makes more sense. I have found I have to just wing it I’m certain spots.
I agree– I’m browsing for materials online and I’m having difficulty finding 5/4 x 12 as well, so I was just going to opt for 5/4 x 6.
I cant find it either. Looking at the pictures too I dont see anything that could be a 5/4 X 12. Anyways, question for you… does the wood need to all be pretreated?
Andy I’m constructing a playset myself, with a little help from friends. Where did you find a $70 slide? Nice price!
jennifer