We finished the office built-in wall. I mean, no big deal. Just a tiny little project we started and finished. No exclamation marks necessary.
We are all TOTALLY CALM AND RESERVED ABOUT THIS.

Extremely accurate depiction of both of us.
Okay, for OTHER people, this would be no big deal, because OTHER people can start and finish projects in NO time. But reaching a “finished” point for us is KIND of huge. Hence the freak-out moment.
SHUT UP AND SHOW THE PICTURES.

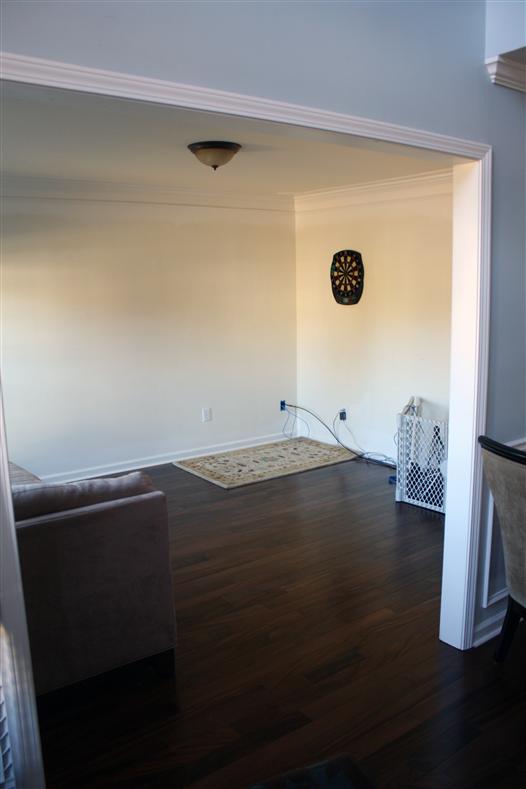
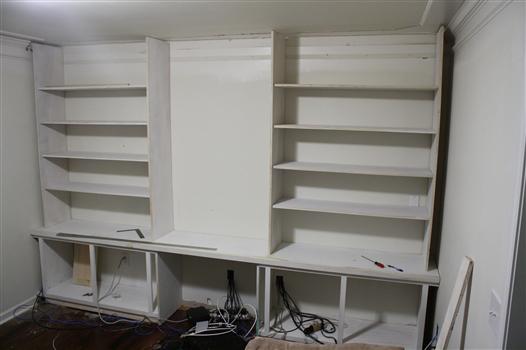
That’s what it looks like. But here’s what it used to look like:
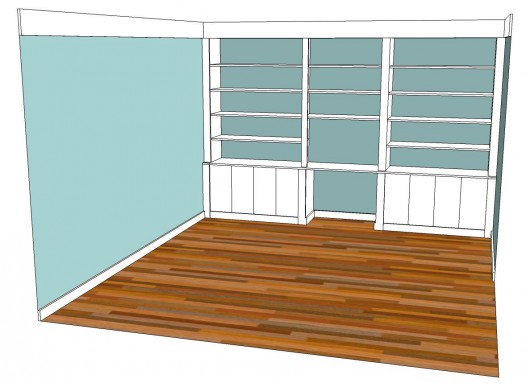
Then we made a plan for the wall:
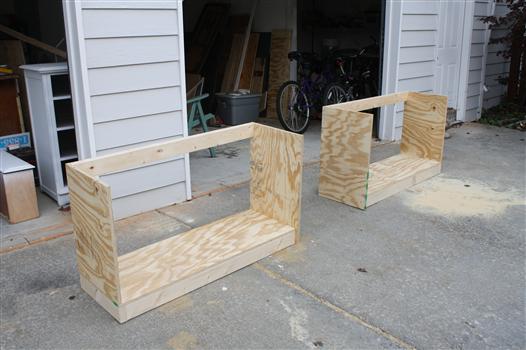
And started building the cabinet boxes:
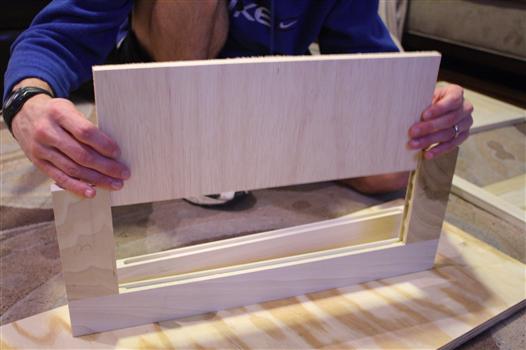
And the doors:
Then started installing:
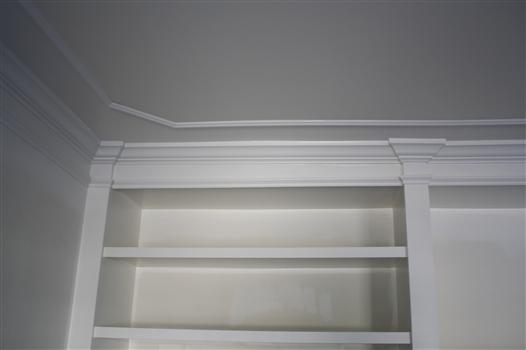
Added some snazzy moulding:
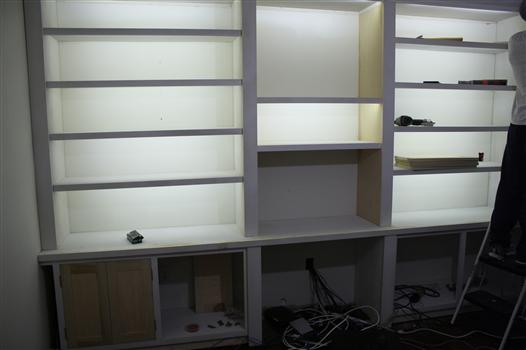
And the coolest lighting system ever:
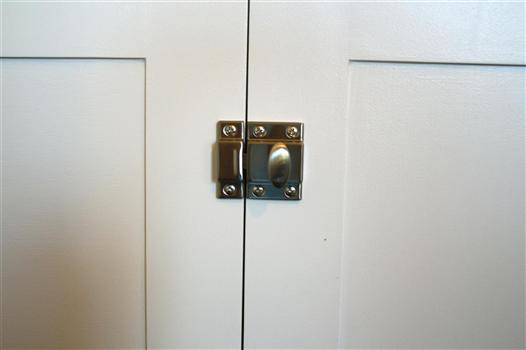
Chose some pretty cabinet hardware:
And selected a paint color using our patented Thinking Tube Method:

Which all led to this:


It’s fresh and new and built-in. Custom. Andy did a fabulous job. I’d totally hire him again. Here’s our cost breakdown:
- Lumber: $275
- Special inset hinges: $30
- Door hardware: $30
- Paint: $15
- Lighting: $35
- Total: $385
We kept costs low by using lots of coupons, shopping around online (tips on this later this week!), using paint and wiring we already had on hand, and um, of course – doing it all ourselves.
It’s hard to say exactly what this would’ve cost to have it done professionally, but a little online research makes me think we’d be looking at a minimum of $3000. I like saving about 90 percent of things.
Update: We finally added all our junk to the shelves. See that process here!

(You can also see our DIY capiz shell chandelier in that pic. Here are the details on that.)
But there it is! Something start-to-finish complete! Hallelujah y’all. Did you get anything finished this weekend?
 Hi, I'm Kelly. Glad you're here! This little blog is where I chronicle our efforts to fix up our beaten-down home on a tiny budget. We're not there yet, but here's a peek at the view along the way...


UMMM HELLLLOOOOOOOO THIS IS FRICKIN AMAZINGNESS. I’m so thrilled for you guys! That is beautiful and I cannot wait to see all the crazy in your head come to life! AH-MAZING!!!!
YEAH!!! I can’t wait to see it all styled!
ahhhhh they are SO gorgeous and professional! I’d never guess in a million years that you guys did them yourselves. Total perfection.
awesome. awesome.
Woo Hoo! You did it, You did it, You did it. Yeah. Kelly & Andy built a built in bookshelf, you did it, you did it, hooray! Sorry for the random Dora the Explorer song. They look fabulous! Want to come build me some now? Can’t wait to see it all styled up! Now it’s time for the nursery reveal tomorrow right? 😉 You guys rock!!!
Oooooooo, so very pretty! Me like!
holy canoli! it looks AMAZING!!!!!!!! wonderful job! love that backing color!
Oh. I don’t like it.
Juuuuust kidding! It looks fabulous. Now you must spend the 90% saving on equally lovely things to go in it. Surely?
You can’t hear me but I am giving you and Andy a round of applause! Take a bow! It’s looks freaking amazing and I love the goodies you have lined up to fill it! This has inspired me to such an extent that I want to do it. Just out of curiosity, what level of carpentry skills does one need to accomplish this beauty??
Kelly it’s fabulous!! I want to close my eyes really tight, make a wish, and open my eyes to see these in front of me in my house!! What a beautiful built in, I can’t believe you both did this from scratch. Very impressive!
Wow, you two did a great job! LOVE this (especially the 90% savings)!
http://MyersMaison.blogspot.com
Wow, you two did a great job! LOVE this (especially the 90% savings)!
MyersMaison.blogspot.com
seriously, this looks amazing! the addition of the moldings makes it look SO custom!! i think my favorite part is the hardware you chose…its SO beautiful!!
Omg Kelly!! It’s magical! Turned out super amazing and now I want one even more!!! Especially at that price. 90% off. Best day ever!!
Xx. Patience
You 2 are pure genius! I guess you can have your baby now huh? Congrats on a fantastic job both of you.
SO awesome!!! I love them! I can’t wait to see how you decorate them!
Beautiful job! Love the white and teal.
Inspiring! Now I want to build them too.
OMG! The result is spectacular!! You two did a first rate job on this built in. My uncle is a custom cabinet maker and I can tell you, for sure, it would have cost at least 3k if not more with all the details you added. WAY TO GO! and I still can’t thank you enough for finding and sharing that brilliant lighting!! My cabinetry thanks you too!
AMAZING!!! They look so great! They look so professional. Can’t wait to see them all styled!
Gorgeous! Love the blue!
Awesome! It looks SO GOOD! I know you must be thrilled that it’s done and looking so amazing!
WOW! These are GORGEOUS! You must be so happy with them! I really love the blue you picked for the back too.
Can’t wait to see how you style them! 🙂
Wow wow WOW!!! I absolutely love it!!! And for less than $400?? Oh my goodness!! Way to go!!! (P.S. I love your drawing at the top of the post too 🙂 )
I am sooooo doing this in my living room and my office thanks 🙂
Wow!!!!! That is one beautifully thought out and executed project. I’m blown away (and pretty jealous!)
David
Oh my goodness that’s so great! We have a similar space in the basement and you’ve got some real gems for us here! Thanks for linking up to the RRR party, we’re so glad you came!
Oh, and we’ll be featuring you tomorrow morning – we really did love this!
Amazingggggg. I love it. And LOL to your thinking tube. (thinking of buying not going to lie…)
WOW! I am totally IMPRESSED!!!! This is exactly what we’ve been looking at to do in our office as well! Congrats on the AMAZING finished project!!!
I’m a new follower and can’t wait to see how you decorate it!
That is fantastic!!!!
Poppin’ over from Cassie’s to say how AMAZING this is!!! You so crazy, too…
Just absolutely beautiful!!! I love the color you chose for the backs of the bookcases. We are hoping to begin a similar project this summer so your tutorial will definitely come in handy. Thanks for sharing all the amazing details. Megan
These are amazing!! We are pretty DIY savvy here, but I think this would be over our head 🙂
Great job!!
Love this! I’m dreaming of adding built-ins on either side of our fireplace… oh how heavenly it would be to have someplace to put our books!
WOW, great work! We’re getting ready to do built-ins with our friends and can’t wait!
We are running a Before and After Link party to support Habitat for Humanity, with a chance to be featured on other big blogs and win gift cards. Would love if you entered! http://www.oneprojectcloser.com/2012-before-after-series/
Beautiful! I was looking for ideas so my hubby could get started on some built-ins for our living room and found your blog! I just was wondering if you have any pix or instructions on how to make the shelving. . . . Are the shelves fixed or movable? If movable, what type of system did your hubby use: pegs, etc.? Thanks for any info!
They are fixed, and he used pocketholes on the sides to hold them up. We didn’t take a ton of pics of that stage, so I hope this helps at least a little and you’re able to get your built-ins! 🙂
Thanks for the info.! I’m stuck though on how deep to make the cabinets below. . .help! I love that your cabinets are deeper than your shelves, that there’s a little ledge Could you pass along the depth of your cabinets and shelves? You are so inspirational!
I think the shelves are 12 inches deep and the cabinets are 18, so we have a six-inch ledge. Hope that makes sense. I also really hope you’ll send pics when you get your wall finished! I’d love to see!
Nice work, your shelves are gorgeous!! I have this linked to my DIY built-ins post too today, well done!
Beautiful and inspiring! Can you share the amazing lighting system? Thanks!
This is the first post where I talked about those lights (which are definitely amazing! we love them): http://viewalongway.wpengine.com/2012/01/let-there-be-fancy-low-watt-high-tech-light/
And here’s the tutorial for how to install them: http://viewalongway.wpengine.com/2012/01/how-to-install-inexpensive-energy-efficient-under-cabinet-lighting/
By the way, we also used those inexpensive, energy-efficient lights to make a cordless lamp, which you can see here: http://viewalongway.wpengine.com/2012/08/lamp-hack-how-to-make-any-lamp-cordless/
Love the built ins. I al starting this project soon. What type of lumber did you use for the cabinet doors? And the cabinet tops? That a long span to cover with plywood. Did you use any extra supports?
Great job!!
Thanks! The doors are poplar with a plywood middle. All visible wood is poplar and the boxes that support everything is pine. The cabinet boxes are the only thing supporting the counter. Good luck with your project!
This is amazing! I’d hire Andy again too! I am blown away by all the work you did to build that. AND by the molding details. That’s crazy! Nice job and thanks for sharing. I’m curious what color you used on the back? Was it Symphony Blue? It looks a lot like my son’s reading nook closet.
Thank you so much! The wall color is “Brigade” by Olympic. It does remind me of that amazing reading nook of yours! PS: I could live in that reading nook for days at a time.
Love this! How did you affix the shelves to the bookcase frame? And did you follow any DIY for the cabinet bases?
Totally doing this but need help! 🙂
Thanks! Andy used a kreg jig to attach the shelves. He loves that thing so much and uses it all the time! To build the cabinet bases, he actually kinda just winged it and made it up as he went along. He didn’t even read up on it, which is unusual for him, just thought of how he wanted it to work and did it. 🙂 I know that’s completely unhelpful. So sorry! I bet you could dig around google a little and find some great tutorials. Best of luck to you!
This is beautiful, and you make it look so simple. This is similar to what I want in my “formal” living room. Right now it has computer cabinet in it. Anyway, wondering where you put your printer, and all your wires/cords from your computer stuff. I can’t see them in the picture.
Thanks for this demo. I cant fork out 3,000 either. This seems doable.
Hope to hear from you.
Thanks! We actually put all the ugly stuff – printers, computers, routers, etc – in the closed cabinets. My husband just drilled holes so we could run wires inside the shelves and they all stay hidden. I’d love to see pics when you finish yours!
Great built ins! I’d like to do something similar at our house. I’m curious though what are the dimensions of your cabinets and shelves? Not the width because that will be different at my house. What is the height and depth of the base cabinets, and the depth of the upper shelves. Are any of your shelves adjustable or are they all fixed? Thank you.
I must say that I am impressed by everything here – really – not use the work, but the writing of the blog, the style, you tastes and talent – you should be very proud !
OMG, you’re amazing! Im getting married next year and I have so many plans for my new house, I just hope the “crafting god-mother” will sprinkle some craftiness into me!
So I just happened upon one of your posts while scanning Pintrest (at 4am) and went on to read every one of your projects lol! You are amazing! And your husband… Sigh, if only my husband could build stuff 🙁 He barely owns any tools! Lol! I’m hoping he will get handier along the way. Anyway, I love the way you type, like exactly as you would converse w someone. Makes you relatable. You have inspire me to get busy on my home too! I can’t even imagine how your homes value has skyrocketed since you first bought it! (PS can I borrow your husband to come teach mine???!) Thanks!
My husband and I are inspired and doing this project (not exactly but really close) in our office. What kind of paint did you use for the shelves themselves? Every time I use latex stuff sticks to it and it comes off (even with dedicated sanding and priming). Do you remember the brand and type?
It was latex and we had to let it cure for weeks so it’d be less sticky. I think you can apply furniture wax on top of the paint and that helps with the stickiness.
Looks soooo good! What did you use for the desktop surface? We’re hoping (okay, I’M hoping, and will later convince my husband that this is a MUST project!) to do something like this soon, and love the cost-effectiveness of it all, we recently priced out new built-ins, and they came out to be in the $6,000+ range. Needless to say, NOT happening. 😉 Thanks!
Thanks! We just used birch plywood for that. Good luck!
Hi! I was looking for plans for a bookcase for my office/study and here it is! Beautiful! Do you have a photo of the finished room from the outside? Was the bookcase put on the right side or on the wall facing you as you go into the room? I’m trying to decide what is the prettiest and most functional. Our study is 12×11 with 2 windows on the left. So, we can put bookcases on the back wall and have a desk that faces the front. Or Put the bookcases on the right wall, and have the desk viewed from the side as you walk in…. So many decisions! Thanks again!
Thanks! You can see more pics of the room here: http://viewalongway.wpengine.com/2012/10/fresh-new-de-germed-walls-in-the-office/
Our desk faces the windows and the shelves are behind it.
Great post. I Just completed a built in with floor the ceiling shelves and crown At tbe top. thanks for the inspiration. You guys are awesome. I love the low voltage lighting. I did not use on this project but plan to use in future. Thank you and. Great job on all your posts
Great job on the built-ins. How did you all affix the bottom & top sections to the wall behind it? Did you put backing on the pieces, or is that drywall behind the shelves? Thanks
It’s just drywall. 🙂
Hi, what a beautiful finished project! I`m trying to get my boyfriend to build something similar and I was wondering, in the stage where you added molding, how did you achieve the thicker look on the inside of the supporting shelving, on the outside I can see you left a space between the wall and the cabinets, but on the inside did you just add a piece of drywall then molding in the front
We added 1×2 poplar boards to the front. Is that what you mean?
Yes! That is what I needed to know, thank you so much! Now to the drawing board lol
Kelly! I found your blog recently and love it! My husband and I are currently in process adding built-ins next to our fireplace. Our shelves are about 51″ wide. Did you add any support to the underside of your shelves in case the weight of ALL THE BOOKS makes them bow? Like a strip of quarter-round on the back or something? I think we will make side cleats to lay the shelves on, but we’re not sure the best support method. If you didn’t add any, how are they holding up under those Reader Digests? Thanks!
Thanks! Yes, we have 1×2 boards running along the back, and the shelves are resting on those. That’s holding everything up perfectly so far!
Thanks for replying!!
Kelly – WE FINISHED OUR SHELVES! Sorry to yell. But yes!!! Thanks for the help of this post. See the picture here! http://thecandidpastorswife.com/2015/01/diy-built-ins-by-non-pros/
Hi Kelly and Andy,
I am about to start a similar project but Im not quite sure how to secure the shelving, specifically the vertical side boards to the back wall like in picture #6 above. Thanks.
I loooove love love all your posts! There’s one thing that happens in my brain every time I read them though .. I think to myself, ‘there is no way I could do this. You often talk about your husband doing that handy work with wood and power tools and what not. Well, I don’t have one of those! haha Let alone power tools. My plan is to buy a house in July, and have renters move in with me to help pay off house (and cuz I’d go crazy living by myself). Then I want to totally renovate it!! As you have done with your house. Anyway, do you have suggestions for my situation? I just don’t know how I’d do all that manly part stuff! Especially without any tools. Maybe tools are something I aught to invest in.
Oh I totally think you could do it! I’ve used the tools myself and it’s really not a big deal once you try it once or twice. I just use my husband because he’s here and he’s convenient. 🙂 Don’t let that stop you!
So I am thinking of doing something similar and came across your blog while I was looking around for ideas. This is amazing! What kind of power tools did you use? I was thinking of investing in a saw and I have drills and other small stuff like that. Thinking of a circular saw. Your thoughts?
Must haves for this type of work are going to be a table saw and chop saw. For occasional use a small chop saw is fine, but a big 12″ compound sliding miter is awesome…i bought a harbor freight one for $139 but put a nice dewalt 60 tooth blade on it and i love it. Its as good as any saw we use on a jobsite. Then an air compressor, hose, and I’d use my 15 GA. Finish nailer and 1-1/2″ nails on all of it except the face frame. A skilsaw( what I call a circular saw) would get you by but it’s gonna look janky. You need square cuts and straight edges. Compressor and nail gun (prolly 15ga finish nailer). Screws, drills, and countersink. Grab a level or laser if available. Gonna need beer and very loud heavy metal music. I suggest lamb of God or slayer. That should get you where you wanna be.
Hi! I got here via your “which blue” post. I admit to not yet having read all these comments, but what blue did you choose for your bedroom and for the back of your lovely built-ins?
I would like to share my experience of bookshelf with you. When I was in hostel, I always requested my dad to provide me a bookshelf but he didn’t know the method. I wish that I would had visited your blog two years ago and show my father that I want exactly this kind of bookshelves. 🙁 ,, Thanks a lot for lovely post
Hey!
I’m going to start a floor to ceiling bookshelf and then I found your blog, which details exactly what I had envisioned in my head! NICE. Question:
Did you just use plywood for the entire thing? Is the main horizontal piece that spans the entire desktop area one piece? Plywood? Where did you get the molding? And the hinges attach to the vertical side panels and then the cabinet doors? So essentially making a 90 degree angle? Thanks so much this is awesome!
This is awesome!!!! This is exactly what I want to do!!! I’m so afraid that I will mess it up. Are you guys skilled in carpentry? It looks absolutely stunning!