A couple months ago, I posted a tutorial on how to make any lamp cordless.
Except I kind of lied a little, because the post only talked about how to make task lamps cordless, and people who wanted to make their lamps with shades run on batteries were left… well… in the dark. (Oh that is SO LAME. Sorry.)
People across the world were throwing their shaded lamps at walls in fury. Task lamps were flying off the shelves of local stores as people stampeded and cleared the inventory. Neither of those things actually happened. But we did get a few questions on how to do this hack to lamps with shades, and I promised an update so here it is!
One quick aside…
The other day, the power went out in our whole neighborhood, and guess who was livin’ it up by the light of a battery-powered lamp? THESE GUYS. Total win for the cordless lamp. On to the tutorial!
Materials You’ll Need
- Lamp.
- Wire hanger (possibly).
- 8 AA batteries (to save money, use rechargeables)
- 8 AA battery pack (like this)
- Wire strippers
- Strand of LED lights like these
- Soldering iron (we use this one)
1. Connect the strip lights to the lamp socket.
As a reminder, we’re using these LED strip lights which are BETTER than sliced bread. BAM. Take that, Wonderbread.
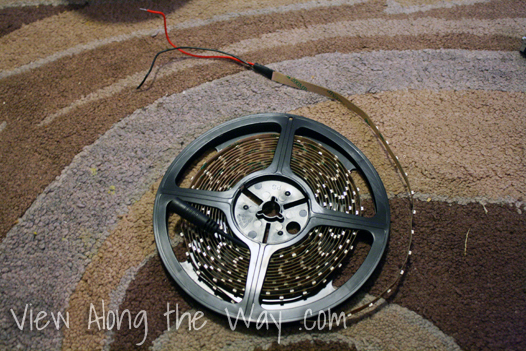
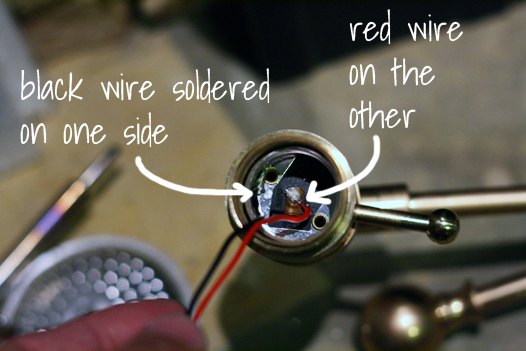
The end of the light strip has a red wire and a black one. You solder the red wire of the light strip to one metal piece in the lightbulb socket and the black wire to another. At this point, it doesn’t matter which wire goes to which metal piece. (See step 3 of this post for more detailed step-by-step instructions for this part of the process.)
2. Wrap the strip of lights around the inside of the shade.
Now you just need something to stick the lights to under the shade. In some lampshades, this will be easy, and in others, you’ll have to hack it a little to create something.
Here’s a look at the inside of a shaded lamp that I had on hand:

The shade has a cage that goes around the lightbulb. After you solder the light strip to the bulb socket, you would just wrap the strip of lights around that cage, and because the strip of lights is adhesive, it would stick right in place and give you a beautiful glow.
ORRRRR….
If you’re working with a shaded lamp that doesn’t have this cage, there’s still a way to do this. Here’s a look at the inside of another shaded lamp that I had on hand. (Yes, I totally have a collection. It’s shameful.)

Now we’re going to create our own cage to attach the lights to. We found a wire hanger and wrapped it around the lamp, under where the bulb would go. Then we shaped it into a triangle roughly the size of a lightbulb. This is what the wire hanger looked like outside of the lamp:

And here it is in place on the lamp. We just wrapped it around the lamp and it stuck just fine, but you might need to use electrical tape or duct tape if it doesn’t seem sturdy on your lamp.

Now you would solder the light strip to the bulb socket, and wrap the light strip around this faux cage you just created, like so:

3. Wire the bottom of the lamp to the battery.
Just follow step 6 of this post. The steps will be identical.
Ta-da!

Have you guys tried anything with these light strips yet? Should we be expecting you during the next power outage?
P.S.: Check out our other lighting projects here, and our other tips and hacks right here!
This post contains affiliate links.
 Hi, I'm Kelly. Glad you're here! This little blog is where I chronicle our efforts to fix up our beaten-down home on a tiny budget. We're not there yet, but here's a peek at the view along the way...


Okay sister half of my “bookmarks” on my laptop are from View Along The Way with all these great tutorials you have, would ya knock it off? No just kidding, thank you for this tute, I have a floating table and chairs in my living room that badly needs a cordless lamp and cannot wait to try this. You.are.the.best.
I shrink in fear at the sight of wires … but I’m so happy you put your neighbors to shame during the power outage! Maybe they thought you had some kind of magical powers …
🙂
Linda
This is seriously such a good idea! Thanks for posting this for shaded lamps too! I really want to use it in our living room!
I also have a shameful collection of lamps. No Superman pjs, though. That makes me less cool than you.
Thank you so much for shedding some light on this delicate lamp subject.
Bliss
Awesome tutorial! Now I can have my desk in the middle of my office after all 😀
Genius.
Pinning! Your electrical skills amaze me, the minute I saw this I just put it into the “I’ll never do this but Kelly rocks” box in my mind:)
Jessica
Pure genius.
Did you attach the battery pack to the end of the cord, and tuck the cords under a table? or did you stuff the battery pack inside the lamp again?
We stuffed it back inside the lamp again, but if your lamp doesn’t have space, you could always hide the battery pack under accessories nearby.
What?! Super cool hack!
can you use a regular light bulb instead of a string of led lights?
A regular light bulb will take a higher voltage. You can do it but you will either have a dim light or have to convert the DC to a higher AC.
Regular bulbs can run on 120 Volts AC. The battery lamp runs at 12 volts (8 batteries x 1.5 volts = 12 volts.) You would need 10 more battery packs and it might not last as long.
I think this may work though with the new led light bulbs or the less new florescent light bulbs, both of which use much less voltage. What do you think?
What a great idea! Is the lamp bright enough to read by?
Can you do this with a hurricane lamp. It has no shade.
If so please post directions. Thanks!
Have you been able to figure out how to put one of these on a timer? I have stand-up lamps in my living room and would love to get rid of the cords that run across the floor, but I also have one of them on a timer.
We haven’t tried it, but I bet they make battery-powered timers that could do the job. Please let us know if you do!
how long do the batteries last?
We’re not sure yet. We’re using rechargeables and they haven’t needed recharging yet – still going strong!
Hi, love your wireless lamp idea! I just stumbled on this post and can’t find an accurate idea of exactly how long your AA battery pack lasted before needing recharging. I’m about to go crazy and do this all over my house! Thanks.
We actually don’t know yet! We haven’t used it until it ran out, even though we did that post a couple years ago. 🙂 We don’t use those lamps a ton, but we haven’t reached a point where we had to replace them yet.
what do you use for wire ends to connect the light strip to the light socket after you’ve cut the lead off for the first lamp? are there replacement parts or do you strip the wires further down the light strip? or will all my questions be answered if i had a light strip in my hands? love the idea, love your sense of humor more! thanks
I had the same question because I plan on making 10 shaded lamps for part of the centerpiece at the wedding! this is such a great idea, espescially if the lights can be split between a few lamps, it would save so much money!!
What about Pottery Barn lamps like this one? http://www.potterybarn.com/products/100388/?catalogId=47&bnrid=3318529&cm_ven=Google_PLA&cm_cat=Lighting&cm_pla=Table_&_Task_Lamps&cm_ite=Eva_Colored_Glass_Table_Lamp%2C_Jade&srccode=cii_17588969&cpncode=30-152554519-2
what do you use for wire ends to connect the light strip to the light socket after you’ve cut the lead off for the first lamp? are there replacement parts or do you strip the wires further down the light strip?
Thank you so much for this!! I need to do this for accent light in bath,… tired of the cord behind the sink…. I wonder if I can do this for my lovely old wall clock that my friends hasseled me into taking down because they said the cord was tacky!
Ok I am totally doing this but have a questions. How do you turn light on and off, still by the switch? I hope I can follow the tutorial , it would be amazing if you did a step by step video!!!:)
A video is a fun idea! Yes, you still use the switch like normal.
When you use the word “cage” in the first shaded lamp, do you mean the harp?
Yes, I believe she is referring to the lamp harp. Note that the second lamp doesn’t have a harp — it just has a shade frame that seats directly on the socket. (Now, the question is “what is the term for a harpless lamp shade?!”)
Great idea. I just cut the cord and attached it directly to the switch on one side and the light socket on the other with small wire ties. Took all of 5 minutes or less — no soldering. Works like a champ and I have a happy wife!!
You’ve made some really good points there. I looked on the web for additional information about the issue and found most individuals will go along
with your views on this web site.
Hi, I desire to subscribe for this weblog to get latest updates, thus where can i do it please help out.
Nice! 🙂 Now i just need to hook it up to a solar battery charger – so it can charge up during the daytime when it isn’t needed. Maybe that can be the next version of your tutorial lol
Is there any possibility of making this work when the on/off switch for the lamp is on the cord? By the way, this is the best idea ever. Thanks.
I was wondering the same thing, most of my lamps have the switch on the cord.
Simply attach battery pack before the switch in the cord
How do you do this for a lamp with a base that is smaller than the battery pack. And what if the base doesn’t have any access to the inside of it?
Exactly what I was looking for. And, ironically, I’m using what looks like the exact same tiny lamp!
I found this 12v bulb on amazon. Would this work?
https://www.amazon.com/gp/product/B004R0EOZQ/ref=s9_simh_gw_g60_i2_r?ie=UTF8&fpl=fresh&pf_rd_m=ATVPDKIKX0DER&pf_rd_s=&pf_rd_r=7ZA5GBKXEYZCE1CYA9J0&pf_rd_t=36701&pf_rd_p=6aad23bd-3035-4a40-b691-0eefb1a18396&pf_rd_i=desktop
The particular brand of LED tape lights featured in this site (LEDwholesalers 16.4 Feet (5 Meter) Flexible LED Light Strip with 300xSMD3528 and Adhesive Back, 12 Volt, Warm White 3100K, 2026WW-31K) have a pretty poor on-line rating. If anyone has tried using LEDwholesalers’ tape light when converting lamp to cordless, how has your lamp(s) fared so far? Have you had problems with light segments burning out?
I so appreciate you putting this link on here for the 12v light bulb. I bought the 5.6 amp one and used the 8AA battery pack and it works great!!! I had this lamp put together in just minutes, thanks to this bulb.
Great! can you post a picture of your new lamp?