By “no-sew,” I mean: I totally had to sew to make these curtains, but just to hem them. Hopefully you won’t have to. Or you’ll just be four hundred times more competent with a sewing machine than I am, and can swiftly sew a straight hem without shaking your fist at the sky and cursing your wretched sewing machine.
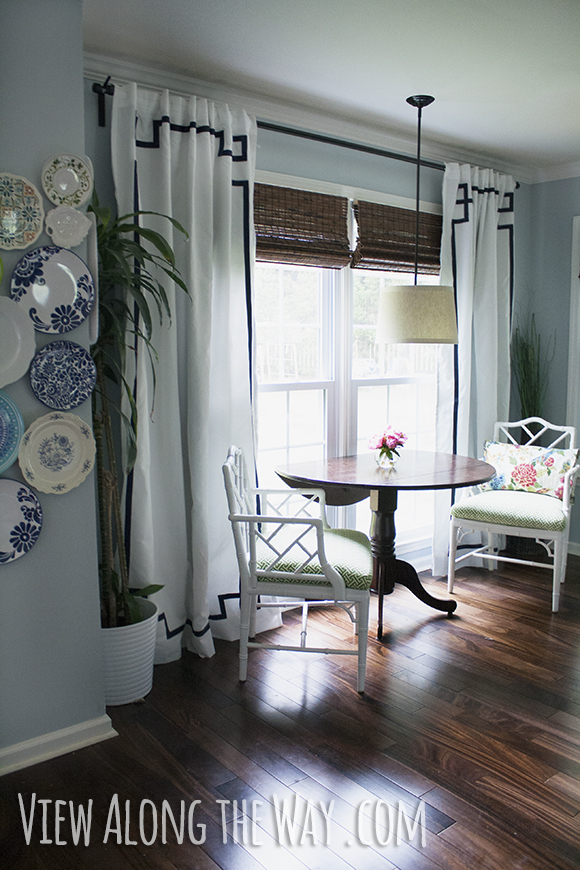
These are my new DIY Greek Key curtains that I showed you in the last post.
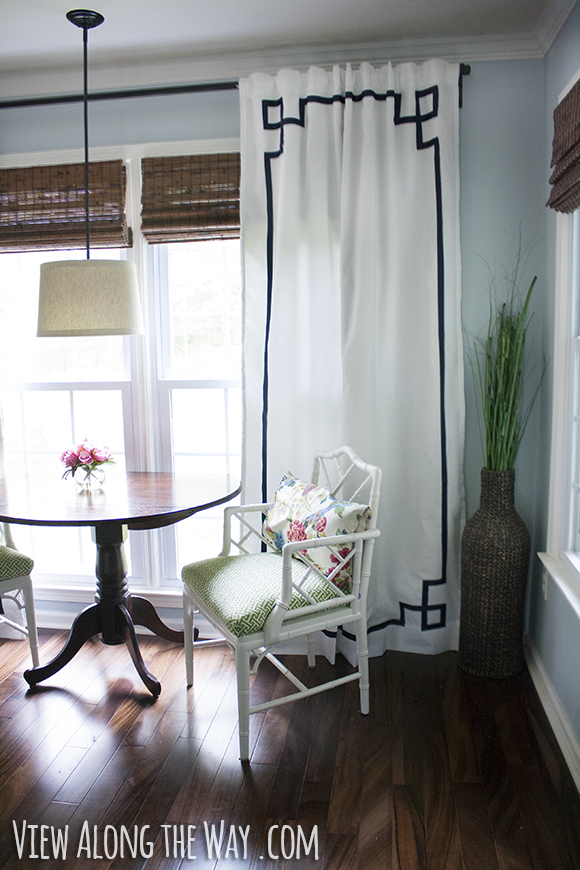

They were inspired by the Greek key goodness of Hollywood Regency, and are rough knock-offs of these from Jonathan Adler.
If you’d like to make your own DIY Greek key curtains, you’ll need a few things, but not much. I spent about $50 total for both panels, and that includes the blackout lining I added. If you don’t add lining, you’ll only be out about $25 for both panels, and friends: that is a freakin’ amazing steal.
Materials Needed:
- Ikea Vivan Curtain panels (Or other simple white curtains. These are $10 for two panels, which is outrageously cheap. I also love that they’re extra long and they hang with hidden tabs.)
- Grosgrain ribbon. I used a little more than three 18-foot rolls of this brand*. I bought three rolls, of course, and then had to hike all the way back to Joann for the last two feet of ribbon to finish. Don’t do that to yourself!
- Stitch witchery, like this*. One roll was EXACTLY enough for me.
- Scissors
- Iron
- Damp rag
- Small piece of cardboard to use as a template
*These are affiliate links, so if you click through them and purchase, you’ll be supporting VATW and I’ll send you virtual kisses. Thank you!
Step 1 (Totally optional): Hem your curtains
Ikea Vivan curtains are forever long, I think 120 inches. I had to hem mine to the right length… with a sewing machine. It didn’t dawn on me until this exact second that I should’ve just used the stitch witchery instead of sewing. Apparently, I am unintentionally masochistic.
I think curtains look best hung high and wide, like this:
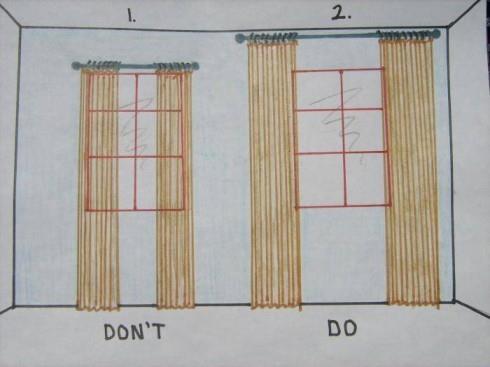
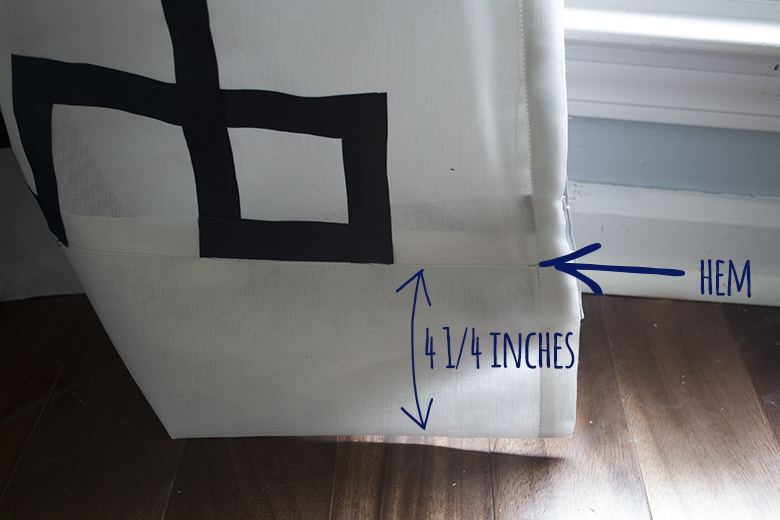
I hemmed mine so they just barely skim the floor.
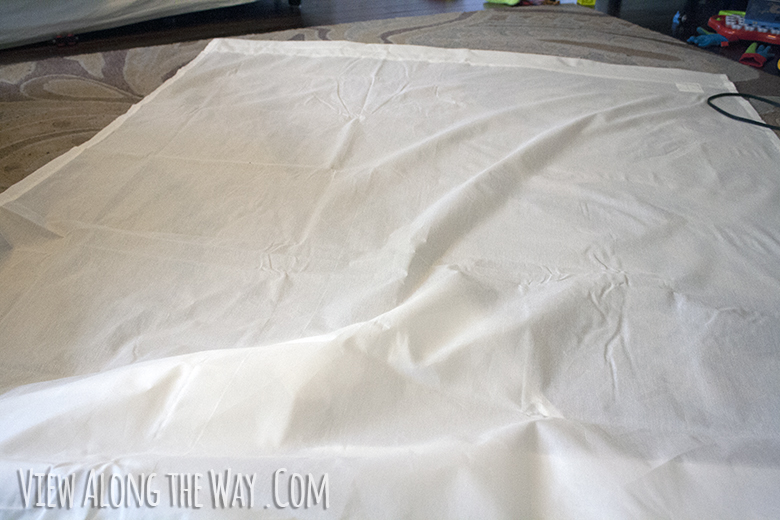
Step 2: Prep
Lay out your curtain on a large flat surface, preferably surrounded on the perimeter by large piles of toys, and iron it.
Then cut your cardboard square. This square will serve as a template to make laying out your greek key design GOBS easier. (I’ll explain how in a sec.) My square is about 4 1/4 inches on each side. I used that size because when I hemmed my curtain, the bottom hem ended up being 4 1/4 inches wide, and I thought it might look nice if the ribbon runs along the hem line on the bottom.
Your square will be used to measure how far away from the side of the curtain panel your ribbon goes, and how big the design in the corners is. Here’s my little square. Isn’t it adorable?
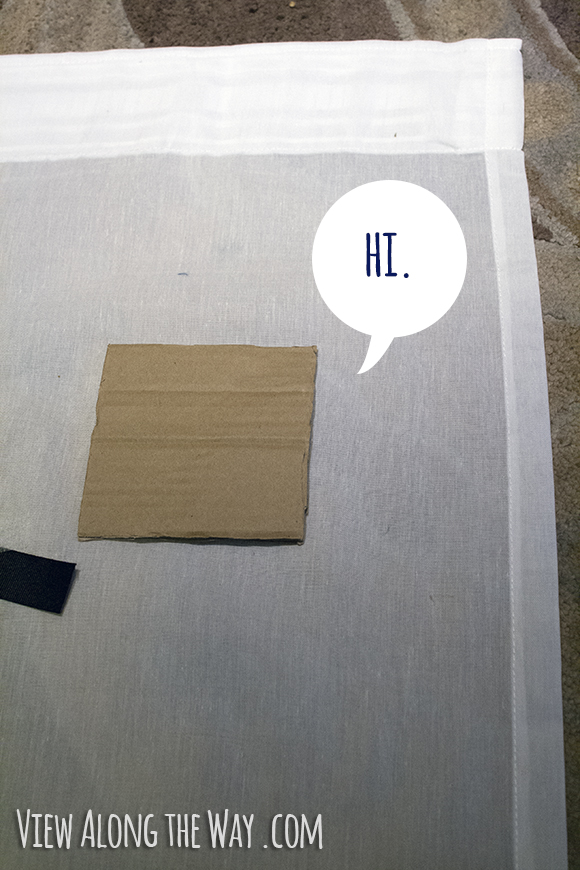
Okay, stop ogling it. You’re making it uncomfortable.
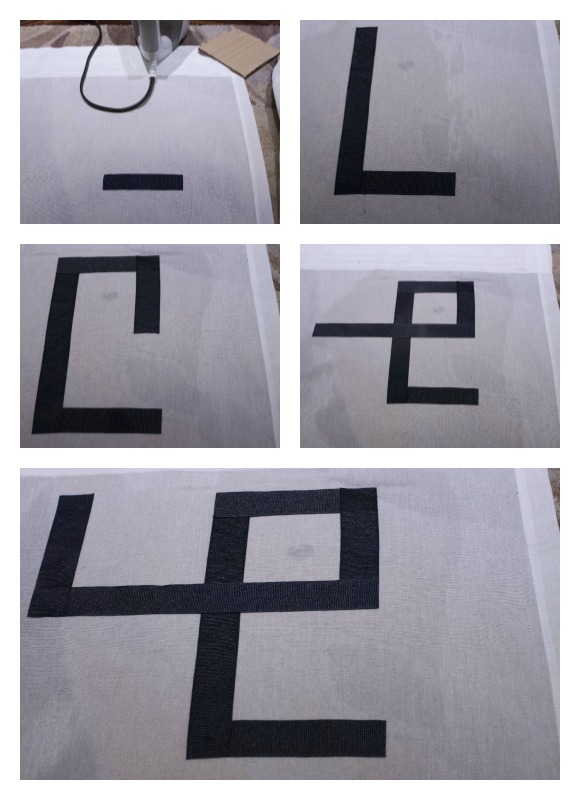
Step 3: Iron on your ribbon
The short story is that you’re going to cut little lengths of ribbon and stick them to the curtain using your iron and stitch witchery.
The longer, detailed story is this.
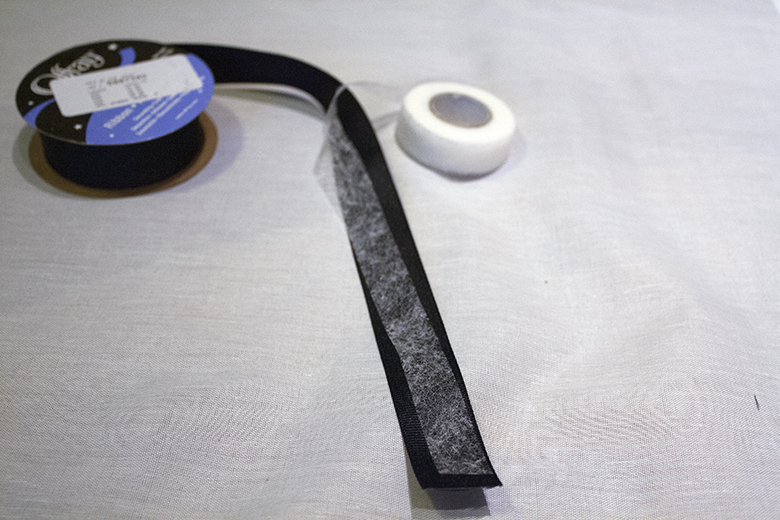
Line up your stitch witchery and ribbon together, like this (but with the ribbon on top) as you lay it out.
You’ll use your cardboard template to know how long to cut each piece and where to lay it on your curtain. My little square, again, is 4 1/4 inches on each side, and this is how I used it to lay out the curtain:
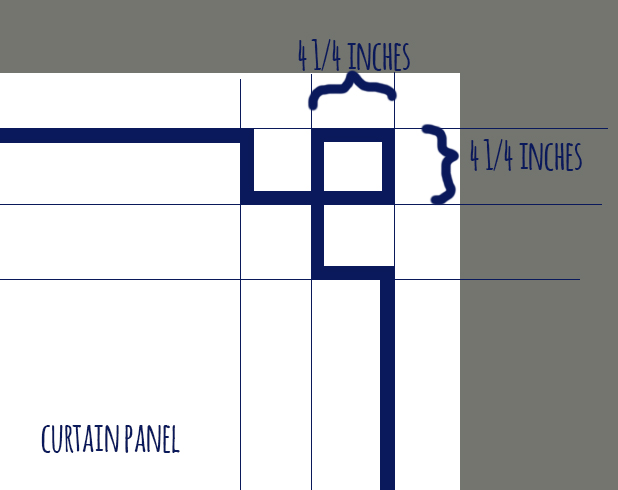
My little diagram is not perfectly square or to scale, but you can see each square on that grid is 4 1/4 inches, which I measured out with my little cardboard buddy.
ORRRRR if you’d rather use measuring tape, go for it! It felt TONS easier to me to measure out my design with the little cardboard template. Measure one cardboard square from the top edge and lay out your top ribbon, then measure one square down, etc. (If you’d rather use measuring tape, check out the “one quick note” at the end of this post.)
Let’s talk about the corners/intersections.
When I first started this project, I thought I would fold the ribbon over on itself in the corners, like a mitered corner, but I didn’t end up loving how that looked. I couldn’t get it to lay quite flat enough, and it was also really hard to make it perfectly 90 degrees. This was my first attempt, but I ended up undoing it because it looked like a kindergartner’s craft project.
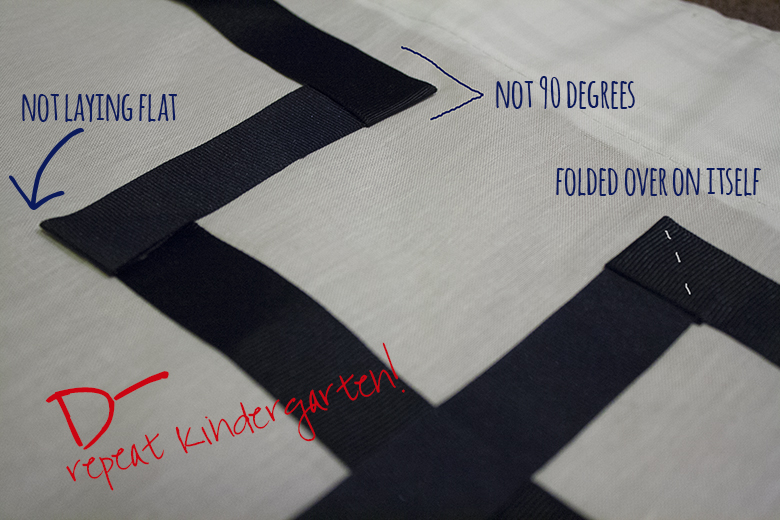
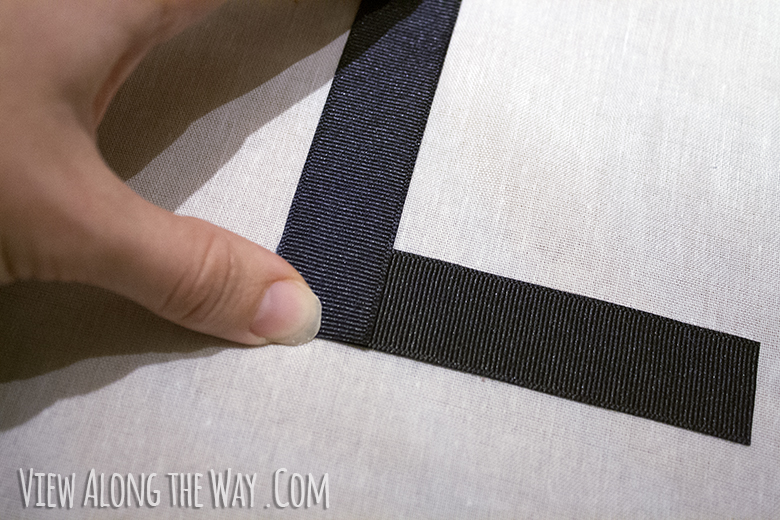
The method that worked best for me was to cut small lengths of ribbon and just overlap the ends.
Cut your first length of ribbon and seal the edges to prevent fraying. I don’t have pictures of that because I completely forgot to do this step. But you should, because it’s the right thing to do*. You can hold the edge of the ribbon on your iron set to medium heat, or hold it over a candle just until it seals. My curtains will fray faster than yours, and you’ll totally win the best-curtain contest.
*I used to work at a company where, when an executive wanted to justify their decision and couldn’t do so with logic, they would declare that it was “The Right Thing To Do.” I quickly learned that you do not question when something has been declared The Right Thing To Do. You cannot argue with that reasoning.
Using your little cardboard square, measure out where the first strip of ribbon goes. You can start where ever you want, because this is America. Unless you’re reading this from another country, in which case these rules are void where prohibited. I measured three cardboard squares down from the top and one square away from the side and started there. Set the ribbon on top of the piece of stitch witchery.
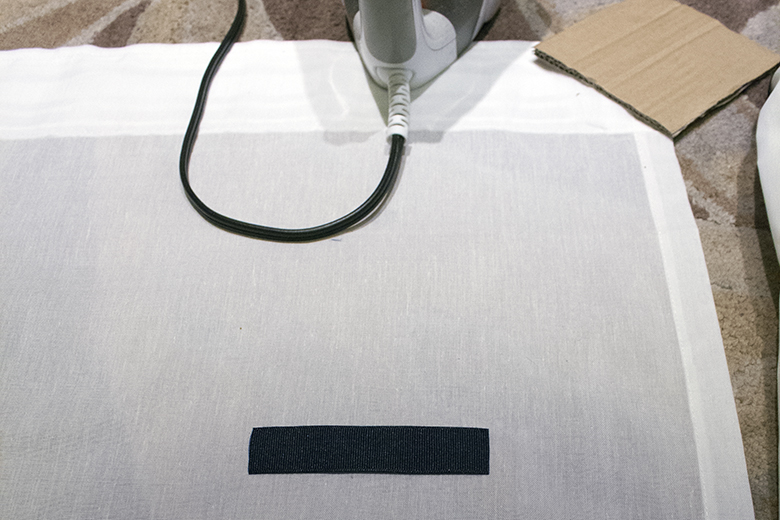
Once it’s exactly where you want it, cover it completely with a damp cloth.
And place a hot iron on top of the damp cloth. It will make the most deliciously satisfying sizzling sound as you hold it there for about 10 seconds, and if your iron came from your wedding registry eight years ago and has been horribly abused, you might notice an odd fishy smell, and decide it might be time to replace it. Or maybe that’s just me.
Continue laying on pieces of ribbon and ironing them to stick to the curtain until you’ve finished one corner.
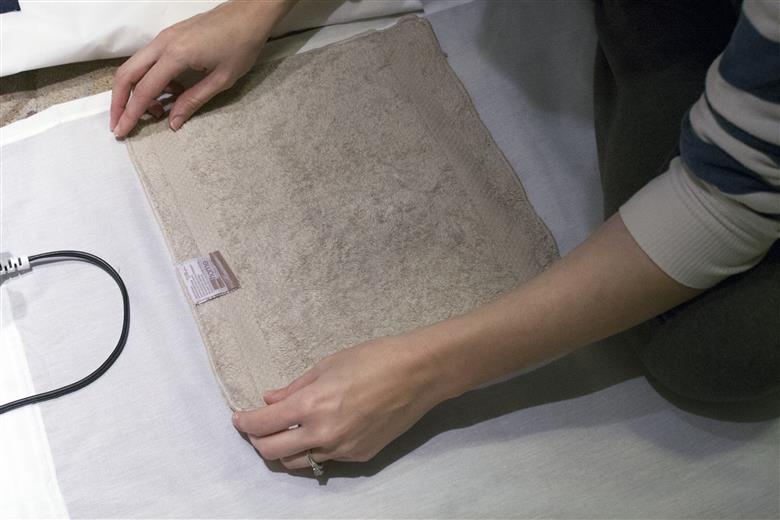
Then turn over the corner, lay the rag on top and iron the back. Just set your iron on top of the damp rag and leave it still for 10 seconds. Don’t move the iron back and forth. This is your ten seconds of sweet relaxation: soak it up.
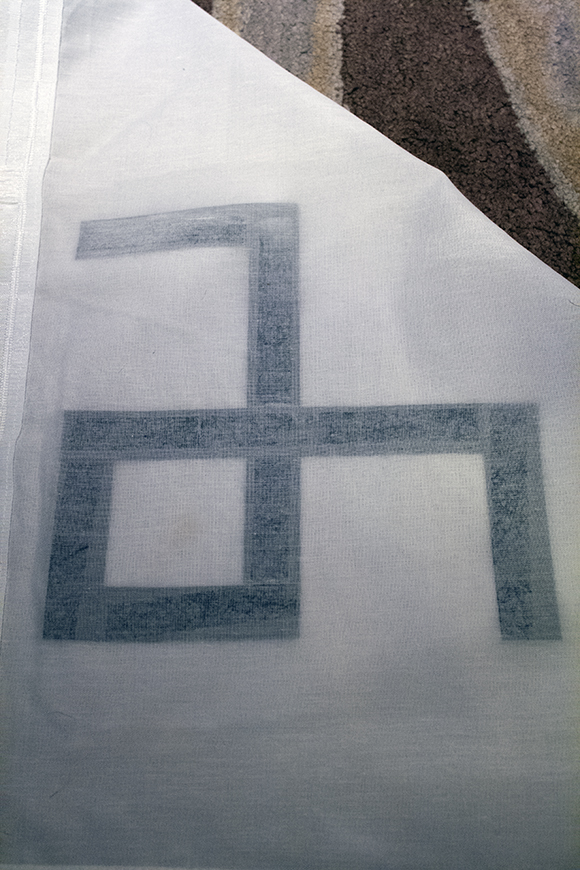
Now check to make sure everything stuck. If some pieces are loose, you might have missed them with the iron, or your rag might’ve been too dry, and you should repeat those spots until everything is secure.
Continue around the curtain panel just like this until you’re all done! It took me a long time to figure out the process and how to measure it all with my first panel, but once I figured out all the stuff I just told you, the second panel went much faster, maybe two episodes of Mad Men. 🙂
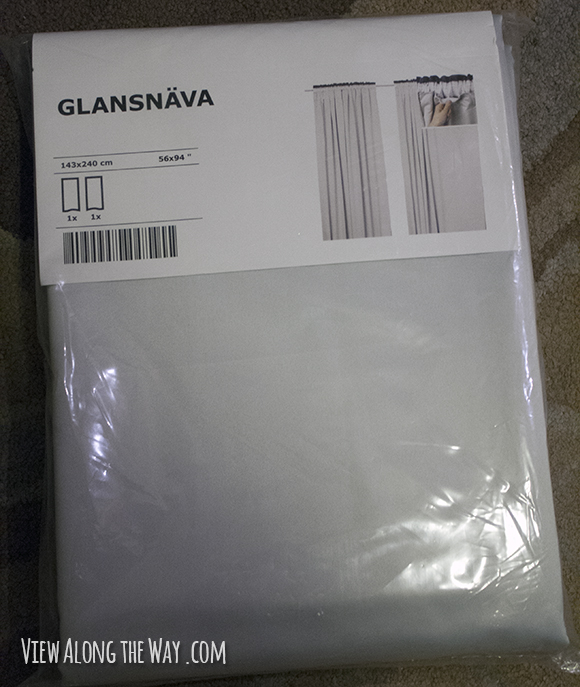
Step 4 (Also totally optional): Add blackout lining
I picked up this lining from Ikea. It’s $25 for two panels.
These panels hang with back-tabs just like the Vivan curtains, or they also come with little clips to clip them to the back of the Vivan curtains. At first I tried just hanging them on the same curtain rod, or with clips, but they hung wonky and did not look cute, so I decided to sew them to the curtains permanently.
I have no idea what the “right” way is to do this, or if there even is one, but this method got the job done. In my book, minimally functional = fantastic.
First, I hemmed the lining to be about 8 inches shorter than my curtains. Then, I turned my curtain panels upside down and laid the lining on top of it, aligning the top of the lining to the bottom of the tabs on the curtain panel, like this.
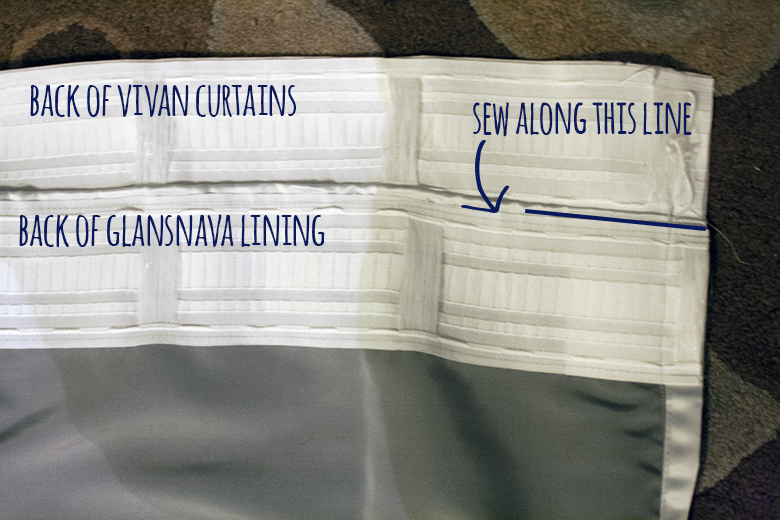
Pin it there, then sew a line straight across the top of the curtains. I put the lining in that spot so that the seam where I sewed the lining to the curtain would go right on top of the manufacturer’s seam on the Vivan curtains, and you don’t notice it at all from the front.
By the way, another thing I didn’t love about this lining is that it’s this really dark gray color. If you hang it up by clipping it to the Vivan curtains as intended, you can see the dark gray lining right through the curtains…?? What a weird design. The other benefit of sewing them on myself is that I could turn it so the lighter side faces into the room and it’s not so visible through the curtain.
The Glansnava lining is exactly the same width as the Vivan curtains, so just pin the sides together and sew right over the manufacturer hem on both sides. Don’t worry about sewing the bottoms together. It’ll hang nicely with just the top and sides sewn together.
This is what the bottom looks like. The lining is a few inches shorter than the curtains.
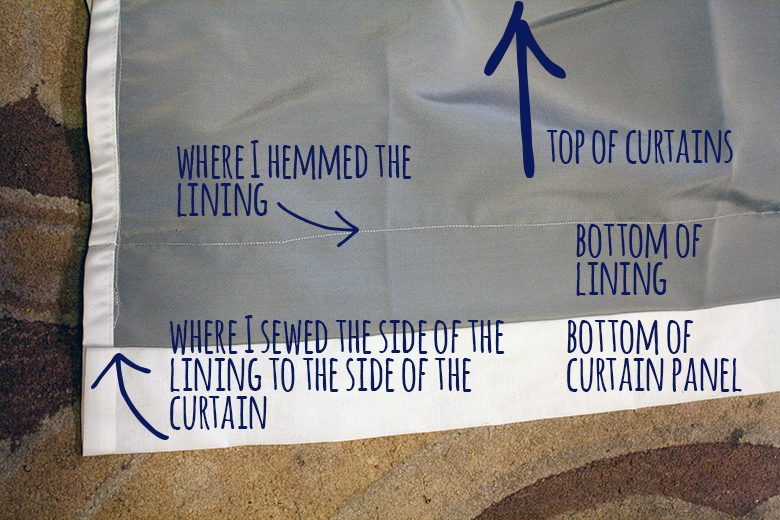
By the way, all I even know how to do on my machine is a straight stitch, so this is basic junk, y’all. Make your lining shorter than your curtains, then sew the two pieces together on three sides. The end.
Step 5 (NOT optional): Hang ’em up and love them til you die.
It’s The Right Thing To Do.
One quick note.
If you’re not digging the idea of using stitch witchery and would rather just sew the ribbon onto the curtain, by all means. I bow to your greatness. My friend Kimberly at Swoonworthy made a similar design on roman shades, and you can see how she sewed the ribbon on right here. If you’d rather use measuring tape to lay out your ribbon, she also did that method, and you can follow along with how she did it.
Have you ever customized your own curtains? Have you ever run out of materials JUST before you finished a project?
Don’t forget to pin this pic so you have the info later!

If you’re looking for other ways to customize your own curtains, check out my tutorial for how to sew your own lined curtains with hidden tabs…

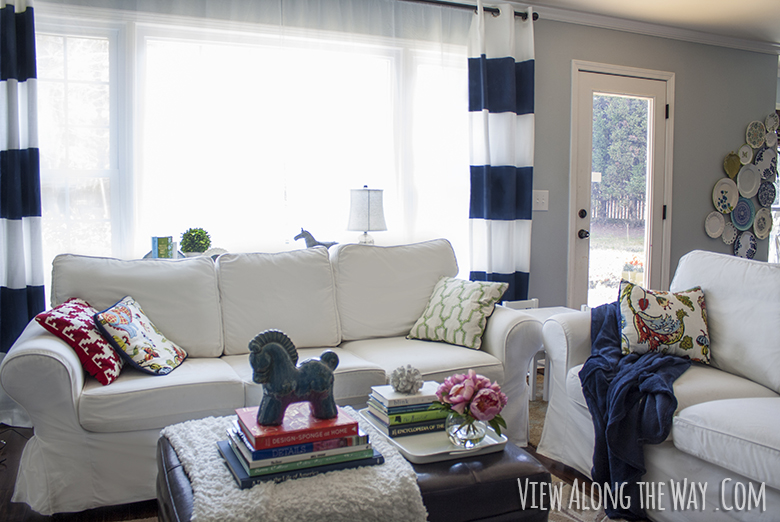
Or here’s my tutorial for DIY striped curtains with paint.
 Hi, I'm Kelly. Glad you're here! This little blog is where I chronicle our efforts to fix up our beaten-down home on a tiny budget. We're not there yet, but here's a peek at the view along the way...


Well, for no sew curtains there sure was a lot of sewing! I totally relate to your attitude to sewing machines – I am TERRIFIED of them, they have a life of their own! I have NEVER been a sewing type person in my life but I suddenly got this mad idea that I wanted to make a quilt. I bought a sewing machine. I ordered yards and yards of gorgeous fabric. I designed, cut, laid out, and SEWED about 10 quilts. This was about 14 years ago and I quilted for about 10 years. And do you know, in all that time I was completely unable to sew a straight line confidently. Anyway, during a bout of serious illness I lost interest and never wanted to make another quilt. I sold the machine and it was like a weight off my shoulders. Now I have the urge to make cushion covers. Go figure. Oh, and by the way, your curtains are FABULOUS. Job well done. The End.
they look AMAZING of course but the first image in this post is my favorite. muah ha ha!
I’m glad you posted this today! We’re headed to Ikea on Wednesday and my husband specifically requested new curtains with a blackout lining for our bedroom. Since he usually has minimal opinions about the house, I GUESS if I HAVE to, I can get new curtains! I like how you sewed the lining in. I didn’t think they’d hang nicely with the clips but that won’t prevent me from trying and getting all peeved I have to use the sewing machine anyway.
I love these Kelly! I might have to do these in our dining area when we are done remodeling. I am not very good friends with my sewing machine yet. xo Kristin
They look great! The evil sewing machine cracked me up, HAHA!
Kelly…you are a rock star! I love these curtains! I was just trying to describe something similar to a client of mine & she was freaked out about the sewing. I’m so excited because now I can just refer her to your tute! They are beautiful! Jesse @ Scout & Nimble
They are SO lovely Kelly! Make me some!!!
I’ve been pondering the Greek Key look for my office but I was too lazy to figure out how to do it. Thanks buddy. You’re always here for me! 🙂
okay, you continue to teach me amazing things I never knew about Ikea. Blackout panels!? I need some of those! I will await your tutorial on how get them on the curtains without sewing, though. Or I’ll the sewing machine out of the garage and try to remember how to use it. grumble.
I also never knew about IKEA’s blackout panels. #goodtoknow! I’ve only hemmed curtains before (using stitch-witchery) in my pre-sewing days…but even a novice sewist like me feels like I could tackle a hem now. And that black ribbon just looks stunning contrasted with the white fabric. Gorg!
I’m with everyone else in loving that photo of your evil sewing machine. I feel like it needs a name. Like Dr. Evil or Dr. Horrible or something of the like. I’m sure you can come up with something clever, Kelly!
LOVE!!!
So where do I go to nominate you for the most detailed tutorials EVAH?!! Goodness, girl, you continue to amaze me with all your steps! These are gorgeous… I will NOT be attempting them b/c the sewing machine does not like me, but they are just gorgeous!
I did not know that IKEA sold blackout lining. I’m kicking myself for not knowing this when I was dealing with lining the nursery curtains.
These look really great! I’m impressed!
LOVE these curtains. Thanks for the tutorial!! I love me some Grossgrain ribbon 🙂 Ribbon horders unite 🙂
So glad you posted this! I’m in love with these curtains and really want to make them! I don’t know where I’d put them, but I want them!
Blackout curtains from IKEA–on my list for the nursery. Thanks for the tip!
Hahaha!! I love that evil sewing machine!! (he wants to be friends, really! ;)) Love the thorough tutorial and thank you so much for including mine in your post! Love how your curtains came out – they look fabulous! Just goes to show there’s more than one way to skin a cat (although I DON’T want to know how that expression came to being).
Rock on with your stitch witchery! xxx
You are a genius. So mathy yet so pretty!
I swear that “The Right thing to Do” is now going to be the mantra to my smart-mouthed boys! BRILLIANT, BABY!
I bow to your greatness and patience in making these awesome curtains! I’ve got some curtains on the horizon and hope I can bring it like you have, girl!
looks amazing as always, Kelly!
I love these curtains the greek key is awesome! Next time we go by an IKEA I am totally getting some black out shades!!
These look so glamourous Kelly! Love!
Wow Kelly, your curtains are beautiful!!
really awesome design and i totally appreciate that those are ironed on. but there’s totally sewing involved. i’ll just have to find something already hemmed and buy and iron … lol
They look so great! You are the queen of patience, my friend. I also just got really excited because I’ve wanted to paint striped curtains forever and I just popped over to your fabulous {and absolutely hilarious–my hubby thought I was nuts bc I was laughing so hard at the unicorn picture} tutorial about it. Beautiful, beautiful curtains! (Both sets!) Hope you’re having a great night!
~Abby =)
These look fab! I love your measuring device and lateral thinking and I adore the end result.
I’m making up some curtains for our house soon so this was a great post to get my head in the right place.
Love! Might have to try this with gold ribbon for my master bedroom curtains. Fantastic instructions btw
Love your curtains!!!!! They look like a million bucks!
I’m loving your blog too and so excited to meet you!
xo
Robin
I much prefer all measuring techniques that don’t require a tape measure, and totally consider it to be the right thing to do! Love your curtains … I am dreaming of getting to the curtain stage … someday. 🙂
Ohhhhhhh, it’s no sew GREEK curtains. I thought it said no sew GEEK curtains, which would be me.
Bliss
Thanks for sharing this Kelly! I love them and am contemplating doing something like this in my dining room. I am a decent seamstress, and I actually think I would go for the iron on tape for this too! Nicely done =)
Well these are pretty darn amazing for no-sew curtains! great job!
beautiful curtains Kelly! 🙂 you have lots of patience, I would love doing something similar to mine but I’m not good with a sewing machine; every attempt has been a disaster! yours look great! 🙂
Love the curtains! I love your method of measuring…that’s so how I roll!
I love that Greek key pattern! Great tute! Pinned 😀
Well, I’ve been laughing while reading and my head is going just like the girl’s in the exorcist…just no green split pea soup! You must have the patience of Job girlfriend ’cause all that measuring has me all twisted. These curtain panels are outstanding! You did such a great job on them and the tutorial is perfect, including the crazed sewing machine. 🙂 Seriously, they look like a professional did them!
Ok, off to get some water and see if my head will stop that infernel spinning ~ 🙂
xo
Pat
Fabulous Kelly!!!! Great pics and step by step instructions!!! I might have to use this down the road on my next curtain project!!!!
Blessings!!!
Kayla
Your drapes are stunning and your tutorial is wonderful. Such detail. I would love it if you would link to my Inspire Me party that is ongoing.
http://www.astrollthrulife.net/2013/04/162nd-inspire-me-tuesday.html
Hugs, Marty
Love how you used ribbon to add a pop to the curtain!
Thank you for such a great tutorial! Lovin these curtains! Totally pinning (because its the right thing to do! haha!) And your chairs are beautiful! I’m drooling over here! Thanks again! Jenna @ Rain on a Tin Roof
You are becoming the curtain guru now, aren’t you? And this post reminds me that I need to finish up my very own white with navy trim dining room curtains so I can finally post that room reveal …
🙂 Linda
OOh, Kelly! You KNOW how much I love a good greek key! 😉 (As seen here: http://sparetimecity.blogspot.com/) I think I’d decorate my whole house with them if I could. Kuddos on the fantastic drapes without hardly sewing a lick! Love them. (LOVE. LURVE.)
I’ve been admiring curtains like this for some time. Your DIY is great! Please say hello to Mr. Box for me. He is a cutie. (haha)
Hey there! I’m loving these greek key curtains and I’m definitely going to attempt to make them myself. I’m wondering, when you’re mapping out the pattern with the cardboard square did you roughly trace the grid on to the fabric with a pencil or just eyeball it?
Thanks!
Hannah
I didn’t draw the grid at all. I just used the little cardboard square, knowing that it was the size of each square in that grid, to eyeball it.
You never know what people are going to get out of your posts… for example, me: “Whaaat, Ikea sells blackout liners!?! why did I pay twice that for the ones at Target??” 🙂
LOVE this!!!
Kelly,
This is amazing! Love your curtain tutorials! Where did you get the great roman shades that are under these curtains? I love their color!
Thx!
Melissa
Thanks, Melissa! I got them from Payless Decor. Here are the details: http://viewalongway.wpengine.com/2013/03/dapper-new-window-skivvies/
Hi! I saw these curtains and instantly fell in love. I loved the sophisticated, simplistic style. Through your blog post I bought each of the materials and anxiously awaited everything to come in the mail. I decided to work on the curtains the past two days I’ve had off of work and it’s been an absolute disaster! I would consider myself a generally crafty person but I am having the absolute worst time getting the ribbon to stick to the curtain. I have tried ironing some portions of the curtain 3-4 times on the front and back, tried switching the towel out and dampening it after every time I use the iron and still the ribbon seems to fall straight off. I only finished one panel- my husband helped me hang it last night and when I came downstairs this morning parts of the ribbon were hanging loose! I was so sad. I’m trying to debate whether it is worth the attempt to start the next one or if I should simply buy new curtain panels. Any advice?
Oh noooo! I’m so sorry to hear that! Did you use the same curtains and ribbon type I did? The only thing I can think of is that I had to use a very wet cloth, hold the iron over it for a while, and then flip the curtain over and do the back side too. When you do the back side of the curtain, can you kind of see the stitch witchery showing through? If your cloth is very damp and you’re holding the iron on there for long enough and doing both sides of the curtain, I can’t think of why it wouldn’t stick. That’s what stitch witchery is made to do. I wonder if you could’ve gotten a bad batch of it or something? I’m so sorry you’re having trouble getting it to stick! Mine is still sticking well after several months. 🙁
I love the tutorials and how you decorate. Amazing how big a difference curtains make in a room. Wonderful job!
I LOVE these. I’d been planning to improve my white ikea curtains with ribbon when I stumbled upon these. This is much better than what I’d planne to do. I, however, have a different white ikea curtain that has silver grommets at the top. My dilemma is whether I should go ahead and do the full design as you did or just the two bottom corners and sides (I am envisioning a U design). Do you think the grommets + key design at the top will look too busy? Please help! Thanks 🙂
How effective is the blackout liner? I typically sew my curtains with that rubbery blackout liner sold at fabric stores… I’m liking the idea of things being pre-hemmed.
It’s not quite as effective as the stuff you get from the fabric store, but it’s pretty close!
I’m now not certain the place you’re getting your info, but great
topic. I must spend some time studying much more or
figuring out more. Thanks for fantastic info I was searching for this info
for my mission.
I like how you make those funny side comments on the pictures especially on the sewing machine. And btw, thank you for sharing this wonderful idea.
THANK YOU! I’ve been wanting to do this for my living room, but seemed too hard to do! I can totally do this! So thank you so much for sharing! My friends and I started a lifestyle link party called Be.You.Tiful where we focus on interior design, health, fashion, beauty, and things we find inspirational! You’d be the perfect person to link up to our party, here’s the url: http://www.frysauceandgrits.com/2014/03/beyoutiful-link-party-10.html
Totally going to do this! Was also lusting after a $100+ Ballard Designs shower curtain that also had the greek key and will probably make a matching shower curtain also!
Where did you get your chippendale chairs from the photo? Been looking for some, but hesitant to pay the large price tags I’ve been seeing on these!
Thanks! My chairs came from craigslist. They are not easy to find!
Mass carnage could be achieved with flame throwers or mini guns and other rampages could be attempted by simply stealing specially hidden cars.
KBA41620 – KBA is short for Kraftfahrzeugbundesamt.
All of the playability of the first game was still present, but the developers added more features
in order to add to the value.
I don’t know if you still check this…. I have a set of stairs that runup the side of my house (inside) there is a window at the top of the stairs that is normal and a window at the bottom of the stairs. The window size is normal but it is close to the floor. About a foot and a half to the step on the left and about three feet on the right (top of the stairs on the left bottom on the right). I have to put curtains on the windows because of nasty neighbors. I like the idea of a greek key but how should i handle the different size in the curtains? Should i make the square smaller on the shorter curtains? Would this design work? Thank you for any help you can provide
Hmm… I’m not sure how I’d do that. I think with curtains where they’re going to be different sizes, it might be better to go with something solid colored so it doesn’t emphasize the difference?
Kelly–For your curtains in the nursery that seem to have a rather large pattern repeat, did you have to worry about all the panels being the same….that is….did they all start with the same part of the pattern on the top…sort of like wallpaper matching? I’ve decided on a fabric that has a 25″ repeat and wonder if I need to order extra if it’s important for the 2 panels on the one window to match. Maybe it wouldn’t be that noticeable if it didn’t match exactly. I can’t tell from your picture how closely yours are matched. Thanks for your help.
Debbie
I’m sort of embarrassed to admit that it didn’t even occur to me to consider matching the patterns. 🙂 I didn’t make any effort to make them match at all.
Well, that’s good news. They look absolutely lovely, and I’m not going to buy extra material to try and match them, either. Thanks.
Not only do have fabulous ideas, I completely get your instructions.. Very clear and precise. Your photography is also beautiful .. And can I just say your wit & humor make me want to read each & every one of your projects!!! I’m hooked, you have a new follower (just don’t lead me into the realm of florals & ruffles )
; )
Hi! Are there any fabrics I should be on the lookout for? I am trying to buy blackout curtains and then apply the ribbon (no sewing AT ALL!), but I am not sure if any fabrics will react poorly to the iron/heat? Thanks!
Thank you for the awesome to tutorial!!! I have been stalking Pinterest for a detailed description on how to create a Greek Key design on a window valence. I am 100% following your method. When I blog about it, I will be sure to reference back to your site. Thanks!!!
I love the way you write! Not only are your directions crystal clear, you have a delightful sense of humor…and you know, if it’s not fun, it won’t get done! Thanks for sharing.
Hi there, i love your DIY project. I would like to know if i can showcase this on my blog with a link back to your blog? Hoping for a positive reply. Thanks in Advance!