Dear IKEA (my dearest),
We need to talk. Up until now, our relationship has been a beautiful expression of lasting love. A give-and-take: I give you my money, then take home your boxes of furnishings, sprawl out on my living room rug surrounded by wood parts, screwdrivers, hack saws, drafting compasses and whatever these things are called–  —
— assembling your furniture watching my husband assemble your furniture with a smile on my face. The assembly, the inconvenience, it’s all worth it for you, Ikea. If you didn’t already make your own chocolates, I’d buy you some, then go canoeing with you on a placid lake holding a lacy parasol while you sing me tender love songs in a rich baritone.

HOWEVER.
We’ve hit a bit of a rough patch. I think you know what this is about. It’s about the Wire-Across-the-Back hanging hardware you include with your Ribba frames.

I’d like to ask that you reconsider this choice, based on the fact that anyone trying to hang these frames in a grid style is likely to suffer fits of rage and frustration, probably ending with them hurling the frames from a tall building to watch them smash satisfactorily upon a cement sidewalk in a giant wooden mess of Ribba intestines.
Don’t worry though; I found a solution and we can still be together.
Still yours for all time,
Kelly
* * *

When my husband Andy and I set out to hang a grid of six Ribba frames in our guest room like I showed you here, we determined there had to be a better way. A little googling produced this handy tool:

…which makes the process much easier:

Nice, huh? We were getting closer, but still not there yet. The main problems with this tool:
1. It cost $15. (A small price to pay for sanity, certainly.) But more importantly:
2. It was not in my possession at the exact moment when I wanted to hang the frames. We’ve already established that most of my decorating decisions are made out of impatience, so a trip to the store to drop $15 on this admittedly nifty tool was not in the cards.
Plan B.
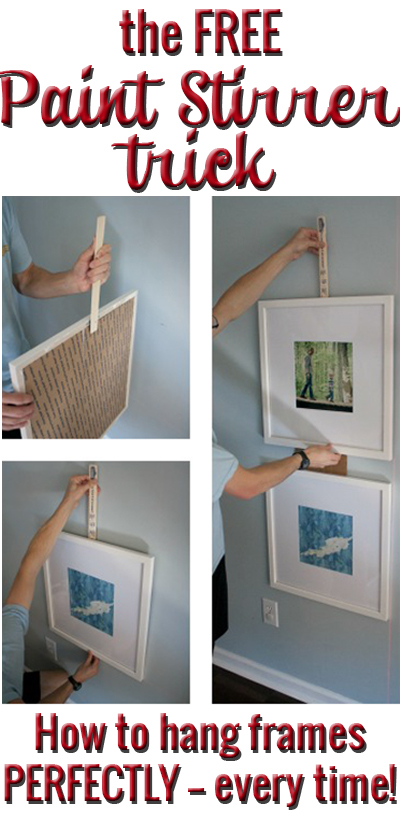
Random screw. Free paint stirrer. Insert former into latter, so it just barely goes through the other side.


Hang the frame on the screw.


Hold the frame against the wall in the exact spot where you want to hang it, then, holding the paint stirrer contraption very still, take the frame off the wall. (This is where having another pair of hands is… um… handy.)


Press the screw into the wall just hard enough to leave a little mark, which is exactly where you’ll hammer your nail.


Hammer your nail right into that spot, then hang your frame on the nail. Should be in the exact same spot. Pretty fancy, huh?
Then to make it level, just do that adjust-a-little-then-step-back-and-look-then-adjust-more thing. Or use a level, if you’re gonna get all geeky about it. (We did. We used a laser level, which you might have noticed in some of the pics above. Laser level = my favorite invention.)
One more little trick I want to show you real quick! The Ribba frame packaging comes with these little corner protectors – bless you, IKEA –

which just so happen to make perfect spacers between the frames so you don’t have to measure anything.


I say, leave the numbers and measuring and calculus to the nerds. I mean the math teachers. Like my husband. Don’t tell him I said that.

So that’s that! Have you guys tried to hang any frames in a grid lately? Any tricks to share?
P.S.: Check out more of our tips and hacks right here!
 Hi, I'm Kelly. Glad you're here! This little blog is where I chronicle our efforts to fix up our beaten-down home on a tiny budget. We're not there yet, but here's a peek at the view along the way...


Lol! Love the picture you did of you and Ikea in a boat with a lace umbrella with Ikea! This whole post had me laughing out loud! I enlisted the help of my guy to do a gallery wall with different sized frames and it certainly put our 8 year relationship to the test! We started out measuring everything precisely (we sure could’ve used the hang and level gizmo), after 3 hours, we just ended up sticking them anywhere and hoping for the best! I am actually planning on doing a blog post on the traumatic event! You guys did a great job – it looks fab, I really love the pics!
I just have to say, what a FUN read and nothing short of brilliant solution!! I love your end result and am going to buy these BECAUSE of this post!! Kudos!!
Hilarious and true. Paint stick-GENIUS! Planning on trying that. I’ve literally cursed at picture frames out of sheer frustration. How sad is that?
Oooh, what a genius idea! I never have paint sticks that are free of paint, how do you do it? My stores are cheap and only hand out one with a gallon of paint. Maybe I need to make friends with the paint people and when they aren’t looking steal a bunch of paint sticks. Anyways, love the idea of the stick for hanging things!
Next time you’re at the paint store tell them they forgot to give you one when you bought paint….uh yesterday. 🙂
Home Depot gives me 5 or 6 paint stirs with each gallon of paint. I have so many left over I’m taking all but 2 back to them in my next trip.
Brilliant!
Love, love, love this trick. Just pinned it!
Great tutorial! Thank you for sharing it. I need to make some edits to my work in progress gallery wall and this will help!
Great trick! I love that you used the packaging on the frames. Oh, and those little graduated “whatever those things are called” are actually called Allen wenches. =) Cool tutorial!
funny post…except I actually thought you were going to give insight to the part of these frames that *I* hate the most…twisting the EXTRA long wire they give you and fishing the wire through the stupid metal sides that hook onto the back of the frame! I do like your tips, espcially using the corner protector to measure between! I wish I knew your paint stick trick when I was hanging all of my ribba frames.
I’m just jealous that you can shop at Ikea. I have never been. Sad.
I’m pumped about this coral desk..mainly because I’d never be brave enough to do it but I think it would love AWESOME!!!!! So do it. Because some strange girl that reads your blog says so. 😛
What a great post! Genius!
Timely post!! I dreaded putting up the frames ‘coz I didn’t have a simple way to ensure that I wouldn’t cringe after I see that all the frames were askew!! Thanks a ton!
That is brilliant! You are so smart! I am horrible at hanging pictures, etc. HORRIBLE! I usually have to wait for assistance from my SIL. Sad, but true. I’ll pass this tip on to her to use at my house next time she’s here to hang something. HA!
Love this post! What a brilliant idea. I’m not very gifted in this area, 🙂 so I’ll definitely have to try this.
Brilliant idea! I am horrible at hanging stuff. i usually end up with a bunch of nail holes before i get it right.
LOVE the tips & LOVE the idea of coral. I’ve seen some gorgeous rooms with coral accents on pinterest!
xoxo
Cat
Brilliant! I love this solution, and I too, HATE wire backed picture frames. Why oh why are they even still in production?? Thanks for the tip!
I think you just changed my life!!!
I’ve already read (and pinned) this, as I am a faithful reader, but YAY on having this featured on AT!
Brilliant post, I love it 🙂
I could’ve used this trick the other day…
Picture on the bottom left corner is a little bit crooked
Great tutorial, Kelly! And I love the paint stirrer idea. In fact, that and my own frustrations as a designer with hanging anything on walls inspired me to invent Hang & Level, the tool you refer to in your post. Over the years I’ve hung lots and lots of Ribba frames, in all types of arrangements and I thought you and your readers might enjoy reading how I’ve dealt with some of the hanging challenges. I’ve been there, done that with: the wire that is too long, or too stiff, where to place the wire clips and how to replace the wire with a sawthooth hook. Check out my tips here. http://www.utrdecorating.com/blog/?p=692 And by the way, your pictures look great!
I googled “the best way to hang a ribba frame” and found this. Thanks ! The ironic thing is that Ikea themselves do not even use the wire to hang these frames in the store. They attach two screws into the walls in a level horizontal line and just hang the frame on those.
question, did your frames dangle some from the wall? I’m trying to hang ribba frames and am finding that they are not actually sticking to the wall rather they are dangling slightly from the wall. thanks so much!
Hi Shunta, I don’t think ours dangle too bad, but the trick is to make sure the wire on the back is as tight as possible. We ended up only using about half the wire that came with each frame, because if it’s too loose, you’ll get too much dangle. Know what I mean? I hope that helps, good luck!
Great Idea, I ended up buying the tool but never thought of a DIY way.
Question: what size are your Ribba frames? Are they the square 20.5″ or the 16″x20″? and if you happen to remember, what seller did you buy your prints off of? I’m looking on Etsy and they’re crazy expensive for prints to fit into these frames.
Thanks, and great post!
Jessica
Hi Jessica! I think these are the frames we have: http://www.ikea.com/us/en/catalog/products/10134631/ We just bought 8×10 prints, which fit great. They cut off a small part of the print, but it’s worth it to not have to buy a special size! I’ve seen lots of cool projects online where people used cutout pages from design books, or printed their own photos, or just used free online printables as art. If prints from etsy aren’t in your budget, maybe you can find a cool free (or close to free!) option. If we were doing it over again, I’d probably do that instead. 😉 Thanks for your comment!
Ugh wow thank you. Hanging Ribba items myself and the paint stirrer trick will be a lifesaver.
Brilliant!!! Such a simple solution to such a perplexing problem.
This tip is GENIUS!!
Karah
This is perfectly done – an amazing mind, Kelly! Who needs extra gadgets! The gallery looks perfect and I love the colors in those picures. I continue to hope and pray that Ikea moves closer to where I live – currently at least an hour away.
Thank you so much!
I am trying it this weekend.
I just got a paint stirrer.
FANTASTIC! And I love the idea of using the corner pieces for spacers. Yay!
Hi Kelly,
thank you for this instruction. I used to think that Ikea’s mountings, hangings whatever are very simple, fool-protected and easy to use.
HOWEVER 🙂
I’ve met this frame with skeptical smile – I was not ready to believe in this dumb hanging system with metal wire. I was going to come back to Ikea to ask missing hanging parts 🙂 since I’ve found neither hanging instruction inside.
I was wrong and your pictures proved this. This Ribba’s hanging wire smashed my good opinion about Ikea’s technical solutions, as they were before – well balanced and reasonable.
Good luck and many thanks from Russia 🙂
I love this! I usually (always) do it by eye and it looks ok, not great like yours do! I also like the way that you hung them fairly low on the wall. I don’t know why but I always hang my pics at eye level and I am fairly tall (5’10”) so everyone always complains they are too high. After seeing yours I realize I could go all the way down the wall, or place them as low as you did :- ).
thanks!
Thank you for such a useful idea! We were trying to hang 6 Ribba frames (yep – same size too!) in a tight group and your idea was just the thing we needed. Like you I improvised – with a piece of stiff card and a screw. Has done the job perfectly.
Many thanks.
Love this; Thank you. I’m curious which laser level you use. My husband got me one for mother’s day and I’m not crazy about it.
We use a Ryobi laser level. We didn’t read any reviews or do any research before we bought it, but it works well enough for us. Good luck!
I like the Hang & Level, but sometimes it is difficult to use in tight spots. These are all great tips! 😀 Have a super day Kelly!
There’s a genius in your head.
THANK YOU!!!! You just saved my husband and I so much headache!! We just brought home four of these frames and were sitting here staring at them trying to figure out how in the heck we were going to hang them in a straight line.. Yes yes yes.. So smart
Genius! I was googling ribba frames to see if there were any tips or tricks out there before I set to hanging my new Ribba frames. So glad I found this!! Thank you!
Great post! Saved me so much time in hanging three rows of four Ribba frames. Thank you!
That’s a great idea! XO, Aimee
Um, that’s pretty genius. I’m loving this blog more and more and I’m afraid I can’t exit out.
I feel like someone always needs a funny story to get through the day so let me give you one – we FINALLY almost completed our half bathroom renovation. Of course in the middle of the renovation – which cost way too much money and now I’m really regretting it even though I think the room came out pretty awesome for our first renovation EVER – the Hubs had to have hand surgery so it took a lot longer than it should have, but hey, we have two bathrooms upstairs so it was okay. Right? Anyway, we bought a mirror that was on clearance at Kirkland’s to replace the builder grade mirror that was previously in there. Since the Hubs had hand surgery he obviously couldn’t help me hang it but guess what? I could do it all by myself! Right? I saw this thing on Pinterest where they took a piece of painter’s tape and taped a long line on the back of the mirror where the nail placements would go and marked the nail places on the tape and then stuck that piece of tape on the wall and leveled it and drilled my holes and was done! Not really, the mirror was SUPER crooked and I just couldn’t figure out why. I put the leveler up to the wall and rested the leveler on the nails and guess, perfectly straight. “Okay”, I said, “this is not going to be the end!” So I went to the store and bought picture wire, put it across the back of the mirror and adjusted it approximately 8,458 times and still couldn’t get it straight. I was really frustrated and couldn’t figure out what the problem was UNTIL I put a level across the back of the mirror where the nail hangers were and guess what? THEY WEREN’T EVEN ON THE BACK OF THE MIRROR! That dang clearance mirror. Gr! Eventually I got it together and it’s sittin pretty but man, an hour and a half of time that I could have been doing something fun. Like eating cookies.
Someone just told me they got stuck in a redirect loop on my blog, so you might ACTUALLY not be able to exit. It’s like hotel california.
I have SO done that. I get frustrated easily with projects like that, so I usually jump straight to the cookie-eating portion of the job and leave the rest to Andy. #WifeoftheYear
this is genius! thanks for sharing…I’ve seen that handy little hang&level contraption (I even pinned it I think), but I love this thrifty option!
Used this to hang a gallery of Ikea frames today and it worked brilliantly!! Really, you can use this for any frame! Thank you!
I just bought 3 huge Ribba frames from Ikea measuring 70cm by 100cm to hang my marvel/dc posters and i have been pulling my hair out. your post is a brilliant idea!
Oh my goodness! You and I think way too much alike. (I guess that is a good thing.) I was just pondering this very thing, because I found some botanical prints framed with the wire hangers (no wire hangers, Christina!) and was racking my brain as to how I would hang these six frames in a perfect grid. I am a math nerd and I obsess with things not being straight, square, in-line, etc…, so you can imagine my frustration! Thanks for this post and showing me that my little plan (although I was going to use a ruler (the kind that snaps into a 3-ring binder) instead of a stirrer.
Then, in the final photo, I saw your faux bamboo desk and chair and you mentioned coral paint – so me, and a little scary, too!
Looking forward to future posts. I am now following you! (That sounds creepier than it is.)
Great Blog – so glad I found it before I started to hang my new Ribba frames!
Thanks from the UK
I have up with the wire on the frames as it drives me mad if a frame gets knocked and isn’t perfectly square. We did our gallery wall pretty quickly just by drawing a level line and knocking 2 tacks in it to hang on the frame. The pictures tend to stay more flush to the wall and can’t swing around to become skew if someone knocks them. This trick works really well for canvases too- once you have a level line it is easy. (It is however worth making a little bit of card the width of the frame so you can line up the hanging point with the top of the other frames).
fabulous tips! and I love that you used the cardboard corners for spacers! Right up my alley as I am not a math nerd!!
Paint stir stick = Brilliant! I will definitely be trying this wonderful trick. Thanks!
Emily @ elizabethjoandesigns.com
Such a simple (and ingenious) solution to an extremely frustrating task. Great thinking, Kelly! Hanging a grid just got a lot easier (and happier!)
Love the way you explain the most ¨useful¨ things! Usually I don’t read if the text seems too long…but I read all the way to the end (too funny!). Keep it up!
You’re one funny lady Kelly. This is genius. I am switching a picture frame from the living room to the bedroom and I remember how much I cursed when trying to hang this Ribba frame the first time so right now it’s just leaning against the wall, but not for long, thanks to you!
Love this. I finally learned to take my time when we moved to Germany and lived in an empty house for 5 weeks. By the time our stuff arrived I knew where everything needed to go and some of what we need to buy. We just moved again, are buying a house and our stuff is already here. I’m so worried about making bad choices because I don’t have time to live with the space first. Can’t wait for the rest of the series!
OMG! That desk is my EXACT bedroom furniture! I have the end tables and the dresser w/mirror! Which, by the way I am thinking about painting “Hollywood Silver” soon, TOO FUNNY!
This is brilliant. Much appreciated. Thank you!
Bottom left picture is not straight. And it is bothering my OCD lol
Genius!!
That is called the best guidance. I am glad to read this info. It is so annoying thing hanging frames with lots of holes on the wall at the end 😀
I have only just discovered this post and I think it’s brilliant! I’m definitely putting this contraption into my tool box! It’s a bit late, but something else I like to do to keep the frames from shifting (as they tend to do) is place a bit of Poster Putty on the back corners and press into the wall. No more constant fixing! But you might’ve figured that out already. Thanks so much for this! ~M.
redesignedbym.wordpress.com
My husband and I spent 3 hours hanging 12 of these ikea frames in a grid and it was such a pain!! Wish I had this idea when we were doing it!
you could also use the toothpaste trick and eliminate all supplies together. Search it on pinterest.
Awesome idea!!!
Hey,
I actually have that exact same picture hanging tool! I bought mine when our local Zellers (I’m Canadian, eh) was going out of business. I had a gift card and could not for-the-life-of-me find much of anything to buy. A lucky stumble on this little tool, and I thought ‘hehn, why not, might come in useful for when I hang new pictures (since I can NEVER hang anything properly without making multiple nail holes first)’. So I was totally stoked to see you mention it.
Though, to be perfectly honest, I haven’t used it yet… or even taken it out of it’s cardboard wrap (mainly due to the instructions printed on the wrap that I don’t want to lose until I’m SURE I know how to use the thing properly). But, I’m still super stoked you mentioned it.
Aaaaanyways, that’s my story, eh?!
Thanks for all the diy tutorials and all,
Kylha
This post totally cracked me up, and is brilliant! I have a bunch of Ikea frames to hang so it came at the perfect time too! Thanks for sharing (and preserving my sanity) 🙂
I put one of your pictures and a link to your site on my blog today. This is a great tip!
Love it!!
Another simple trick for hanging pics…get some of that 3M putty stuff and use a little of it on the bottom back corners of the frames to keep them level. That way when you dust (or look at them funny), they don’t lose their uniformity.
Mind blown. You’re brilliant.
Ummmm….. man I wish I had seen this post last week! lol But I am definitely going to pin it for later. Thanks!
Stacy
http://www.anygirlcandoit.com
I stumbled upon your post on pinterest and very rarely do I read the entire how-to article but I have to say, you are hilarious! As I was reading this I felt like you were actually telling me what to do and not just writing about your experience.. kind of hard to describe.
Anyway, genius idea! I am going to do this when I hang my pictures on the wall!
Thank you so much for this post! I am about to hang Ribba frames and I could see the frustration before I even started. Your trick is a MUCH better option than throwing my nice new frames across the room–probably a serious contender if I’d tried the math route.
I have an Android cellphone so I’m not sure this app is available for other phones. An app called SwissArmy Knife has several cute and useful programs, and one is a bubble level. This miggt be helpful to those without a cellar or garage full if tools or gadgets. So after using this hanging method, place your phone on top of the frame and nudge it until the bubble is in the middle….then it’s level! This hanging method you explain is really clever! Just thought I’d add this hint.
I just have one thing to add…in order to keep your frames hanging straight…just put a tiny piece of
stick-on velcro on the back edge of the frame and then the opposite piece of that Velcro on the wall behind the frame. Now when a door slams or the wall vibrates…the frames will stay exactly straight and will not become crooked. 🙂
After reading your post I’m pretty sure you and I are best friends that just haven’t met yet! Pinning your brilliant idea. I will definitely use it the next time I do battle with picture frames, er, I mean hang picture frames!
I know others used it, but “brilliant” came to my mind as well. Thanks for sharing!!
Great idea!! And those IKEA frames frustrate me too especially since I am challenged in the area of picture hanging to begin with. Thanks for passing along this awesome infomation!!
Ack! Why did you not hand deliver this post to my home a month ago?!?! My oldest son and I spent way TOO MUCH TIME trying to hang 4 of these frames in a nice straight little row. Don’t even get me started. ..
Very useful tips presented in an entertaining way! I love this article.
This design is steller! You obviously know how to keep a reader entertained.
Between your wit and your videos, I was almost moved to start my own blog (well,
almost…HaHa!) Wonderful job. I really enjoyed what you had to say, and more
than that, how you presented it. Too cool!
What a brilliant idea.
Brilliant–I could definitely use this in the future!
Two other tips:
1. Once you have them hung perfectly, a little bit of poster tack on the back of the bottom corners can keep them from slanting askew–even if they’re hung on the wall directly beside an oft-slammed exterior door. 😉
2. If the frames come with the tiny triangle brackets that flatten against the frame the second they come within sight of a nail, just tie a loop of ribbon to the triangle and hang the picture from that. This trick saved me from (probably literally) hurling several 5×7 Ribba frames across the room. How, oh how, they think a half -inch triangular loop is going to help me hang a frame with a one-inch recessed back is absolutely beyond me, but every good relationship needs its share of mystery and compromise.
Hi! Although I follow you on Bloglovin’, I found this post via Pinterest. (Don’t they go hand-in-hand?)
I am rebuilding from a fire, by myself. December of 2005. I JUST last month, was able to get the drywall finished and a room painted. A real room. With paint. And canned lights (vs. holes). And no boxes of stuff stacked in it. Room. Peace. People talk about living in clutter causing stress? Consider 10 years of stacked boxes and construction materials stacked all over. Peace. 🙂
I have just begun the thought of uncrating not only my own artwork, but pieces I inherited from my mother.
I was having a panic attack. ATTACK, I say! I can’t hang things fer sh…crap.
I think you’ve saved another person’s sanity in your willingness to share all these tips and tricks. You’re right on time. Thank you. Very. Much. for taking the agony out of hanging pictures and helping me make my Peace pretty.
Love this site. If you want to create a “gallery wall”, it just doesn’t get any easier than this.
Bill
Creating a “gallery wall” or photo wall collage wall or photo-wall…NOT sure how to name it but if that is what you seek to do…there is no easier way than this system. Amazing
Excellent! Thanks for the tip. I hung a collection of frames perfectly in a pattern not a grid (not all of the frames were square or rectangular). My frames didn’t have the wire backs, they had the brackets on the top of the frames. I started by laying all the frames face down on the floor in the pattern I wanted, then laid one large sheet of wrapping paper over the back of them. It was easy to feel the brackets through the paper. I marked the center of each bracket on the paper by poking a hole, this is important because you will need to hang the paper backwards on the wall. Then used removable tape to hold the paper on the wall while I hammered in each nail right through the marked paper. Removed the paper, hung pictures perfectly (works great for hanging plates too). One tip…make sure your brackets are centered on the frames before marking, you may need to mark a different “tooth” of the bracket.
Very slick! Thank you! Now I need to go buy some new paintings and frames and stuff!
You’re simply the best!!! Thank you for sharing your brilliance! I moved a few months ago, and all of my artwork is still packed. I will start tomorrow! Thanks again and God bless!
Oh My heavens. You are an answer to my prayers (AKA….frustrations is more like it!). Thanks for the awesome tip, and the laugh! Going to hang my frames now!
This is such a great idea! I’m off to my garage to source a piece of wood and a screw ready for my next hanging experience 🙂
Thanks for taking the stress out of hanging my Ikea frames. It only took me a few minutes to get 5 frames in a row to look perfect!
Can I just say I love this plus all your other brilliance!