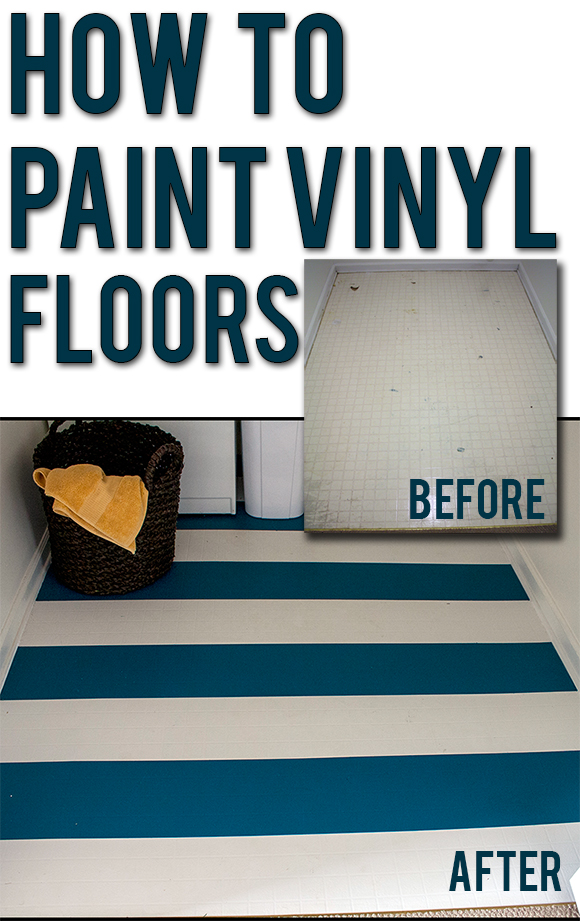
If you have old, gross sheet vinyl floors, did you know you can paint them? YEP!
There are times when you should listen to the experts…
…And there are times when you should just gleefully jump in with both feet to a project with no idea of the end results.
Deciding what to do about our laundry room floor was definitely the latter. I showed you guys the before and after photos of our $157 laundry room makeover last week:
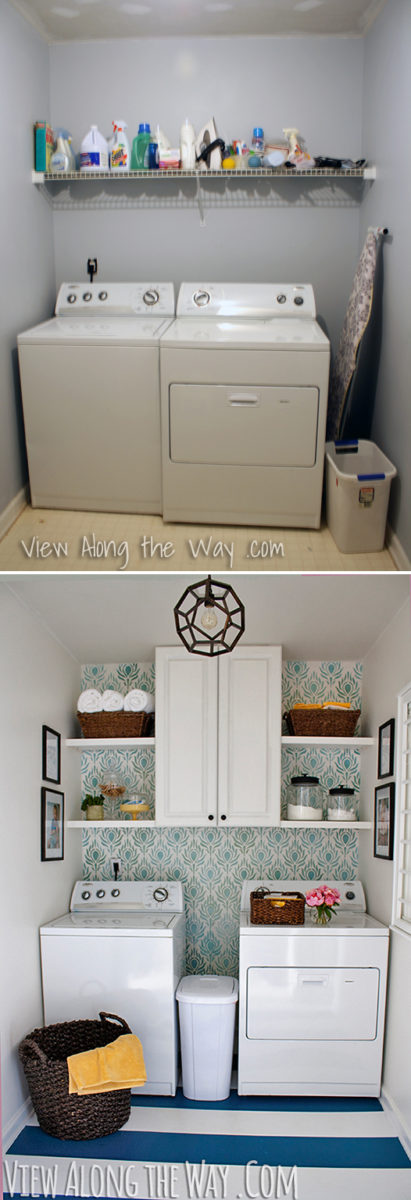

And I mentioned that the vinyl floors in the “before” photo appeared unclean in person. I may have understated. (Eww.)
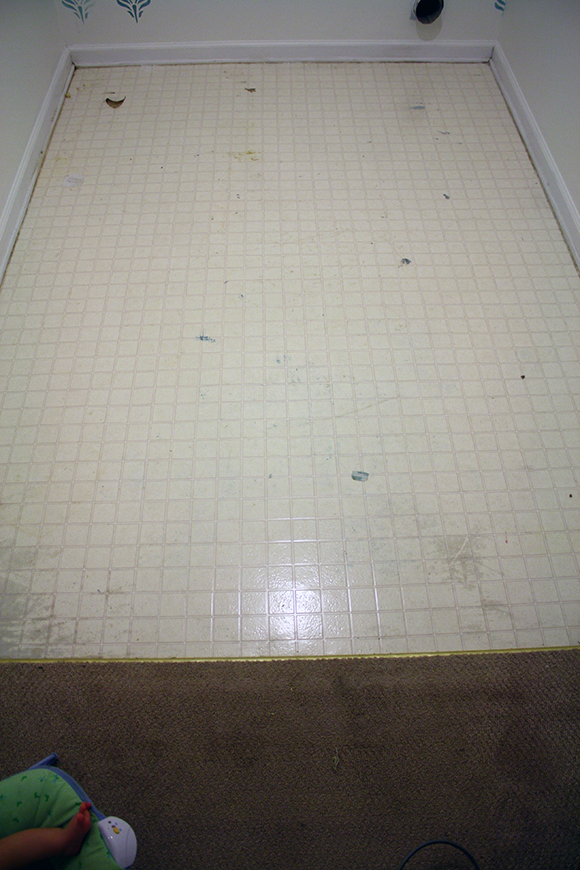
(I probably should’ve cropped that photo a little, but I couldn’t bear to cut off the tiny baby foot in the bottom left corner. I’m just not the kind of person who likes to cut off baby feet, sue me.)
We had a goal to redo the flooring for about a dollar a square foot, and we laid out five ways to update vinyl sheet flooring on a budget. The craziest idea – but also the most oddly tempting – was to paint them. The paint experts we spoke to thought we might be mildly insane. One guy tried so hard to talk us out of painting our floors that we ended up agreeing we wouldn’t do it just so he could get some sleep that night.
But since we’re basically hard-core DIY rebels who run with all the wrong crowds and break the rules, we did it anyway.
*Gets on motorcycle and rides away.*
*Does not even use turn signal.*
Materials Needed
- Regular latex primer like you’d use on the wall.
- Enough porch and floor paint to cover your floor. (We bought a gallon of teal and a gallon of white because you can’t buy it any smaller amounts, and we had LOTS left over in our 50 sq ft room.)
- Painter’s tape (for stripes)
- TriSodium Phosphate (This is a heavy duty cleaner you can find at Home Depot or order it right here. We paid about $7 at our home improvement store, so the current amazon price as of this posting is actually cheaper than that.)
- Paint rollers and brushes
- Orbital sander and sandpaper. (This is the sander we use.)
- Caulk, if your vinyl has holes. (This is the exact kind we use.)
Step One: Clean
Clear out the room and clean the floors with soap and water, then scrub them with trisodium phosphate.
Having the room cleared was probably the hardest part for us. We lived with the washing machine and dryer taking up our whole hallway for about a week.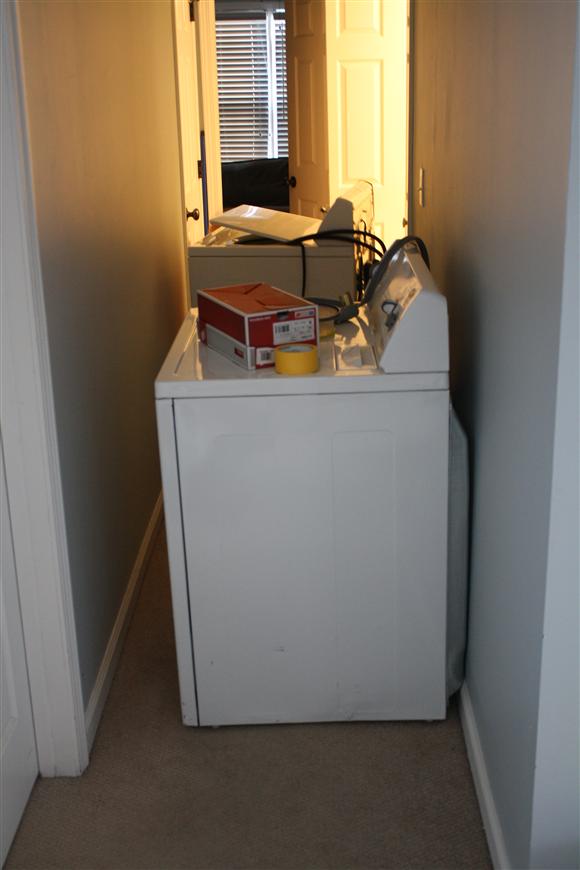
It was super duper fun times squeezing through there, and also lugging our dirty cloth diapers to the laundromat.
Step Two: Sand
Using a fine-ish sandpaper (maybe 180 or 220-grit – we just used what we had), sand the floors to remove the shiny finish.

If you’re already like: “Power tools? Ya lost me.” – don’t freak out; this is easy. Just put some sandpaper on that guy – it velcros right to the front – turn it on, and rub it all over the floors until they’re not shiny. Sanders are the least-scary of all power tools.
If you have anything stuck to the floors – we had some paint spots from when we sloppily painted the walls – sand or scrape those off too.
Step Three: Repair
(You get to skip this step if your vinyl has no holes in it.)
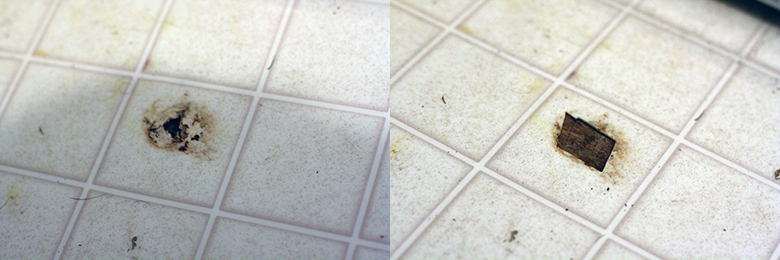
If you have any tiny holes in your floor in discreet locations, you can try to patch the holes. This patch job is not perfect, but the hole we had in our floor was actually underneath where the washing machine sits, so we weren’t concerned with perfection.
Even after we patched hole, you would definitely notice an imperfection in the floor if it was in a more obvious location. Still, if your floors are vinyl and you can’t change them for budget reasons, painted holey floors look better than unpainted ones!
So here’s how we repaired it. First, we used a utility knife to cut around the hole where it was swollen and awkwardly protruding at us.
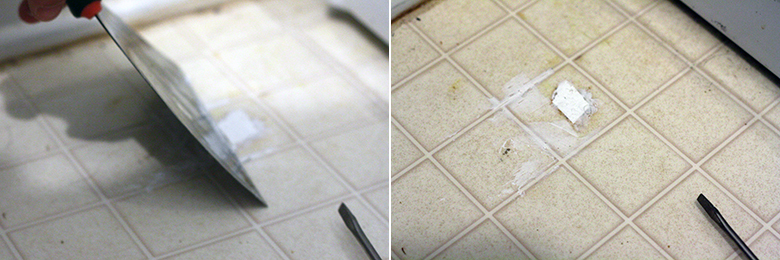
Then we filled the hole with all-purpose caulk and smoothed it out the best we could. Caulk works best because it expands and contracts like the floors do.
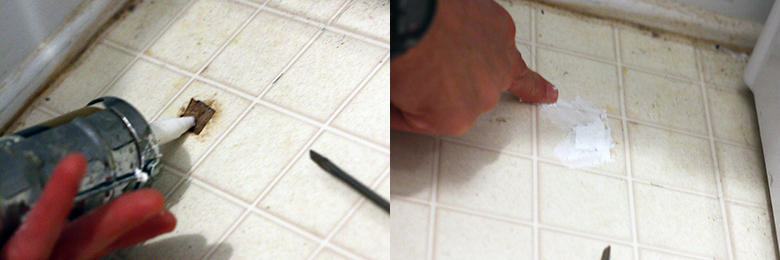
After the caulk dries, smooth it out so it’s even with the rest of the floors. Wipe away any excess with a damp cloth. And that’s it!
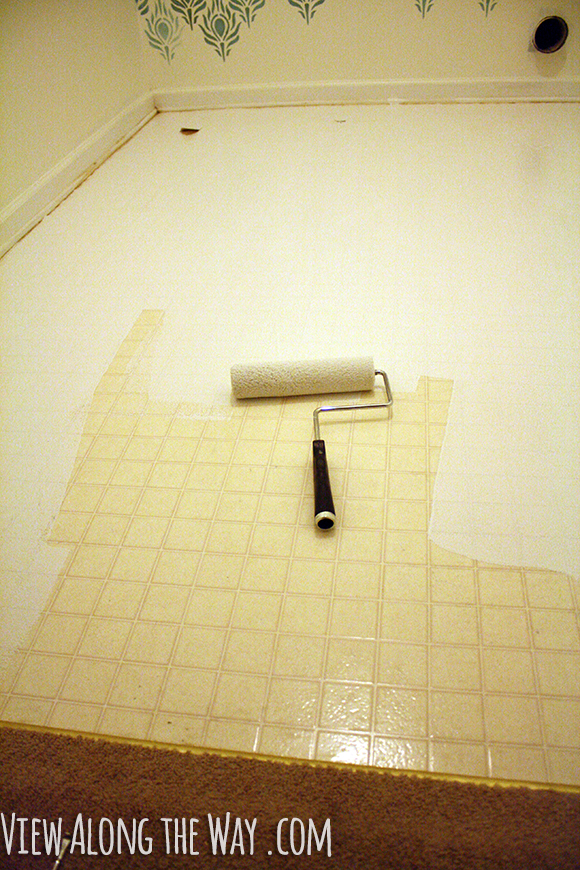
Step Three: Prime the floors
Already this is sounding easy, don’t you think? It’s really not so hard! We used standard latex wall primer that we had sitting in the garage.
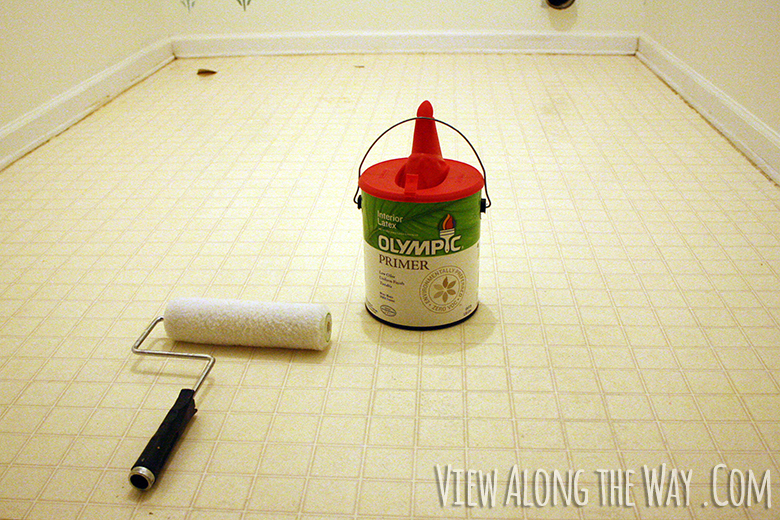
Just roll on the primer and let it dry. We might’ve done two coats because we had no idea if it would work at all anyway, and we were being extra careful.
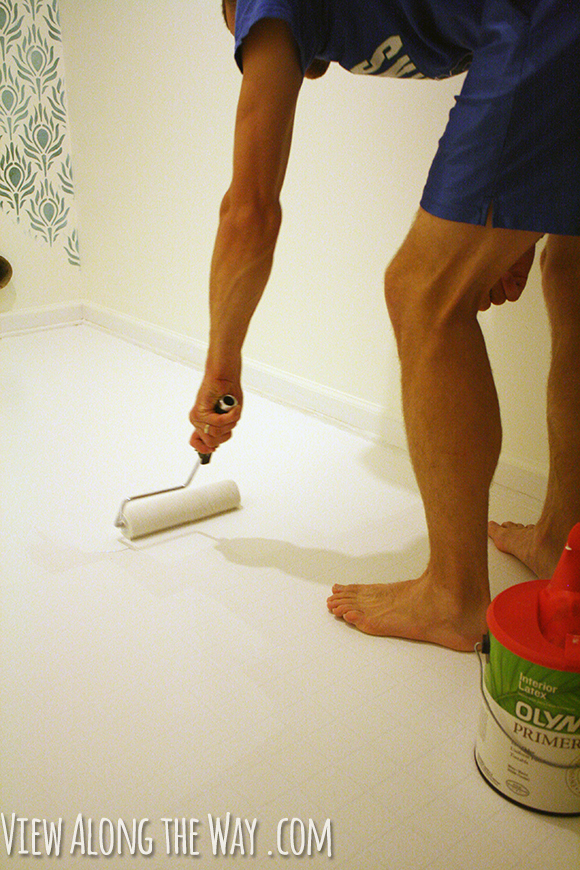
Step Four: Paint!
Before you do this, PLEASE make sure you bought “porch & floor” paint! That stuff is made to be rained on, walked on, and spit on by tattoo-wearing DIY rebels.
This step was actually about a hundred times more fun than painting a wall, because you just pour the paint right on the floor and roll it around.
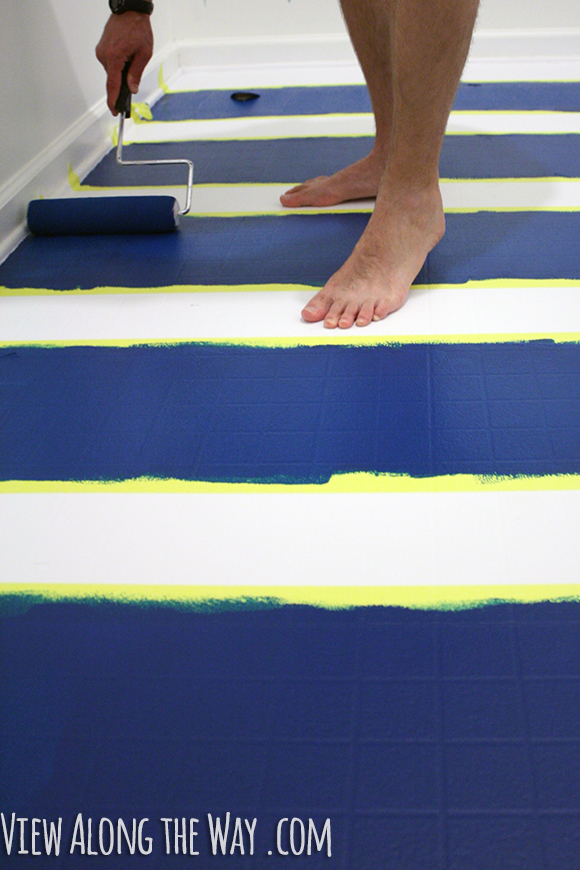
Step Five: Fancy ’em up as you desire.
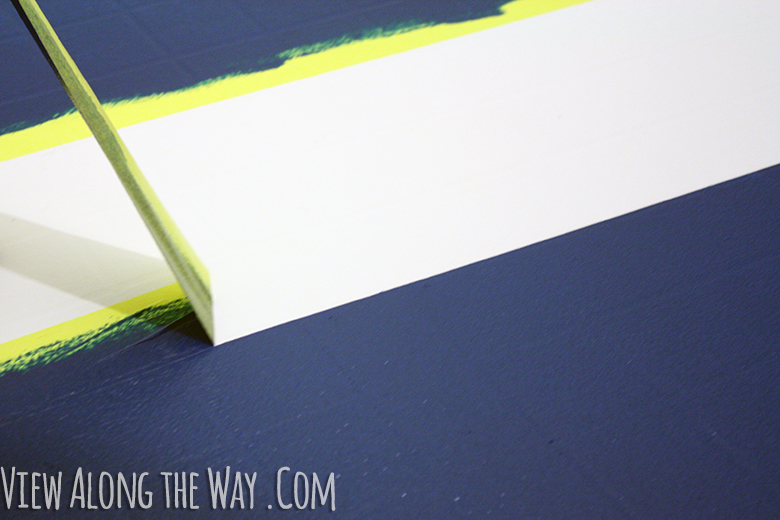
Obviously, we painted our floors with horizontal stripes which we taped off with painter’s tape.

But I think a stenciled floor would look SUPER cool. I actually considered doing that for mine, but decided that sweet peacock stencil I’d chosen was too directional. Something like this or this would be awesome. (And I’m giving away a stencil right now – go enter here!)
One thing to consider when you’re choosing your stencil design: if your vinyl floor has any kind of texture, that’ll still show up after it’s painted. You can see in the pictures above that our floors have a grid pattern that’s indented into the flooring. We chose our stripe size to be four little grid squares wide, so the stripes work with the grid texture. It might not be a big deal for you, just something to consider.
But how do these floors hold up against wear and tear?
I’m SO glad you asked. We’ve had our floors painted for about five months, and so far we have seen nary a scratch. They still look perfect. The porch and floor paint is made for, well porches. And also floors. So it can handle your pretty little feet.
That said, we don’t drive bulldozers through our laundry room, or hold all-night raves there or anything, but I can tell ya that I’ve been pleasantly surprised by how clean and perfect they’ve stayed all these months and I have no reason to think they won’t stay that way for a long, long time.
Step Six: Enjoy
What do you think? Would you ever paint your floor? Have you ever defied the experts and won?
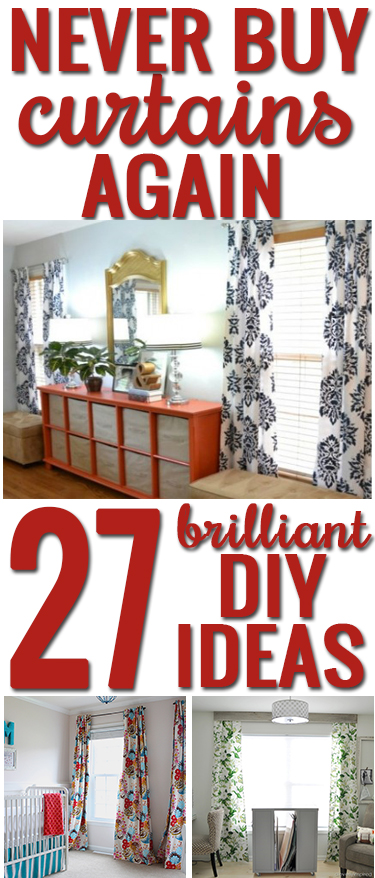
P.S.: If you like this post, make sure you check out these brilliant DIY curtain hacks!
This post contains affiliate links
 Hi, I'm Kelly. Glad you're here! This little blog is where I chronicle our efforts to fix up our beaten-down home on a tiny budget. We're not there yet, but here's a peek at the view along the way...


I just did this two weeks ago except I guess I took the lazy way out because I skipped a few steps. I didn’t sand or repair holes but my vinyl flooring was not glossy. I painted two coats of the porch & floor paint w/out primer. So far, it’s holding up.
laminate
How would this work for a front entry way?
That is “FANTASTIC” does anyone know if this will work on laminate floor tiles also?? Id’e much rather paint over them then tear them out.. It’s in a small bathroom in the basement..I may try it anyway just for shits-n-giggles if it don’t work, have to tear them out anyways right?? lol
Definitely! You can skip the sanding part if you want and use a “Bonding Primer”. It’s designed to stick to glossy surfaces without sanding.
OK’ folks. Who have flung the craving on me!,,, Now to pick out a great color for the kitchen and laundry room. Can’t wait to see how it’s going to turn out…..Thanks sooo much, wish me luck!!!
Please update me as to how the kitchen floor is holding up! I want to try my hand at this but am a bit worried about such a high traffic area? ie: kitchen
Also did anyone use anything on top of the final coat of floor paint?
Thank you
I wondered same thing, thinking a gloss laminate or something would create a shine and maybe make it more durable as well. I’d like to know same thing. I want to try kitchen but am worried of the high traffic area as well
Try a top coat of Polycrylic to make it super tough. I have a gift-shop booth at a local antique mall. The mall floor was an ugly painted, scuffed-up grey over concrete. I painted a stencil onto the floor using similar steps found in the how-to blog. However, I didn’t have to sand (it’s concrete) and I had to contend with heavy traffic from the public. Porch/Floor paint for everything except some small punctuation of color (stencil has four colors). I ended up applying a light dusty glaze over the whole stenciled floor, to achieve an old-world look, but this left a soft topcoat. To give it a really tough finish then, I used two coats of Polycrylic (satin). I have never gotten a scratch despite heavy traffic & weighty antique furnishings from time to time. All my paints were water soluble, including the Polycrylic, which conveniently comes in liquid and spray can form. Hope this helps!
I totally agree with adding the polycrylic!! I painted a VERY HIGH traffic front entrance, hallway, two piece guest washroom AND kitchen (since the ENTIRE piece of laminate covered ALL of those spaces!!! OY!!!!) BUT, I left out the polycrylic stage due to my budget at that time. I might mention that I was a single mom with three very busy girls, ages 10 and 8 (twins) years old, who were CONSTANTLY in and out with many friends (as WELL AS in the kitchen for that never-ending “last snack”!! 😉 ). The long and short of it is that the floors stood up very well to the traffic (EVEN in winter- with salt covered wet/muddied boots etc.!), but DID need to be touched up by about the 9-12 month mark. SO, if I decided to do it again (and I just might do that!! 😉 ), I will DEFINITELY invest the time AND money into adding a polycrylic stage at the end, to preserve my investment AND enjoy my handiwork for many years to come!!! 🙂
Thanks for the tip! I’m looking for ideas to paint my mudroom floor. It’s a high traffic area as well.
I know your post has been here forever, but my parents painted the living room of their lake house (nasty avocado green vinyl) blue as a temporary measure until they found floors they actually wanted. It lasted 7 years, with some mild scratching, until they found laminate that was at both the price and style they liked.
Hi ya can you still mop this ? If you do it am thinking of doing this time my living room
Did you slip the TPS or whatever step? I would like to do this in a closet, so zero high traffic concern, but the floor is super old and I am not sure if there’s asbestose I might stir up by super scrubbing them. I’m gkad to see you skipped sanding for that same reason. Again, did you skip the super scrub too?
love it, love it, love it! And I’m impressed that you managed to squeeze around the washer and dryer in the hallway. When I first saw them, I was picturing you all having to climb over them every time!
Absolutely beautiful! It is such a huge statement in that room. Love it :o)
It actually makes sense to me that paint would stick to vinyl better than it would to wood. I’ve painted wood floors in the past and the paint chips and peels almost right away. This looks fantastic, cost very little and is holding up well. I’ll call that a gigantic success story. Good job you 2!
We are eventually going to re-do our master bath, but before we rip up the old floors I am dying to try this out first!
I really love this- thanks so much for the tutorial. Now to get up the courage to try it! 🙂
We have hideous vinyl in our laundry room and I absolutely pinned this tutorial for when we have the guts to re-do ours!!
What I want to know is WHY you don’t have a shop for me to buy my own killer laundry room light?!
Love this idea- I’d totally give it a go but only because I’m a bad ass DIYer too. ; )
See, it worked out that you didn’t post about this room for 5 months so that you could have some ammo behind the potential durability concern! You tattoo-sporting people are brave for trying this. It looks great!
Yep, that was COMPLETELY intentional and well thought-out. 🙂
Such a great decision…it’s inexpensive and looks fab! We painted our porch floor becuase it was in a major hurt before. So far, it’s held up okay, but time will tell. {And yes, we used porch and floor paint. ;)}
But Andy has such nice legs I can’t help it. 😉
I am sorry, but my mind wondered off the project onto Andy’s legs. Totally love this project and plan to give it a try in my kitchen. If I fail to get it right, no loss, because I have to rip the outdated laminate flooring out anyway. You two did an Awesome job !!
It looks sooooo good, and it’s totally worth painting before buying new flooring! And since it’s holding up, that just makes it so much sweeter! More money in the bank!
Haha!! I was totally checking out Andy’s legs, then scrolled down and saw your caption. Busted! I’m thinking about painting a design over my bedroom parquet floor, so this is encouraging. I listen to the experts, then do my own thing anyway. I’ve never primed/sealed a textured ceiling (I know… ugh) first… just jumped in and painted.
We have these same type of floors everywhere in this house! They’re coming up eventually but I’ve been wondering about maybe doing a little quick fix with some paint just like this. 🙂 Your post was so fun, I just may have to do it!
Wow! Would you recommend putting a clear coat of something over the top for some gloss/extra protection, or do you think that would compromise the porch paint? I can’t get over how great your laundry room looks, btw!
We’ve actually heard that you should add polyurethane on top, but we thought it might compromise the porch paint. We weren’t sure, and we really needed to use our washing machine again, so we skipped it. It might add a nice gloss, but I don’t know how well it would hold up to traffic.
Polyurethane WOULD compromise the white parts of the porch paint as it yellows over time. However polyCRYLIC (different from polyurethane) is extremely durable, would extend the life of the porch paint almost certainly and would not compromise the color / finish in anyway. It would leave a bit of a glossier finish though, so if your porch paint is matte finish and you like it that way, then probably best to leave out the polycrylic. Anyway, I just thought this might be useful to know in case the floor started showing wear-and-tear anytime soon!
HOLY MOLY! It looks AMAZING!!!!!!! The whole laundry room is perfection!
You should travel around the world making it your personal mission to cover all the ugly laminate! Love how it turned out – your whole laundry is amazing – bet they can’t tear you away from the washer now!
Kelly
I love how the floor turned out. I’m a sucker for anything striped. I have no vinyl in my house but I’m totally passing the info onto little brother!!
What a great idea! I would have never thought of that. Pinned it to my board “Laundry Room” because that room is in my “site” for a major overhaul. I love the walls and cabinets also. I have my cat box in the laundry room and any rug I put in there would just be scattered with litter but I’m wondering now if I just paint a rug on using your technique??? Thanks for the inspiration!
Jaye
Hey Girl… do these stripes make my legs look hot?
Bliss
Loooove this!
I’m torn between painting my laundry room and tiling it
I stenciled my bathroom floor. http://the-kelly-house.blogspot.com/2013/01/bathroom-reveal.html I used the porch and floor paint and covered it with two coats of poly.
Wow that is super fabulous! I *KNOW* that must’ve taken you hours and hours. Is it holding up well? I was wondering about whether using poly is better for worse. Thanks so much for sharing!
So far, so good, but I haven’t had it on there long. I’m painting my laundry room floor next.
How long does it take to dry? Does it stand up to mopping?
Yes, Debra, that’s what I would like to know, too. I am curious if you can mop it? 😮
You keep saying “we.” As in “we sanded. We patched. We painted.” So are those your hairy legs? Is that your five o’clock shadow? Ha ha. Every one of you did a fantastic job! 😉
Yes, those ARE my legs. Thanks for making me feel insecure.
Just kidding. 🙂 I need to make Andy take pictures of me doing things, except that would mean pictures of me in all my best painting clothes… maybe that’s why it looks like Andy does everything. Or maybe it’s just that he does. 🙂
I know you work your fanny off cause I read every post. If you look at pics in our album, you’d think the kids were being raised by a single dad. And a photographer. (-:
I have bought all of the supplies to do this in my kitchen and bathrooms, but now I’m panicking (that????????doesn’t look like it’s spelled correctly, but I double checked, lol) over the texture my floor has! I purchased a floor stencil from Royal Stencils (love them!) but I’m second guessing myself now. Thoughts?
Cindy,
Come on! Have fun with it and enjoy it! I promise no one will die and you will have a wonderful new floor! Try it on some paper to prove the concept to yourself. Then take pictures. I think it will be your ‘proof of concept’! Enjoy your new kitchen and bathrooms!
Courage Woman!
Hugs,
Deb
Thanks for the reply Deb, It’s ironic that you replied today. I am emptying the master bath TODAY! So what can it hurt right? We have solid white linoleum and we’ve lived here for 9 years and it’s started to yellow in places. I think it’s the adhesive underneath that’s causing it and even when it’s freshly cleaned it still looks dirty in places. So here goes nothing! Thanks for the vote of confidence!
hi, what colors would be good for floors in laundry?
What would I use when I need to clean/wash my kitchen floor after I’ve painted them? Please…
Thank you for your brilliant hard work too. It’s going to save me from having to stare at my kitchen floor. Looks similar to your before photo. 🙁 I cannot wait to DMS (do it myself) 😉
I just use soap and water. 🙂
And hardcore rebel DIY biker spit 🙂
I would TOTALLY give this a shot! They look 5000% better (even SHARP!) and I love that it’s so affordable. Home run, Kelly! Don’t know how you lived w/o washer dryer for a week???? I’d have been committed.
xo Heidi
Thank You! Thank You! Thank You!
I’ve been thinking about painting the vinyl floor in our powder room for 7 years but everyone (my husband & my father) told me I would ruin the floor. The floor is so ugly anything would be an improvement.
I can’t wait to try this 🙂
I never would have thought to paint the floors, but they turned out amazing! Great job!!
Thank you for this…I have been thinking about doing something similar, but didn’t know if I could…you are the best!
Anybody that is going to do this, make sure you wear a mask or a ventilator.
Some of that old linoleum flooring contains asbestos, if you are going to sand
it and kick up an asbestos dust storm, it would not be good.
If you can just paint it without sanding it, that would be safer.
Great tip. Our house was built in the 90s so we aren’t usually thinking about that. Thanks!
Pretty darn cool! I love the way they turned out. If I had some vinyl flooring, I’d definitely give it a shot.
Amazing! WOW! What a transformation! Love them!
Wow! That is an amazing transformation! I love the stripes with the stenciled walls! It looks awesome! Pinning!
Very impressive. Great tutorial and inspiration.
I didn’t know you could paint vinyl floors- I may have to try this in my laundry room! The rest of the room looks fabulous as well!
Love love love love love! I told my husband that you did this, and he said, “that’s crazy talk.” I said that everyone said that, but you did it anyway, and it has held up really well. He’s down with the idea now! I’m not really sure if we have anywhere to do it, though. Hmmm….
How do you clean them without damaging the paint? Love this idea, but I would like to do it in a bathroom and I have to wonder if the moisture would cause the paint to peel or bubble and, of course, the floor would need cleaned regularly.
We just clean them with mild soap and water. Some people have said they sealed the floors with some kind of floor sealant, and that might not be a bad idea. We didn’t try it because we really needed to use our washing machine! 🙂
So happy I stopped in from SSS…the room looks wonderful and I have been contemplating painting our old vinyl floors in our downstairs kitchen! Can’t wait to show my husband!
Thanks!!!
I’m so glad you linked this post to Kelly’s linky party. I have a vinyl floor in my bath that I need to update. (When time/money/energy allows). I love how your painted floor turned out. I also like the prior post showing other solutions. I am definitely inspired. 🙂
Wow! I mean… wow! I am so pinning this. Everything looks better with a fresh coat of paint. Even that ugly vinyl flooring. We want to buy a house soon. So if we end up getting vinyl flooring we can’t replace right away, I’ll know what to do!
LOVE THIS!!! Your laundry room is adorable and I love that floor. I didn’t know you could paint vinyl. I am featuring this at somedaycrafts.blogspot.com.
Just a note — priming is good if you have color to cover. The BEST primer ever is Glidden’s Gripper. NO SANDING primer! It is amazing! And I would say yes, add poly to the top. If you have little ones and little bit starts to peel up, I could see said little one pulling on it and yanking up an entire stripe. 😉
Awesome job! The room is lovely. Thanks for the inspiration. I’ve got a few rooms before the laundry room, but I will use this when I get there.
Kelly- This is my first time stopping by and your laundry room is stunning! I love how much imact the floors and stencil have! Great job!
xo
Good tutorial! We did this 2 years ago on top of old vinyl in a basement bathroom. We didn’t to the TSP and sanding, just primer and porch and floor paint. You do see the vinyl “pattern” through the final paint layer, but it doesn’t look weird. I also found that I needed several layers of the porch and floor paint to get a good result. Finally, it was very important to give the paint time to harden — not just dry. It took up to a week for ours because it didn’t have great ventilation.
Well, it’s super cute, that’s for sure! The only thing I would have considered doing differently is the primer… I’d use either BIN (not the latex based variety, but the ammonia based one, that stuff really sticks… or there’s a newer primer out there that is latex based but supposed to be every bit as good, I’m not sure how to spell it, but it’s pronounced Sticks… it may be spelled Styx??) Anyway, thanks for the great tute, and cute room!!! Little Bit
Could we use acetone and skip the sanding step? Hmmmm . . .
Good question! I think any kind of deglosser would work. As long as you get rid of the glossy finish so the paint can stick, you should be okay!
What a fantastic project! I’ll be linking to it on our Flooring pinboard. Check it out at pinterest.com/homedepot.
That tape really works well for the stripes! Pinning. So glad you didn’t cut out the baby feet:)http://www.sewsweetvintage.com/2013/01/his-and-her-pillows.html
Your laundry room looks amazing! I never would have thought to paint the floor! Love it!! I have a new Pinterest Power party and would love to have you share this and any other projects or recipes you have!
http://www.thetaylor-house.com/2013/01/31/pinterest-power-party-4.html
Thanks!
Chrissy
Great idea! I want to try this in our laundry room! Thanks for the great step-by-step guide.
Thank you so much for sharing!!! I’m in the stages of buying my first house and as a newly single mom on a strict budget I was wondering if there was anything I could do to make the kitchen floors look better without breaking the bank, I’ll definetly be giving this a try!
Thanks for the great tutorial and for stopping by my blog. 🙂 Maybe someday I will be brave and give this a try.
I work for Sherwin Williams and we sell Porch and Floor enamel in quarts (in any color). It’s obviously too late for you but maybe other readers will find this helpful. Also, I would recommend adhesion primer. It’s made especially for surfaces that paint might have trouble adhering to. Great work!!
This looks great! We have yucko linoleum in our laundry room that doesn’t even line up with the walls. I can’t wait to get rid of it! Great job.
You are such a inspiration! ☺
As I have done most of my own interior painting for years now, hope you don’t mind me suggesting that if one uses a good ‘Primer’ there is no need to sand the flooring surface. A favourite product of mine is Zinssers Bullseye 1-2-3 (water-based) Primer. In comparison to other Primers though a bit pricey, it is perfect to use on slick or glossy surfaces! I have used it to great success on laminate, ceramic tile, metal and over oil-based paint for both interior and exterior projects. Though its primary use is to cover up water-marks and stains just follow the application instructions on the can and ensure that the paint is cured (not dry) prior to the top coat of porch paint. -Brenda-
Footnote: I am NOT affiliated with Zinssers in any way.
Thank you so much for this tip! I think we were just SUPER nervous that it wouldn’t work, so we wanted to go through every step. I have heard great things about Zinssers!
a couple of questions…(this looks awesome!)
do you have any 4 legged kids walking on it???
what are you mopping with? have you used any of the cleaners with wax?? mop n glo type?
a couple of questions…(this looks awesome!)
do you have any 4 legged kids walking on it???
what are you mopping with? have you used any of the cleaners with wax?? mop n glo type?
one other thing.. is the blue stripe also in the porch paint???
We have one pup but she doesn’t ever venture in there so I can’t attest to the scratchability. We’ve just used water and mild soap to clean so far and it’s worked well. Since it’s just a laundry room and not a kitchen or bathroom or something, we haven’t had any crazy messes we’ve had to scrub or anything. And yes, the blue is also porch paint. Good luck! 🙂
Can you please tell me about the light? It is unique and fun. I would love to add that. I love the whole room. Shows that stencils don’t have to take us to ’76 country motif!
Hi Jan, We did a full post about the light which you can check out here: http://viewalongway.wpengine.com/2013/01/diy-dodecahedron-pendant-light-and-an-announcement/
How did you get the W/D back in w/out sliding them on the newly painted floor? Just a question because that is what I would have to do to get my W/D back in. These are terrific, I would love to do this in my kitchen, but don’t think I could live w/out a kitchen for very long. I wonder if I did it in stages????
Just curious what your thoughts are.
I think I would put a protective coating on as well.
Thought I would never be able to rid myself of our ugle dated 70’s flooring in the kitchen. This is definately do-able for our pocketbook….THANK YOU! 🙂
Holy mother of Batman! This is blowing my mind right now! Found you from the YHL forum and all I can say is WOW! Our laundry room looks a lot like your before picture. I think you have inspired me to get moving on getting a new look in there!
OMG!! This is so AWESOME!! I just got done painting our kitchen cabinets…now I cannot wait to paint the FLOOR! Thank you for the fantastic tutorial 😀
IVE THOUGHT ABOUT DOING THIS IN MY KITCHEN CUZ MY HUBBY SPLIT A GLUE THAT LOOKS PURPLE WHEN WE FIRST BOUGHT OUR HOUSE 6 YRS. AGO IVE TRYED COVERING WITH RUGS AND ITS NOT WORKING LOL.
MY QUESTION IS IF I DO PAINT MY LAMINATE FLOORING HOW DO I CLEAN IT? AS IN CAN I MOP OR WHAT??? LOL
THANKS,
ONEBRAVEMOMOF2
We just use a mop and dish soap. Good luck!
oh my gosh! We are SO going to try this!! We just purchased our 1st home & have so many things to change, but don’t have a great deal to spend…so glad I found this post! Thank you! 🙂
THAT IS THE SAME VINYL as I have in the kitchen!!! I AM SOOOOO painting those floors when my hubby goes off on his next trip!!! Whooo hooo!!
A lot of hardware store people are very helpful and knowledgeable but don’t seem to have enough imagination. Or maybe knowing how it “should be done” limits your imagination? I bought a 1940s house in 1982. The entire (quite large) kitchen was covered in 1970’s dark brown wood paneling. Every paint store and hardware store guy I talked to gave me elaborate explanations about how it was impossible to paint this, I should sheet rock etc. But my budget was practically non existent. I talked to an interior decorator that I worked for in high school and she was all “they’re silly! get some No-Sand, primer and paint”. That kitchen looked great. Anytime I told one of those people what I had done, (cause I had so many projects, I was always in these stores) they would shake their heads and look very worried. I learned a lot redoing that house, me and the Reader’s Digest how to do stuff books and carefully ignoring some good advice.
I actually used the white porch/floor paint to paint over an old desk and dresser for my daughter’s play/craft room. Experts told me it wouldn’t work, but I figured if its made to hold up on floors, why not hold up to a 10 year old crafter?? It has worked fabulously!!! I’m thinking to do my garage floor in this next (laundry is in garage).
That ‘new’ floor just makes you smile! I love it! I am custodian of my church. The mens room needs an update so badly but we have low funds. The floor is old vinyl tile put down in the 50’s. I believe this is what I will do with that ugly floor and it shall be wonderful then! 🙂
Hi Kelly,
Just wondering how the floors have held up 6 months later – I really want to do this in my laundry room! My only concern is its more like a high traffic mud room that leads to the garage. I’d put a few runners down afterwards, but just a thought I’d ask if the floor was as tough as you initially thought.
Thanks!
Cheryl
Hi! What a fantastic idea. Your laundry room looks beautiful! I would love to do this in my laundry room but I have one concern. My lin-ugly-um has a diamond shape in the middle of every 12×12 square along with a line that goes from each point of the diamond to the edge of the square.(hopefully that makes sense) Basically it’s hideous. Stripes would probably be out of the question but do you have any other suggestions besides just painting the whole floor one color?
Thanks so much!
Patrice
You could consider painting it with a stencil. I’ve seen some pretty stenciled floors!
Hey, I loved this! Now this is my idea of a cool and informative blog. I love doing stuff on a budget too. I will have to look through your posts to see if you have any tips on re-painting your kitchen cabinets and doing a back splash. Please check my blog out at http://www.boulderhomesource.com/blog/. It is mostly about real estate and the Boulder Lifestyle but I have featured a few home improvement articles about my personal home buying and selling experience which involved staging, repairing, and cleaning my house on a budget! Do you like to cook on a budget too?
I’m getting ready to do a complete kitchen redo, diy of course. Painted cabinets, walls, counter tops, new sink, faucet and back splash. My plan was to ensure this awful vinyl until the entire house is finished , when we are going to purchase new flooring wall to wall. Not any more. I’m painting that bad boy. Thanks for the courage!
Love your floors! I am getting ready to try this in my bathroom budget makeover. Just wondering: did you use the satin finish latex porch & floor paint or the gloss finish oil based porch & floor paint? I wanted to go with a latex but it only comes in satin finish and I wasn’t sure about cleanability [yep, that’s a word (:] in a bathroom setting. Also, we have those peel and stick vinyl floor tiles that are supposed to imitate hardwood floors so they are like strips butted up against each other instead of one continuous sheet. Do you think this will work ok as far as painting over the cracks? Thanks so much for posting such a great tutorial… this is just what I need until I can save up enough for some fab tile flooring!
We used the latex porch and floor paint. I think the glossier it is, the easier to clean it is…? That was my thinking. I’m not sure who the paint will do on the peel-and-stick strips. Maybe you can test a little spot behind the toilet or something and see how it does… Good luck!
Great article and something I might try myself. Do you know, or could you put a guess to how well this will stand up in a bathroom?
Also, any suggestions on how to a version of this for wooden laminate flooring?
I have a friend who did it in her bathroom and said it’s holding up well. I’m not sure because I haven’t tried it yet, but if it’s paint the floors or buy new ones, you could always try it and just replace them if it doesn’t hold up.
Thanks Kelly – good news on the bathroom floor. My wooden floor is a much larger areas and I don’t have anywhere I can test it in a small section. I don’t really want to pay for the paint and waste time just to get a new floor although I think it might be the only way unless anyone else can offer any suggestions.
Thanks again
Wow! that looks fantastic. The entire downstairs of my house has the most disgusting tile (i think it’s really plastic or something) that NEVER LOOKS CLEAN no matter what I do. I would love to re-tile but am a broke girl renting a house. My question is, is it insane to do this in a rented house, ie, would it be possible to remove the paint if the next renters don’t want the paint on the floor? Has anyone done this?
Hi
I painted my kitchen floor 4 years ago . Did the TSP and Sanding thing then I used Industrial Plastic Undercoat , Latex paint , and 3 coats of Water-based Floor Varnish . It has held up really well.
Oh cool! You’re the first person I’ve heard who did it more than a year ago. I’m so excited to hear that it’s lasted this long! Thanks so much for commenting!
OMG you just totally saved my sanity! Moving into an apt with hideous vinyl flooring in the kitchen. Thought of laying new tile but thats costly and a lot of work for a place you don’t own. This will totally save the day!! Thanks for sharing!
I love the way you write! Made me grin… A friend of mine just asked me today to possibly paint her deck next year to make it look like a carpet and I suggested to get vinyl flooring instead to paint on that so she can store it inside in the harsh winter here in New England and I offered to check out if that is possible. I’ve seen it done for indoors but not outdoors. So this was very helpful to me and I will try on a smaller scale first before I tackle a large size ‘carpet’. Thank you so much!
WOW. Ridiculously excited that I just stumbled across this. We have some freakin’ HIDIOUS linoleum in our bathroom… And kitchen… And laundry room… And I’m an inexperienced DIYer who would be terrified to rip up flooring but PAINTING I think I can handle! Never in a million years would have thought to paint the bathroom floor!! Think I’ll try it out in the bathroom first!!
Ok, Mind= Blown! I don’t think I EVER would have thought of this, but I am IN LOVE with the idea. My husband and I are VERY suddenly being faced with moving into his grandmother’s house which has been rented out for a year and DEMOLISHED by said renters. We are moving in to revamp the house in exchange for free rent, but it is a DAUNTING task! We were trying to figure out what we were going to do with 2 rooms covered in the nastiest, ugliest lino floors (on a super, amazingly limited budget) you can possible imagine- I’m talking 1000xs worse than your above “before” pic, lol. Now I know what I can do!!!!!! Thank you so much- Newest, biggest fan! LOL
It looks great and we have that same awful linoleum ~ used to be in both upstairs bathrooms and the kitchen area, but only the kitchen/half bath/laundry room are left! Not sure I would want to paint it, but just put groutable vinyl tile in the kids bathroom (my test space) and it is gorgeous so the kitchen area is up next. Only problem is the space is very large and we will need to move the fridge and washer/dryer out so the plan is daunting!
I did paint the tile around my fireplace though and it is gorgeous! I found a tile that I loved and then duplicated the look with a faux finish!
I’d love to do this to my bathroom floor. No matter how often I clean it, it still looks dirty! Two questions;
1. Can this be done on vinyl tiles?? (that’s what in my bathroom)
2. Does the primer have to be latex?? I am very allergic so can’t have latex anywhere in the house.
Thanks! 🙂
I’m not sure about either one of those things. Both the primer and paint were latex. If you can’t use latex paint in your house at all, I’m not sure what you’d use instead? Oil-based? I don’t really know how you paint with a latex allergy so I can’t speak to that.
i am very seriously considering painting (probably stenciling, but maybe stripes…aaagghhh decisions decisions!) my kitchen floor and its still sort-of-new (is like 7 years old considered sort-of-new?) but still pretty uggggly linoleum floor… i’m all about painting anything i can get my little hands on… just gotta figure out how to move the fridge out of the way… thanks for the awesome tutorial and thanks to Ashley from Domestic Imperfection for suggesting i check out your post on this!! 🙂
I found your site after doing a google search for painting linoleum floors 🙂 Wow am I glad I did! We have a 130 year old house and probably 40-50 year old vinyl/linoleum floors which our floor guy absolutely ruined when we moved here 4 years ago – by stripping off all the design and color. (They were ugly but in good shape before). We threw around the idea of painting them to avoid another year of embarrassment when having company 🙂 Now we can use your tips and I know it will work…*huge sigh of relief* 🙂
So for the white stripes was that primer floor and porch paint?
Yes, it was primer, then floor paint. We painted the whole floor white, then did the teal stripes on top.
We JUST finished doing this and I LOVE it- Our laundry room doubles as a pass-thru to our garage so I am curios to see how it holds up. We used Beauti-tone acrylock primer ( it sticks to ANYTHING, even a mirror!) and we also did white and navy stripes. This Blog was the best DIY guide! THANK you!!! Blessings!
First of all, I’d give anything to have a laundry room that size with a window in it.. This was a great tuitorial, great job on it. Now tell me something, why didn’t your husband use a pole extenstion on his roller instead of “breaking his back” You covered all the details and they were easy to follow. I have thought of doing the same thing in our bathrooms. Seems like when we had our toilet in main bathroom replaced, the plumber informed us there were 3 layers of flooring. We purchased this house in 2005 and it appears that the seller went to a home improvement store and got a cheap piece of linoleum and had the painters to glue it down, adding shoe molding on top and never painting the shoe molding, didn’t remove all the wallpaper, just painted over it. What a mess. Hired “cheap flight by night” painters obviously for a cheap price. The seller is into real estate so he knew who he could call and they could turn the job around quickly and work cheap. I don’t want to have to pay a plumber to pull up the new toilet, while a handyman attempts to find out what’s under the linoleum or vinyl sheeting, then having to pay the plumber to reinstall the toilet again.
Maybe I’ll try the same thing you did. Paint the floor! Thanks for sharing this tuitorial and pictures with us.
Awesome, awesome, awesome. You’ve inspired me to do this in our gnarly downstairs bath/laundry room. I just can’t stomach paying money to redo the ugly officey grey linoleum floors. It feels like the equivalent of setting dollar bills on fire. This is an excellent solution! Thanks!
Hi Kelly. I found your blog through Apartment Therapy. Do you think this would hold up in a kitchen? Our sheet of vinyl is hideous and I’m sick of it.
I love the porch/floor paint! I painted my daughter’s furniture with it for her craft/play room and its held up for over a year now!! She was just excited because I let her pick out her new knobs at Hobby Lobby and now her furniture all matched!
redoing old farm house and bathroom has textured vinyl on to walls by sink about height of wainscoating. It also is several shades of green with cream. Can I paint it then rag texture for contrasting colors? husband won’t let me replace cus stuck really well and i excellent shape. Help!
I’m not sure, never tried that. It’s probably worth a try! 🙂
Would this work on 1963 floor tiles?
I’ve never tried that, but you could try it in a small spot and see how it holds up!
This was a great lesson. LOT of people asking if they can lay our cheap peel & stick vinyl flooring over old vinyl flooring. Our tile WILL stick but I will now recommend the sanding technique because I’m sure the adhesion will be better without the glossy finish.
So glad I saw this post!
I love it! I am wondering though, how do you clean them?
Just warm water and a little bit of dish soap.
hello! this looks awesome & i sooooo cannot wait to try on my old yucky laminate. did you happen to seal it in any way? thanks for the help!
Wow that was odd. I just wrote an really
long comment but after I clicked submit my comment didn’t appear.
Grrrr… well I’m not writing all that over again. Anyhow, just wanted to say superb blog!
Great post! Been reading a lot of tips for floor painting recently. Thanks for the info!
Epic pinterest fail — Dunno what we did wrong, but the porch/floor paint did not stick to the primer. After letting the white color dry for 24 hours, we taped it and did turquoise stripes, only to have the white paint peel off in sheets when taking off the tape. Huge mess… now we will tear up the linoleum and hope that the cement underneath is paintable…
Wow, really?! I’ve heard from lots of people who did this and it worked. This is the first I’ve heard of it failing. So sorry to hear that! It sounds like maybe the floor wasn’t sanded or prepped quite enough. Either way, I’m sorry it didn’t work for you! Ours is still holding strong.
Painter’s tape needs to be removed immediately when finished. The longer it sits, the more susceptible it is to peeling the paint. 24 hours was too long 🙁
Do you think this would work in the kitchen?
I’m not sure. It’s holding up really well in our laundry room so far but we definitely don’t use it every day.
Didn’t quite catch a date for this post, so I don’t know of this is too soon.. How is the paint now? I’m considering it for my kitchen maybe.
It’s been almost two years and it’s still holding up perfectly. It is a low-traffic area so I’m not sure how it would do in a kitchen, but so far so good in our laundry room!
I was gonna ask how they are now 🙂 and I’m also wondering about doing this in my kitchen. I’m currently painting in my kitchen walks and cabinets (as in partly done just stopped for a break) and I spray painted the inside of the cabinet where my drawers go with a can of red spray paint.i I’d never seen spray paint do this but I now have a splotchy “sunburn”on my legs and get from the spray that blew around. Also four or five feet back where the drop cloth wasn’t covering the floor, our greenish linoleum had a later of redishnes :p so maybe il have to paint over that? If it doesn’t last…we want to remodel in a few years. can of red spray paintof red sprayt. Id never seen spray paint do this but I now have asplotchy
I gawked at Andy’s legs; they are very nice manly legs. Sorry (kinda’).
I hate my bathroom floor so it is definitely getting painted soon. Thanks for the info!
I love these. I happen to be renting in a place with what everyone else considers “beautiful hardwood floors,” but they are laid out in a square pattern I really don’t like. If they were mine I would paint them!
Oh my god, I absolutely love the floor!!! I started my day out on the computer searching for something and came upon this……it was like it was “meant to be”. I rent a house and the floors are absolutely disgusting but my landlord is not in the “mood” to be replacing them….when I moved in I spent two days on my hands and knees washing the 3×3 squares and try and get all the dirt and grime that has built up over many previous tenants…..I wore my fingers to the bone…but I had clean floors…though all the work , to me…they didn’t really ever look clean.This might be my answer, as it appears to be more economical choice….I am so excited to try it…..
We recently paint our oak woodwork white using a primer made to help the paint stick to the shiny surface. I bet you could do this with the floors and skip the sanding stage. If it turns out I will let you know;-)
So I really wanna try this! This is such a fantastic idea! But I am wondering, do you still use chemical cleaners to wash your newly painted floor?
We don’t, but we don’t use any chemical cleaners anyway. We just use a little dish soap and water.
Ok, I don’t use them often. I am more if a apple cider Vinager or baking soda person. But my boyfriend is big in chemical cleaners.
Thanks for the quick response!
Have you ever refine your shower surround? I was looking into that as well.
This was a trainwreck in our house. So disappointed, but so glad we did the small laundry room before we did the whole kitchen (although I have a $70 stencil already I can’t return..darn it!). We thoroughly cleaned the floor 3x with TSP, sanded it, oil primed it twice and painted it twice. We also put a layer of polycrylic on it. We wanted to put 3 layers of polycrylic down because we had an old vintage laundry ad painted in the center that isn’t as simple to fix, but lightly sanding the first layer takes the paint right up. In fact, everything does. If you rub on it, the paint comes up. It’s only been done for a week now and it’s already coming off all over. I think with the bazillion different types of linoleum and vinyl it just doesn’t work on all. Ours was the unfortunate one that didnt 🙁 Took is a TON of time and I don’t expect it to last more than 6 mo-year 🙁 Do you think the oil primer could have done it? I thought that would be even more durable. That’s what we’ve put on paneling in the house and on the paintable wallpaper with no issue.
Oh no! Yes, if you used oil-based primer and latex paint, I think that’ll be a problem just about every single time. I don’t think there’s any situation where you can safely mix oil-based primer and latex-based paint and get a good result. I bet that’s what happened. So bummed for you!
Really? We had to paint our walls this way. We had paneling, so we were told to use oil based primer first followed by latex paint. We were told/did the same with the vinyl wallpaper that’s on the walls (previous owner put it up to hide imperfections of 135 year old plaster). We painted oil primer, then latex there too. I hope that doesn’t fall apart! Eek! But I suppose I won’t be walking on the walls either 😉 I think I’ll be daring and do the kitchen floor, but with latex and hope for the best! Thanks!
Doing some more research on this…everything I read says oil PRIMER is just fine with latex paint and its preferable on things like wallpaper, paneling, moisture areas, etc. But you should never try to paint latex paint over oil PAINT. Maybe it’s just something with the porch and patio paint. Goodness…good thing it’s a tiny room!
We used a primer on a wall that was supposed to be used over oil based paint followed by latex and it was a disaster. The entire wall bubbled and paint was constantly falling off. I would avoid using oil base. Semi or high gloss latex paint is less porous than low luster or flat paint and holds up nicely. I would rather use latex and repaint a earlier than use oil.
For future reference, there needs to be longer dry times between coats. Sounds like you primer dried but did not cure. For oil paint, I would suggest 4 days between costs, latex 2 days. For the five layers you applied it should have been 2 weeks at least depending on the weather.
This really does look great and seems fairly easy and inexpensive. We just bought a new house and the bathroom floors are vinyl now but we won’t be able to replace them for awhile. Would painting them work in a bathroom? How do you clean the painted vinyl floor? Would you just sweep it or could you mop it, maybe just a little warm soapy water or just water?
Thanks!
We just use warm soapy water. I’ve heard from people who painted their bathrooms and they said it went well, but I haven’t personally tried it.
wow! what a brilliant idea you had in there! I was having a hard time cleaning and maintaining my floors when its design is slowly vanishing. Thanks for the tips! your floor looks absolutely new and adorable! I’ll definitely do this one! I love to design my floor!
I use a steam cleaner (H20 X-5 steam mop) how do painted floors hold up with regular steam cleaning?
Thinking of doing our kitchen dining area which is quite large and absolutely hideous vinyl-not forever but okay maybe forever until we can afford real wood floors.
I have no idea — I’ve only tried soap and water. Sorry I can’t help!
Yes!! I too bought an old house on the cheap(ish) and am redoing it all myself. But, I had no idea I could revamp my grimy bathroom floor! Now my only problem is choosing a color. I love the idea of a stripe, but I have the following colors: stormy/civil war blue + warm chocolate accent wall + tangerine towels. I love the combination. But what on earth could I choose as a floor color? Hayelp!
Your floor looks amazing! I love the colors and the pattern. We are about to update bathrooms at our house. We had some tile left over from a previous tile job and should have enough to update one bath, but will have to buy tile for the other bath. They are small rooms. Just an FYI for those who would rather do tile my calculations are that for basically what you may have spent on paint/supplies we can do porcelain tile. We found some at home improvement store locally for 66 cents sq ft, so I’m about to become the master tiler in our house again. Then again I may put my 18 year old to work doing the tile. He needs the experience 😀
Congrats on a great looking floor!!
This is the most creative home diy ever!!! I was a renter for many years in north jersey where 9 out of 10 rentals are extremely old homes and have cheap ugly flooring, i thought about painting many a laminate flooring and figured it was a crazy idea that would never work. I wish i would have tried this. You are genius! Lol
I read this post a few week ago and went right out and got some porch paint – on the oops table of all places 🙂 – Anyway, i painted the floor and i love love love it, but it feels a little sticky. The paint is completely dry (i stayed off of it for a little over 73hrs after painting), but when i walk on it it’s kind of tacky. Has anyone else had this problem? How can i fix it?
You know, I haven’t tried polyurethane on top so I don’t know how well it would hold up, but it might help solve the tackiness problem. I actually thought our vinyl floors were more tacky before the paint, so maybe it’s a difference in paint type? Anyway, the poly might be worth trying in a small spot before you do anything big.
o.k. I have a question. I see that you used painters tape to separate the stripes. How did you get UNDER the stripes? What did you use underneath when you removed the tape?
I was so excited to see the wonderful floors. I painted my ugly floors and love it! But my floor also feels tacky. Did you try the Polyurethane? Did it go away?
I never listen to what the sales people in the paint departments at Lowe’s and Home Depot tell me. Or anyone else, for that matter. If a brush will go on it, this girl will paint it. 🙂
I have the same floor and I burned it a little bit. Does anybody know the name/part number of this floor? Cant find it in stores 🙁
Beautiful. I was wondering, how did you put the washer & dryer back in the room without scratching the paint off of the floor? Thanks
Very slowly! You might be interested in this post: http://viewalongway.wpengine.com/2014/09/painted-linoleum-floor-update/
Hi Kelly!
LOVE this post. You’re hilarious too – I’ve laughed out loud several times now at work from reading your posts! I have an AWFUL 70’s pattern vinyl bathroom floor and since we’re definitely on a budget with a little one as well, I was in despair until I found your post! Now I’m having luxurious bathroom…dreams. Now my challenge is to figure out what to do with our varied brown tiled-to-look-like-stone shower area… EEK!
Questions: How well should the primer work for our highly colorful flooring? Do you think there would be issues with doing this in a bathroom??
Thanks for starting the attainable dream!
Sarah
Thanks Sarah! It might be worth trying the primer if it’s very colorful. Obviously ours was just white so I can’t say from experience. Good luck!
Now you do not need to spend money on changing your old vinyl or linoleum floor. This amazing article is helps you to know how to paint those floors in your own home.
Hello
شركة تسليك مجارى بالرياض
Hi, I was doing some internet searching and came across this post. I too painted our old 70’s vinyl floors in our former home. Both the bathroom & kitchen. They held up remarkably well. We cleaned, primed and painted them. Originally I used polyurethane over the floor paint but it yellowed. So I merely repainted with regular old wall paint. Loved it much better. I did repaint about every 3 years in the kitchen because I wanted a fresh new look. It’s still super easy.
With today’s primers and paints, painting an old vinyl floor is super easy and affordable.
I really hate to be a killjoy but I feel I should pass this on. If you decide to paint an old vinyl or linoleum floor – DO NOT SAND THE VINYL OR LINOLEUM!! Old vinyl and linoleum contain asbestos and sanding it will release the asbestos into the air.
I have two bathrooms that are painted battleship gray and have gray patterned linoleum. No, I didn’t do it — the house came that way. I already have the paint and wallpaper to fix the walls, but I wasn’t sure what to do with the floors. I was just hoping they’d look better when the walls were done. Now I have an alternate plan. If the floors are still ugly when I finish the walls, I will go with paint. Problem solved.
You’ve managed to make linoleum flooring look good! I always find that it loses its sparkle after a while, I must say…
I love your instructions. 15 years ago we ripped the carpet out of our house due to our sons asthma. The floors underneath were all cement. We painted them and they still are holding up.
My brother recommended I may like this web site. He was once entirely
right. This publish actually made my day. You can not believe just how a lot time I
had spent for this information! Thanks!
Thanks for this post! This really helped me out with my guest bathroom project.
I’m wondering how long it had to dry after painting? We oy have the one (horrid vinyl-floored) bathroom and if we had to let it dry for more than 12 hours or so we’ll have to do it right before we go
away for a weekend or something.
Did you let it cure for a certain period of time or just let it dry? How soon did you move your dryer back in? Were you concerned about that?
Hi I wanted to ask you how long it took your laundry floor to dry once painted? I want to fix up our kitchen floor to get my house ready to sell and I’m waffling between painting and the stick-on tiles. My kitchen couldn’t be out of commission for more than I think 24 hours (12 would be better) so I wanted to see how close it’s be to that. Thanks!!!
Very helpful and informative article.
Thanks for this post! There are some really cool ideas here. Keep up the good work on this blog!
Hello…ive always wanted to do this to my floors, but never knew how to start, but now i do. thanks for sharing you page. but i wanted to ask you, that i didnt see you say. did you use a polish or something to give it shine. cuz i would also like that on my floors. if you can please get back to me so i can start on this project ASAP.. and once again, thank you.
Wow. You guys did such an amazing job. Now i’m inspired.
information that is very valuable to me ! good luck and verygood website
looks so much better! nice work
Did you use any type of sealer after painting the top coats? I painted my vinyl a dark gray and I went to wipe some water on it and a dark color came up. It’s been 7 days since I painted the last coat of paint. My sandles stick to the floor, Im not sure what went wrong. I did everything everybody else said they did. Only one person in what I read on pintrest said they sealed they’re floor with a polyurethane. I think Im going to have to do that. I don’t know what else to do. Any suggestions?
I am currently in the process of RE-DOING my floor after only 2 days of painted perfection. I don’t know what I did wrong, this DOES NOT hold up to animal nails. I painted with porch and floor paint, used SO many layers of polyurethane and it still was getting scratched. If any has suggestions, I would LOVE to hear them. Otherwise, round 2 begins tomorrow.
I am doing my ugly bathroom floor now and so far love it.
Thank
Vichandra – Best supplier and installer of vinyl flooring in Chennai, Tamilnadu. We offer with wide range of world class brands like Armstrong, LG, Polyfloor, Rosetta, Milliken, Daiken, etc
We are Authorised Dealer for Vinyl Wooden Floors. Vichandra floors are a reputed organization, offering flooring solutions to high end residences, hotels, hospitals, retail showrooms, corporate offices, educational institutions, laboratories. industries & sports facilities for more than 2 decades. Our association with global brands guarantee our clients the best of quality products from wood, carpet & vinyl floorings.
This is too cool! I’ve got some laminate flooring in my house that’s pretty ugly, but since we’re renting, I don’t want to invest too much money into improving it. I’ll have to keep this in mind! Does anyone know if I can do anything with my counter tops? I’m pretty sure they’re a cheap laminate as well; I’d love to just paint it black, but I don’t want it to react poorly if it’s not the material I assume it is and have it come out looking tacky.
Love it
What about cleaning? Does paint fade? Abd d u put a sealer on it?
Thanks, That is great post 🙂
طراحی سایت
How’s the floor holding up after a few years has passed?
So, I’m hoping to do this to my tiny bathroom in the next couple of weeks, but I’m curious about something: after sanding, do you not clean the floor again? Would you just sweep up the dust, or do you do a full-on cleaning again (tsp and all?)
Thanks so much!
thanks for sharing with me i really found it very informative
Just a friend tip… We painted our kitchen with a gorgeous white hexagon type stencil.. Turned out beautiful. But then we decided that a polyurethane would protect it well.. It did. But it also turned me white white paint, stained pee yellow.. I sorely learned after the fact that polyurethane has a tendency to turn whites yellow and stain them! So if your looking for a good top clear coat..I wouldn’t go that route. Maybe Talk with your hardware guys and find a different top coat/gloss
PolyCRYLIC is what you would use on this, NOT polyurethane.
I want to try painting our vinyl kitchen floor.
Thanks for the tips.
If you are seeking finest as well as simple method to promote your business then this solution is flawlessly ideal with your requirement.
I think this idea is fabulous!! After reading all of the comments I realized that it is a super idea, it gets people excited that they can finally change an ugly floor into something updated that they like for a low cost; however,
the most important part of the whole process seems to be: making sure the floor is free of grease, dirt, etc. using
• TriSodium Phosphate to clean it then using a primer that will stick to the floors ( you may want to ask someone in the paint dept. for a primer that has good adhesion) THIS NEXT STEP MAY BE THE MOST IMPORTANT!! WAIT FOR THE PAINT TO CURE…………….CURING IS NOT JUST DRYING………..IF THE PAINT IS NOT CURED IT DOES NOT WORK OUT WELL. This wait time can save you from having to do the whole process over!! Curing time is different depending on where you live and the amount of humidity in the air: talk to a painter if you know one or again, talk to someone in a paint department that seems to know what they are talking about.
For more success, think about posting this at the beginning of the Steps.
I think it is a great idea and I will be doing over my bathroom floor soon.
One more thing: Since most people are doing this project over mostly kitchens and baths, it is tough to wait for the paint to cure because they want to get back into using the rooms……this impatience can ruin the whole project.
So do not start the project until you have considered the time element, as they say, it’s worth the wait.
Thanks Kelly, great post!
Hi again, I forgot to suggest using two coats of Polycrylic (satin or glossy) for the top coat instead of Polyurethane because Polyurethane can cause yellowing after a few years.
I’m still trying to figure out if it would be cheaper to paint or to get peel and stick vinyl tiles. I just bought a new house and *the entire house* looks like your laundry room floor used to (fixer upper!). So Primer, porch paint, and polycrilic…might add up to be too much on this size project? Any thoughts?
Should the porch paint be used if you’re going to do your master bathroom?
Just stumbled on your blog. You’re hilarious.
So, we decided to save some money & try painting our vinyl floors. I liked the idea of being able to do exactly what I wanted, it made me feel artistic 🙂 but what did you do with your kids? The snell of the paint was so strong, I had to leave my husband to do it alone because I was so worried about my daughter. You could smell it from the laundry room to the very back room. I’m worried about my husband & he is wearing a mask. The smell goes away when it is completely dry, right?
Hey — I want to paint vinyl placemats. I was wondering what type of paint you would use on it. Or if you would just use acrylic paint and put an overcoat? Just wondering your thoughts.
Your laundry room looks amazing! I never would have thought to paint the floor! Love it!! I have a new Pinterest Power party and would love to have you share this and any other projects or recipes you have!
I am so excited to have found this. I rent a house which is 1940s-early 50s, and the floor shows it.
I can’t wait to try this on my floor. I have art and quilts hanging on my walls and then…..I have this totally ugly floor. Thanks for posting this project.
Hello! Great idea and I love it! But what if I want to get back my old floor (If I want to remove the paint) with what should I clean the paint? Thanks a lot! ????
What is the size of the blue and white strips. Love the width of these!
all the commenst were about painting a vinyl floor….I was asking about painting a wood laminate floor would you do the same thing to prpare and the same kind of paint?
I’m hoping you can help me…I’ve done all of the prep work, cleaned with tsp, sanded, cleaned again. Before I went ahead and painted the entire floor,I painted a small area with the primer and let it dry for 6 hours. I just used my finger nail and did a scratch test and it made a scratch so easily. I’m afraid to paint the entire floor now because if the primer didn’t adhere, the porch and floor paint will be pointless. Any advice? Thanks! !
I followed this step by step. It sounds like I have masking tape on the bottom of my feet when I walk across my floor. It is not sticky to touch that sounds sticky when you walk across it. How do I fix this?
thank you very much
Hello,
I found your post very informative. I have two questions if you don’t mind answering. .. If you still reply to this post 1-did you ever clear it or just the glossy paint?
2 -now that it has been a couple years how are they holding up?
Oh sorry and a P.Scott. question how do you clean them just soapy water?
Thank you in advance for answering my post. Stevie D
We never clear-coated it so ti’s just the paint. Still holding up great and we clean them with soapy water. 🙂
I would love to know how your floors have held up. I’m in a rental apt and the kitchen floors are awful. I would love to try this but worried about it being a high traffic area.
So far so good! It is a low-traffic area but has done really well so far.
Does anyone have any knowledge of, or experience, staining a peel and stick floor which looks and feels like wood, but is vinyl? Thanks.
Are you presently seeking to ways to gain worldwide popularity quickly? You only require to Buy Facebook Followers to get well known online.
Thanks for post.http://www.straforevi.com/urunler/maket-pasta/maket-pasta-yeni-modeller//
my site all serves https://ebad-rahman.blogspot.com
thank you very much
I just did it
any tips? any issues you ran into?
question…I am preparing to do this this weekend to my craft room. The guys at Sherwin Williams think I’m crazy for wanting to lay down a primer because the floor paint is meant to stick to hard surfaces on its own. I know that we aren’t using the floor paint as intended so I’m wondering….is the acrylic primer the way to go here? Has anyone had issues with this not working right? How has your floor held up after all this time? Can we see current pics?
تعتبر الشركة افضل شركة امن وحراسة تقدم العديد من الخدمات التي تضمن لكم ولاسرتكم ولممتلاكاتكم الامن والسلامة التي تحقق بتوفير عدد من افراد الامن والبودي جارد الذي يتم اختيارهم بعناية ليكونوا قادرين علي تقديم خدمات الشركة علي افضل وجهه وتتمثل خدمات الشركة في توفير عدد من العروض والتعاقدات علي حماية وحفظ امن وسلامة الشركات والافراد والمنازل
thank you for this posting
thank you wery much for this amazing post
thank you very much for this amazing post
thank you for this post
Would you use this technique in a kitchen and possibly polyurethane it after painting?
The linoleum that I am thinking about painting over has a awful quilt like pattern…and I want just a solid field of one color when I paint. Any thoughts on a skim coat that I could apply first that would mask it to a smooth texture? I would also opt for BIN brand primer over sanding the material. BIN makes any surface paintable (including glossy shower tiles)!
I have this same type of cushioned vinyl, and the same question about disguising a busy, indented pattern, Amy.
Did you receive any answer or comment you thought helpful?
so what do you clean it with…mild soap? which is what? like a brand name good job did it not scratch when returning wash/dry to room?
Hello! I was wondering if the cleaning with the TriSodium Phosphate is necessary if you then sand afterwards?
Thanks!
Sarah
I love this. Redoing my laundry room is on my DIY list, but I never thought to paint our awful vinyl floor; until now. SN: Reading this blog made me laugh.
Never thought of myself as a DIYer…but my children say I’m wrong! Y’just do what y’gotta do, right?! Our ensuite and also our basement floors have been painted for at least six years, and the ensuite has changed color twice. You can even “speckle” them with paint chips bought at Lowe’s. (Ask me how I know that!)
The only wear I see is on the basement floor, where big boys have drug heavy furniture across it many times. The ensuite is perfect.
Yes, you can paint over ugly vinyl, and it can last for years! Good job!
Thanks EVERYONE for your input, have been deciding what to do to my kitchen floor. I saw where somebody used contact paper, looked liked barn wood…..but seeing and reading all the comments…I”M GOING TO PAINT….THANK YOU
I tried the paper/barn wood floor thing in another room. I’d stick with paint! ????