Sometimes, when you’re DIYing, things go wrong…
like you realize you mis-measured or that you married a difficult woman. This was one of those times, for Andy.
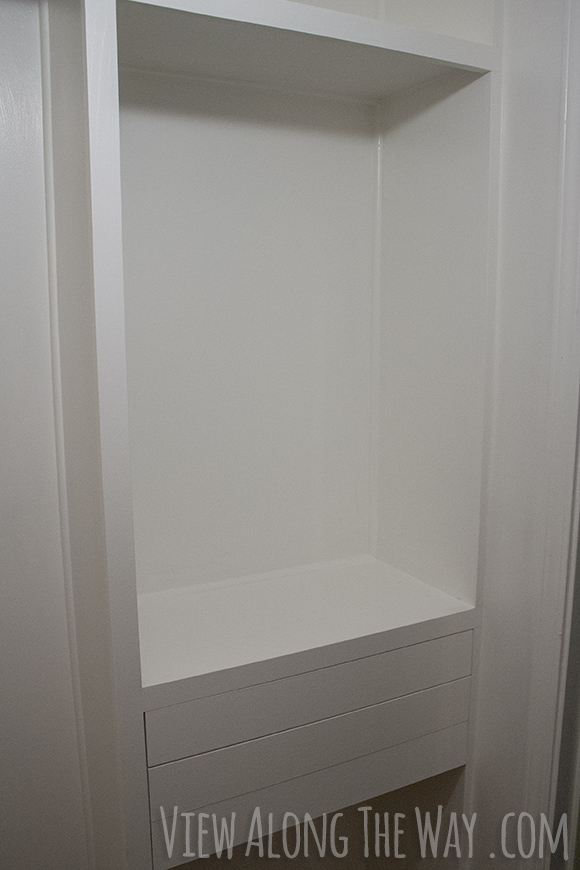
With the closet all painted and the popcorn ceilings removed…
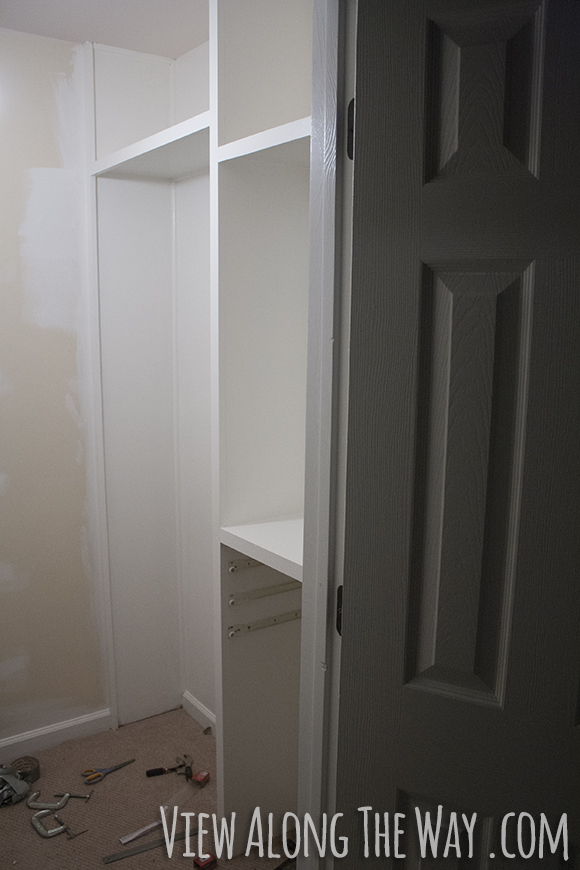
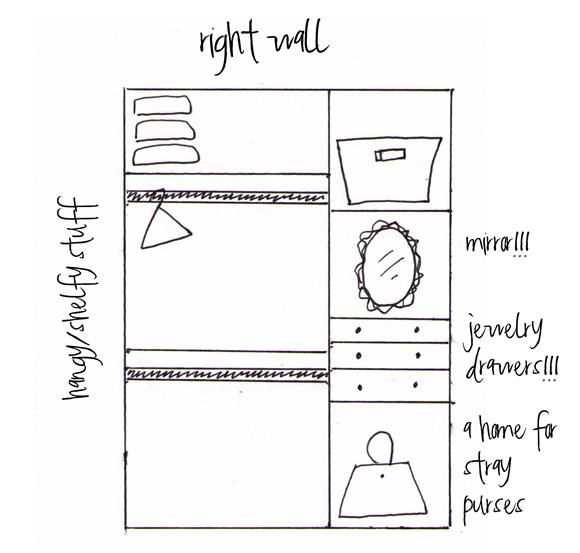
it was time to make some drawers for my little jewelry station. This is the plan for that side of my closet:
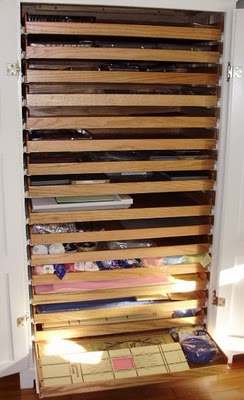
Originally I was thinking we’d make shallow little drawers with just a lip on the front, kinda like this situation:
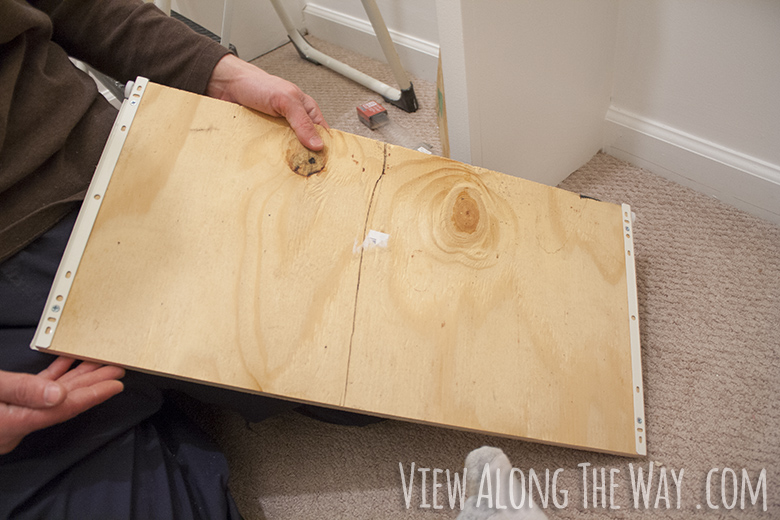
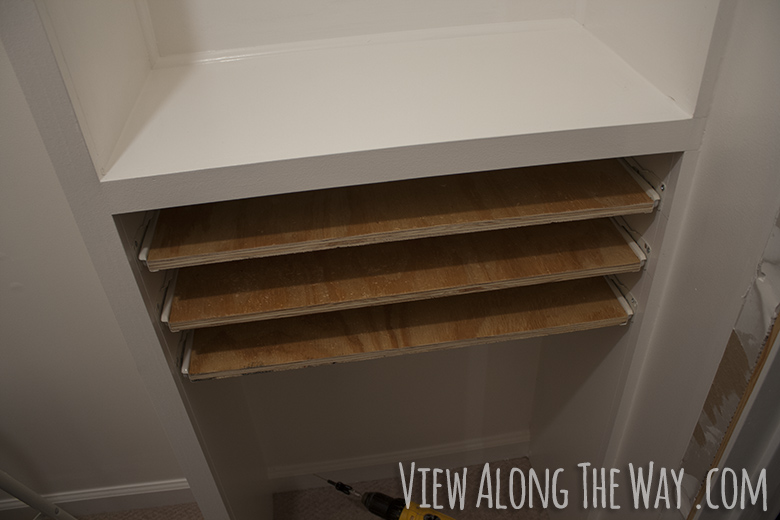
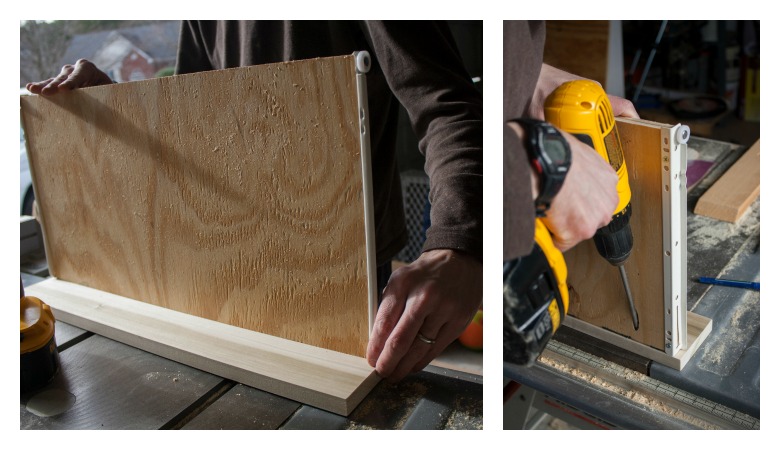
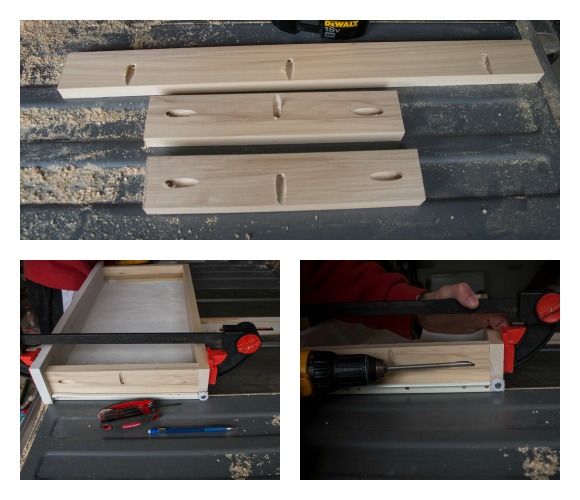
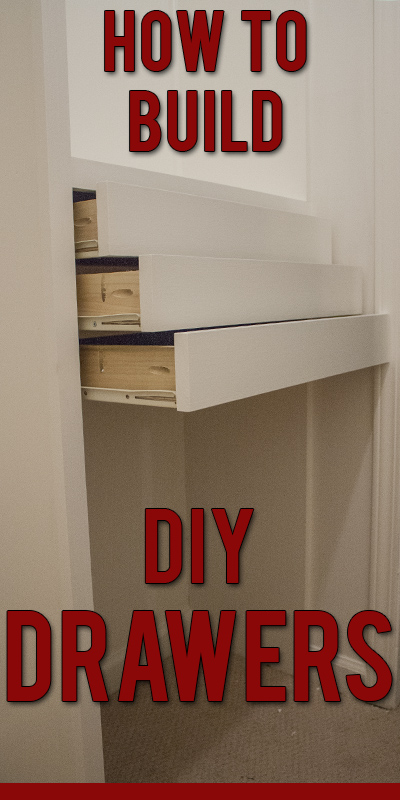
The first thing Andy did was create the drawer bottoms by cutting a piece of plywood to an inch smaller than the width of the shelves, and screwing the drawer slides onto the sides, like this:
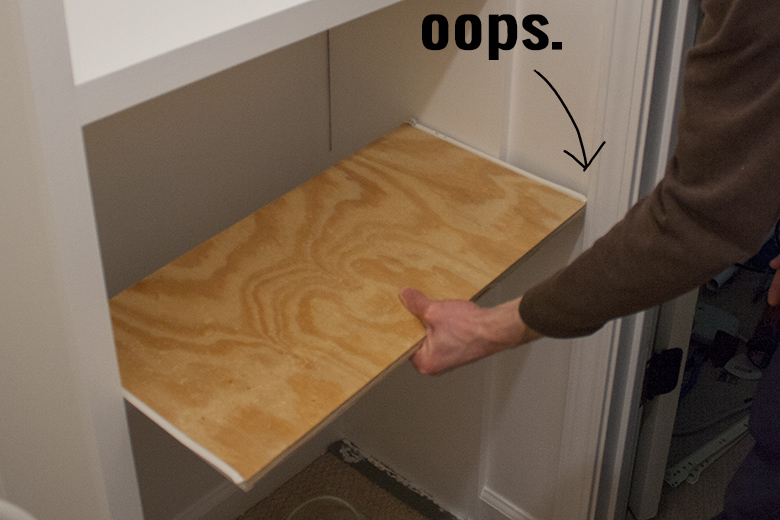
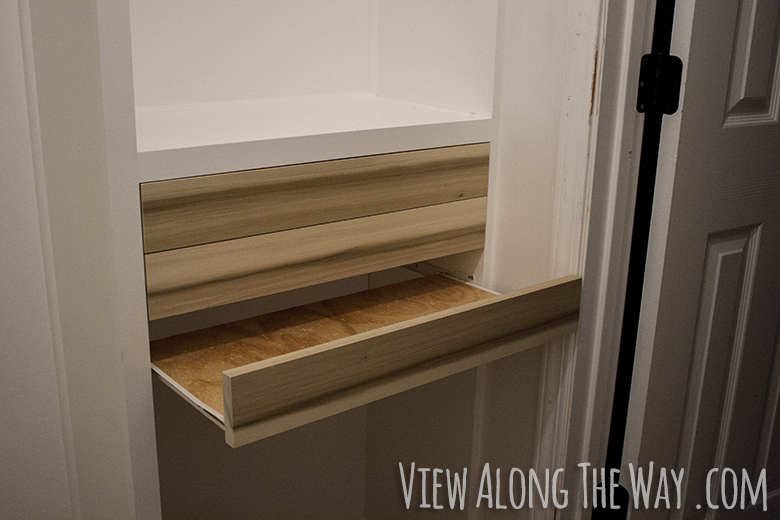
Then he held it up to the hole in the shelves to get a feel for it, and that’s when we realized we had a giant “oops” on our hands.
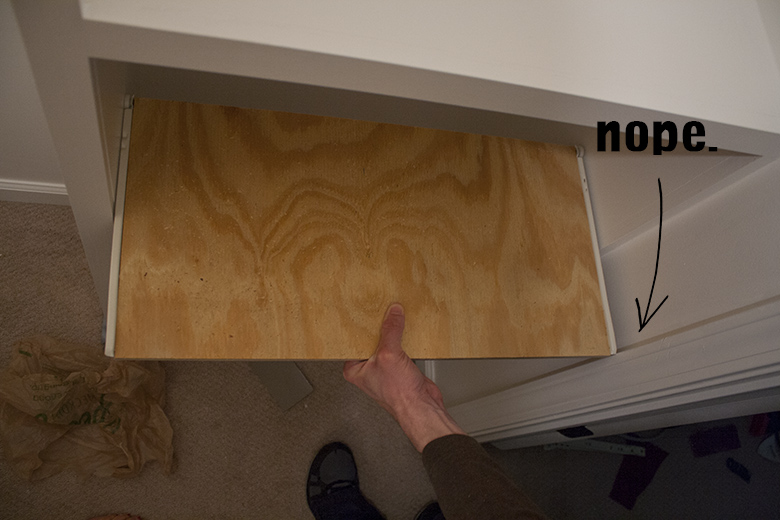
The drawers would only open about four inches, because the trim around the inside of the closet door was in the way.
These are the necessary first steps when things like this go wrong:
1. Cry a lot.
2. Wonder how you ever missed this.
3. Throw all the things.
4. Give up on life.
(The seriousness of the DIY error is in direct proportion to the amount of time you’ll spend on the first four steps, or how heavy the things are that you’ll need to throw.)
When you’ve completed steps 1-4, you can proceed to step five: brainstorm possible solutions. Once all our things were thrown and we’d wiped each other’s tears, we came up with about four options:
1. Build out the shelving on that side of the wall to make the drawers smaller. (But it was already paaaainted, and you know I didn’t want to have to redo that mess.)
2. Don’t install the drawers. (But my whole heart was set on those drawers and you couldn’t pry them from my cold, dead fingers.)
3. Remove the trim around the door. (But it would look pretty rough and not-cute.)
4. Somehow make the trim around the door narrower.
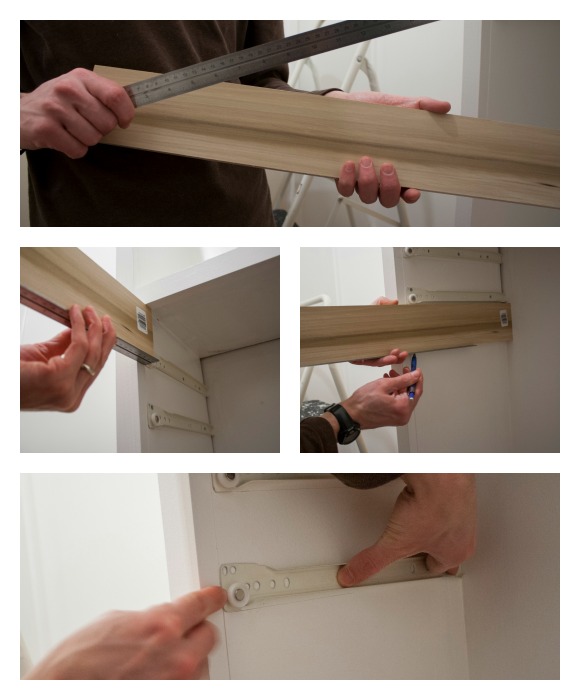
So that’s what we did. First, Andy scored around that piece of trim with a razor blade, then slowly tried to pry it off the wall.
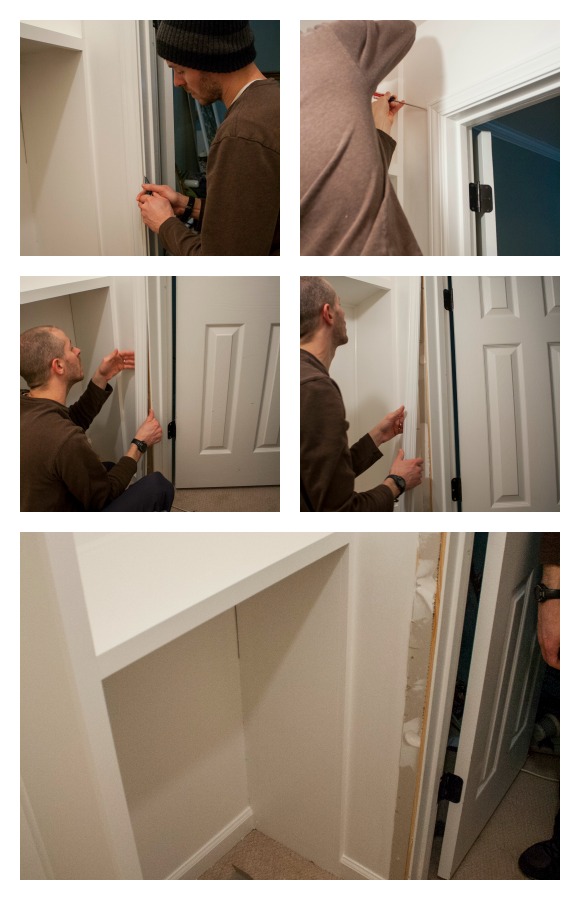
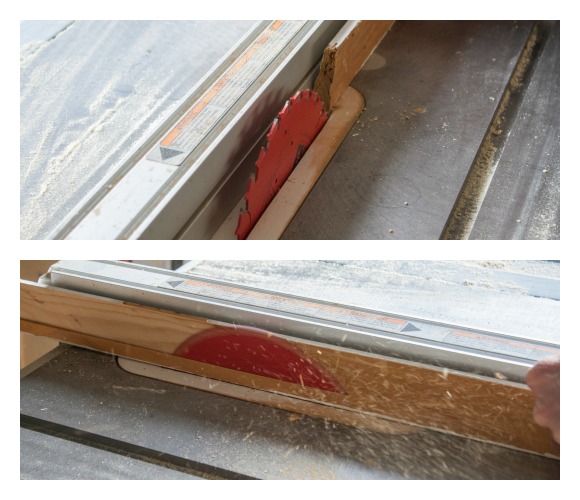
Then he ran it through his table saw to rip it down by about a quarter of an inch.
But would that be ENOUGH to fix the crisis?!! We could only wait and see! #Suspense
Meanwhile, he installed the drawer slides in the shelving unit. Obviously, you need to get the spacing on the drawer slides pretty perfect. Andy used a little trick to space them: he used the same 1×4 boards he was planning to use as the drawer fronts, plus the width of the ruler. This gave him a perfect ruler-width gap between each drawer when it was installed.
Winning.
He used his trusty Kreg jig to attach the drawer fronts to the bottoms, and we checked to see how they fit.
Even more winning.
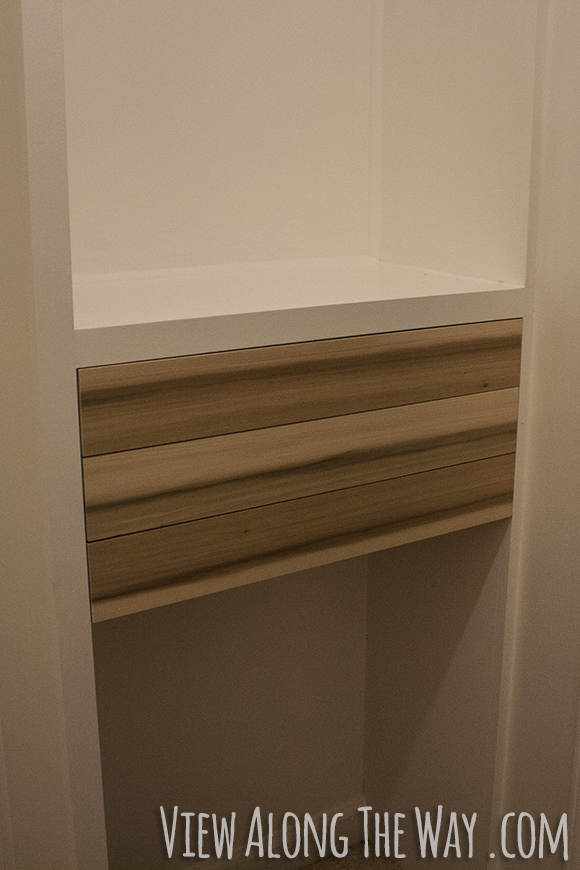
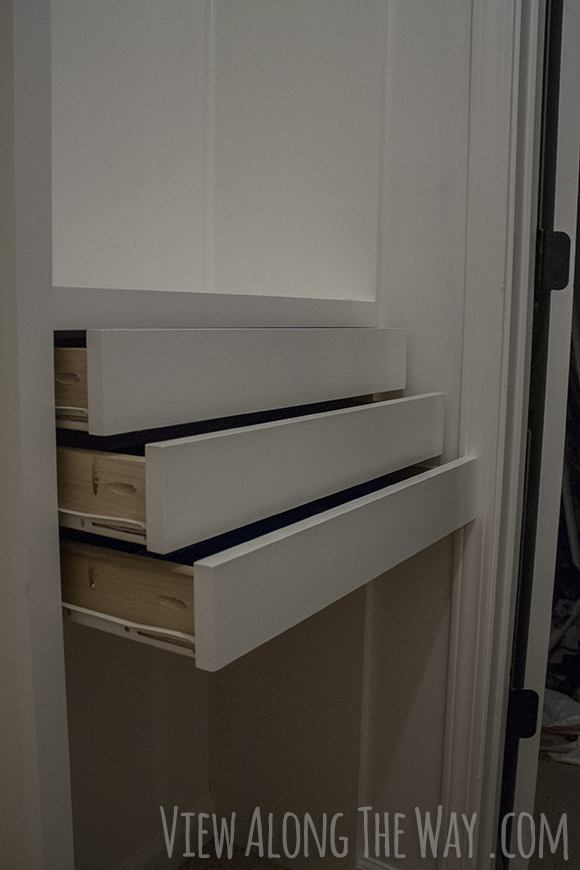
We reinstalled that trim piece (though we still hadn’t repainted it here)… Annnd look, they opened all the way! Winning-er-est.
Crisis averted!
But that’s the point when crisis #2 presented itself: I accidentally changed my mind.
I started to realize the plan of flat drawers with just simple fronts was not a cool idea. The jewelry could just slip out of the back of the drawers or get caught on the drawer slides. The drawers needed sides, and a back. (Things that could’ve been brought to Andy’s attention YESTERDAY!)
Fortunately my husband is a patient and long-suffering man. (Otherwise he wouldn’t have married me in the first place.) And he didn’t think it’d be too tough to add sides and a back.
He just cut some more 1×4 boards, ripped them down to 1×2.5 inches, drilled pocketholes in them, and connected them all together.
I painted them, and we installed them. Winners, Drawer Contest, DIY division.
Before we did this project, I thought building drawers was this hugely intensive project, but it’s really just building a box, and screwing some drawer slides onto the sides. Even without an Andy, I feel pretty confident I could build some.
They wouldn’t be straight or cut at 90 degree angles, but I could build them.
These drawers need some fancying-up, and I have plans in place! More to come!

Have you ever built drawers or realized mid-project that you made some calculation errors? Did you throw heavy things or small things?
 Hi, I'm Kelly. Glad you're here! This little blog is where I chronicle our efforts to fix up our beaten-down home on a tiny budget. We're not there yet, but here's a peek at the view along the way...


That’s exactly why my children aren’t allowed to be around when I do any DIYs like that especially with my difficult husband. Lots of throwing and bad language. You are a lucky girl with your new drawers and your patient husband. Seriously! I have jewelry drawer envy.
I did build drawers back in the fall for a little table I made for my cousin, and they gave me fits – they were side-by-side and mounting them/getting them even was a massive exercise in patience! I used the same basic technique you did here. I’ve been thinking of adding a few to my closet situation too – it actually looks much simpler than the whole table deal 🙂 Nice work, guys!!
Are those hard to open when they’re in all the way? Are you going to add some super fun drawer pulls too?
Yep, they definitely need some pulls. I have a little DIY idea in mind. 🙂 Hoping it works out!
“They wouldn’t be straight or cut at 90 degree angles, but I could build them.” I think we’d be best friends lol! 🙂
I can so relate to this. How do they put up with us sometimes?!?! My husband is good like that too- when I can’t take it anymore and I’ve left to go cry somewhere he continues to work until he gets it. His patience is obnoxious but handy. Love those drawers– I didn’t know they were so easy to make!
You forgot step #5: eat copious amounts of expensive chocolate.
And yup, our husbands deserve awards. Those drawers are going to be soooo handy. (Rick just walked by and asked if that’s what I wanted in our closet. Um, okay? Sure? If you’re volunteering?) 🙂
The closet is looking great! When I get frustrated I tend to jump to a new project… Then have 2 or 12 unfinished ones to complete.
just when i think you have done it all. mind blown.
When I turned my antique radio into a bar cabinet, I had several issues…that also involved drawer slides. My problem was that I had to install all the pieces in a certain order or stuff would be in the way of other stuff when it came time to put that stuff into the cabinet. Not a very helpful description I’m afraid, but suffice to say, I feel your DIY pain.
AAAAHHHHHGGG!! Oh I have had situations like this way too many times. I can feel the frustration! Looks like you guys got it all sorted in the end…yay!! Those drawers are amazing!
I am feeling many things right now:
1. pride
2. sadness
3. jealousy
4. jealousy
5. jealousy
cool?
No jealousy! I’ll share. You can have the top drawer.
Aha! I feel your pain, although you have a solution to your problem! We bought a foreclosure last summer and have been DIY-ing it to awesomeness. I refinished the kitchen cabinets and installed hardware (beautiful kitchen jewelry!) only to find out that after I installed pulls on the drawers, two of them could no longer open all the way!! They run into the pulls! 🙁 I must have pulls…
Oh nooo! We totally had issues like that with our kitchen. I think if you’re not running into problems like this, you’re not DIYing enough. 🙂 Good luck with your reno!
Your husband is indeed a patient man! Mine would have totally abandoned me at that point! He does not like it when my plans go awry. Of course, you’re better at the actual project work. I’m more the brains and save money type! It looks amazing, Kelly!
Wow Kelly. And Andy. I have to say I am blown away by your DIY mad skilzzzz. These drawers look so professional and awesome. Better than awesome. What a great tutorial.
and the award for DIY drawers goes to ….. (drum roll please) ….. ANDY & KELLY!!! woooohoooooo (clapping/cheering and the crowd goes wild) In the few minutes it took for me to read this, I went through a million emotions, and pure elation at the end! The drawers are magnificent and the closet is going to be even more dreamy than I thought it would be. Can’t wait, you have me on the edge of my seat!!
Can I borrow him? 🙂
Love how the drawers came out! That molding trick was brilliant, I don’t think I would have thought of that solution. You basically described every DIY scene that my husband and I have had together too, haha! Thank goodness for patient men. Can’t wait to see what you do with the drawers and the rest of the closet!!
Yep. Lots to be thankful for with the patient husbands!!! I am the impatient ‘why isn’t it done 10 minutes ago’ kinda gal and he is the measure 11 times and gets it right the first time kinda guy. It makes for some rather interesting DIY projects around here. I do LOTS of walking away and finding another project to work on and coming back to help him as needed! Good thing we can laugh lots together!
Oh you guys sound JUST like us. I’m so impatient and want to just eyeball everything. I guess that’s what makes a good marriage? 🙂
I need this in my closet. STAT!
My husband is not as patient as yours, he builds me furniture and things, but he’s WAY less patient.
#AwesomeSauce
They turned out perfect! I don’t think I am capable of making anything let alone drawers.
Dave is constantly mismeasuring things when he builds stuff. I left out the whole part about how he had to go back to Home Depot for more wood when he built Abe’s shelf. He’s always very mad at himself….I think maybe the ease with which he does much more complicated number stuff like calculus makes him cocky about simple tasks like measuring and he doesn’t take his time? I dunno. ANYWAY–I can’t believe Andy built drawers! I’m not sure I believe you that it’s easier than it looks. It looks like the woodworking equivalent of sewing a zipper….i.e. a task that I’m sure is so complicated only wizards can do it. They look great!
I’m also flabbergasted that people can sew zippers. It seems like wizardry to me!
DIY drawers for the win!! You guys are awesome problem solvers. I never would have made it past step 4. And I tend to make the mistake of thinking that I’m an awesome eye-baller who has no need to measure. Especially with space planning….which is why my office plans just completely changed. Can’t wait to see the rest of your purdy closet come together!
hahaha! This cracks me up because I do the same thing with eyeballing! It’s totally my downfall. I’m completely sympathizing with you on having to change plans due to lack of measuring. 🙂
I love your drawers! That sounds wrong but you know what I mean 😉 I’m also really happy to hear you’re not the only one who cries and throws things during DIY projects haha I may or may not turn into a 2 year old when things go wrong!
Andy is a wise man and knows you are worth it.
Gosh, I need a Andy in my life!
Never stop blogging! The closet is looking great and your writing always makes me smile!!!
Your husband is a handyman genius. I am impressed. Very impressed.
We’ve certainly had our fair share of mishaps. I’m a measuring and calculating drill sergeant so those are usually kept to a minimum…but yeah, we’ve had things not work out. I just stomp out of the room and go sulk somewhere. Usually somewhere with chocolate.
Sulking is always an important step with any intense DIY project. 🙂 And we all know chocolate solves everything. EVERYTHING.
Amazing! I am simply amazed. Making your own drawers. . .who would even think such a thing is possible? Go Andy!
Super fantastic job on the drawers and problem solving! I want to do something like this in my new kitchen and this is just the inspiration I needed. I will tell my husband how easy it will be for him to build drawers with this step by step guide 😉 He will be excited I am certain.
love what you have done. I wish I had some of these jewelry drawers in my house! And I love your steps 1-4 when it didn’t work the first time. . . so true!
I hormonal-cried whilst reading this post. I’m glad you guys figured it out!
As usual, I’m amazed at what you and Andy accomplished- this time the jewelry drawers. What’s next? Aerial walking across the Grand Canyon? I have a teensy favor to ask of the two of you: Would you please adopt me and take me under your wing(s) and teach me everything you know and make me an awesome bedroom, office and crafting area? In turn, I’ll do all the laundry, dishes, baking and babysitting. And stay out of your way when you’re DIYing.
Um, YES. That sounds like the best deal ever! 🙂
Andy! Now I think you’re just showing off 🙂
I just have one criticism. It’s too perfect! *duck*
Great drawers! Me and my husband did an epic-miscalculation when having fence holes drilled along the boundary of our brand new block of land. We marked the spot we wanted one of the holes with a giant big X, right on top of ALLLLLL the electrical and phone cables that come into our brand new house. Drill goes down… commence epic hair tearing. And the really hopeless thing is that WE dug the trenches for said cables… so we knew they were there, because we’d spent hours digging them and then hours filling them back in. We still don’t know how we managed it. A combination of stress and exhaustion resulting from building a house on a very tight time-frame, I suppose!
I’m so happy you found a workable solution. I’d hate for you to have had to revamp your design, although I suppose flipping the drawers and hanging space would have worked. You guys are so smart! And, Andy is quite the carpenter! I can hardly wait to see what kind of hardware you’ll choose for the drawers.
Your miscalculation may have saved MY sanity–thanks! We’ll soon revamp our closet…as soon as I started reading your tale of woe, I thought “uh-oh, that could happen to us….” Now, maybe not 🙂
You guys are my crying, thing-throwing, non-giving up heroes! And yes – patient husbands are the absolute best! Love the drawers!!
What a team! I love your plan for this closet, it’s going to be so functional. I think I would have cried when the drawers didn’t work, too…great solution!
So my big question is: knobs- matching or mismatched? I had so much fun looking at World Market, Hobby Lobby, and the Anthro sale section for knobs a few years ago. Can’t wait to see the finished product!
Hopefully kind of both, if my plan works. (Is that a weird answer? It’ll make sense soon!)
Holy Crap Kelly I just had flashbacks. Not the good ones either. When Matt did the pantry drawer pulls we had similar issues with the doors being in the way of the slides. Only thing is our drawers were already built and had to be re-built a few times till we got it just right.
They look beautiful!
I repeat steps 1 and 4 throughout almost every DIY project I attempt….
OMGosh, how frustrating! You left out the part where you screamed out, “Why can’t anything ever go right//!!!” Or maybe that’s just what I do. Lot’s of yelling into the air lol. They turned out perfectly! The thought of building drawers was really intimidating to me, but Andy makes it look pretty doable! Pinning just in case. XO
Omg I feel your pain. After I’m done crying I think I’m going to throw the couch. Or maybe the fridge. I bought a pre-made closet organizer with visions of it fitting like a glove since it’s made by professionals and all. Nope!
Oh I just love your shelving! What kind of wood is that? It doesn’t look like regular pine to me.
Thanks! It’s MDF, and the fronts are poplar.
Ahh, make that the THICKNESS of the ruler plus the one by four between slides. If you use the width, you’d have al one inch gap… Great paint job, is it sprayed?
Ah, good point! Nope, we have a paint sprayer but only use it for big jobs since there’s so much cleaning and measuring; this one was just brushed. Thanks!
I have a place in my house that could use this molding trick, but doesn’t the piece that is 1/4 inch less in width now sit below the top piece that is the original width? Is it noticeable?
They are both the same width, so it looks good. 🙂
I rarely comment on these types of things. BUT this article was hilarious, useful, relatable and well-written.
Thanks for sharing!!
Ermagawd, you have the best husband in the world!!!
😀
Great post, thank you 🙂 I lol’d at the necessary steps when things go wrong *funny*
You are hilarious! I thought building drawers would be way hard too! But you showed me wrong!
The drawers look great, but you could have just cut a couple of 2×1″ strips of wood to nail vertically to the front and back of the right side to space the rails of the drawers out so that they clear the door trim. Your drawer would end up being 1″ less wide, but I’m always reluctant to start cutting into trim to make something fit.
I am currently in the middle of this project on my closet right now. (Thanks for your awesome tutorial!) I have a question, though. I have completed the left side of the closet and put the poplar fronts on the whole thing. When doing the right side (where I will have drawers similar to yours), did you use the poplar fronts on both vertical sides of the jewelry drawers? Specifically, the side against the wall. Is there a poplar front attached there? It seems like it would get in the way of the drawers. I’m trying to analyze the pictures and it seems like there may not be a poplar front and just the MDF? Can you please help me explain how you finished off the right side? I hope this makes sense! Thanks so much!
It’s just the poplar, with a poplar piece of equal width that the drawer slide attaches to. Hope this makes sense! 🙂
Ok this DYI project for building a closet is just what I needed. My husband & I were just in the Container Store (OMG I love that place) but realized the closet that I loved displayed in there was 20k installed. On what planet did they think I was going to just dish out that much then low & behold I came across this plan. We have the same shape closet just mine is longer. The thing though – I suck at measuring so I am definitely going to have to purchase a Kreg Jig DIY Kit. to help me along the way. I will post pics. If this project comes out looking like yours I will be making some kitchen cabinets next…….
I put together and Ikea dresser. drawers were supposed to go in by themselves the last few inches. One went in and wouldn’t come out, had to remove the back of the dresser and push it out –hard. I loosened the sides of the dresser and drawers worked fine but that was no good.
I couldn’t modify the dresser so I took the drawers to woodworking class, one each week and routed a groove in the drawer sides and screwed the hardware into the groove. I took it home and put it in the dresser and held my breath, I didn’t have to push hard and 3 inches from being fully closed it took off by itself and went in perfectly.
Initially to figure out what was wrong I checked some very fine old furniture I had inherited with the same self closing hardware, took drawers out and studied it. I was hoping the new drawers were too small causing the hardware to bind, solution for that would have been a couple washers on each side, no such luck. Drawers were too wide.
You could have spaced each drawer out with a few washers at each screw and cut the drawer down. But EW!!!
Yah I was thinking something similar Gail.